Spreader

Spreader
Catalog excerpts
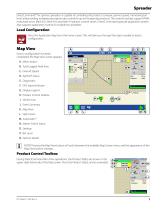
Spreader DirectCommand™ for spinner spreaders is capable of controlling the product conveyor, spinner speed, monitoring bin level, and providing multiple prescription rate control for up to five granular products. The control modules support PWM, motorized servo, Mark IV.2, Mark IV.4, and Mark V hydraulic control valves. DirectC+ommand granular application system also supports application control of multiple bin spreaders. Load Configuration Press the Application App from the home screen. This will take you through the steps needed to load a configuration. Map View Once a configuration has been completed, the Map View screen appears A. Menu button B. Total Logged Field Area C. Ground Speed D. AgFiniti® Status Flow: Container: E. Diagnostics F. GPS Signal Indicator G. Display Legend Settings H. Product Control toolbox I. Vehicle Icon J. Event Summary K. Map View L. Split screen M. AutoSwath™ N. Master Switch Status O. Settings P. Bin Level Q. Spinner Speed NOTE! Pressing the Map View button will cycle between the available Map Screen views, and the appearance of the Map View button changes. Product Control Toolbox During DirectCommand Run Time operations, the Product Tab(s) are shown in the upper right-hand side of the Map screen. Press the Product Tab(s), and an extended Flow: Container:
Open the catalog to page 1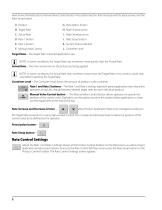
view shows the Rate butons, Manual Valve Control button, Prescription button, Rate Increase and Decrease arrows, and the Rate Setup button. A. Product H. Rate Increase arrow I. Rate Decrease arrow J. Rate Setup button K. Section Status Indicator F. Manual Valve Control Target Rate—The Target Rate is desired application rate. NOTE!: In some conditions, the Target Rate may increment more quickly than the Actual Rate. NOTE!: In some conditions, the Actual Rate may increment slower than the Target Rate, or its numeric values may vary before matching the Target Rate. Actual Rate—The Flow Sensor returns...
Open the catalog to page 2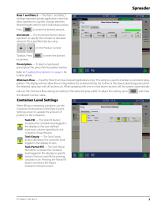
Spreader Rate 1 and Rate 2 — The Rate 1 and Rate 2 settings represent preset application rates that allow operators to quickly change between desired target rates for each individual product. Rate Control Settings Rate Control to enter the desired amount. Minimum Flow Increment — The Increment button allows operators to specify the increase or decrease amounts for a specified rate by using / Toolbox. Press increment. Prescription — To load a map-based prescription file, press the Prescription button. Refer to “Loading Prescriptions” on page 5 for further details. Minimum Flow — (Used for DirectCommand...
Open the catalog to page 3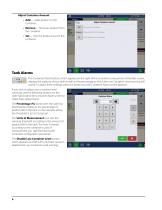
Adjust Container Amount • Add — Adds product to the container. • Remove — Removes product from the container. • Set — Sets the product level in the container. Adjust Container Amount Add Remove product from the container Set the product level in the container Tank Alarms The Container Alarm button, which appears on the right of the Container Level portion of the Rate screen, displays the capacity of your tank as well as the percentage at which the Low Container Level warning will sound. To adjust these settings, press the button and the Container Alarm screen appears. If you wish to adjust your...
Open the catalog to page 4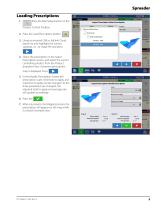
Spreader Loading Prescriptions 1. Press the Rate Setup button on the Import Prescription: Select Prescription Product Product Control Toolbox. Grower: Dittmer Farms Farm: Home 2. Press the Load Prescription button. Field: Creek Bottom 3. Using an inserted USB or AgFiniti Cloud, search for and highlight the correct .agsetup, .irx , or shape file and press . 4. Select the prescription in the Select Prescription screen, and select the correct controlling product from the Product dropdown box. A preview prescription map is displayed. Press 5. In the Modify Prescription Screen the prescription scale,...
Open the catalog to page 5
Shape File Conversion What is commonly called a shape file is actually a collection of three different files. All three of the files are required and must be present on the USB drive for the system to use shape file groups for variable rate product application. A single "shape file" can contain recommendation rates for multiple products. 1. Press Rate Control Settings Rate Control Minimum Flow Toolbox. The Rate Control Settings screen appears 2. Press the Load Prescription button 3. The Select File screen appears. Highlight your desired .shp file and press . Import Prescription: Select Files...
Open the catalog to page 6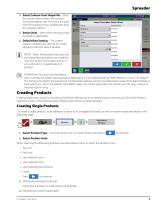
Spreader 4. Select Column From Shape File—Select the column that contains the product recommendation rate. The list on the right side of the dialog shows sample data from the selected column. 5. Select Units—Select the controlling units for product application. 6. Default Rate Setting—The system assigns a default rate. Use the on-screen keypad to edit the value if desired. Import Prescription: Select Column Column: Column Preview Tgt_Rate_g Product: N Units: weight Default Rate: NOTE!: Select the product and units that the shape file prescription was made for. Selection of the wrong data column...
Open the catalog to page 7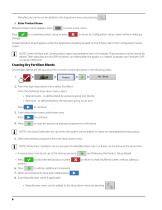
Manufacturer name can be added to the drop-down menu by pressing 5. Enter Product Name Default product name appears. Press Press change. to complete product setup or press to return to Configuration Setup screen without making a Created product should appear under the Application heading located on the Product tab of the Configuration Setup screen. NOTE!: Some Fertilizer and Carrier product types are predetermined in the display. These product names cannot be edited. Their Manufacturer and EPA Numbers can edited after the product is created. Examples are: Fertilizer>DAP or Carrier>30% UAN. Creating...
Open the catalog to page 8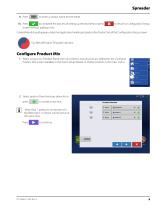
to enter a unique name for the blend. 10. Press to complete the process of setting up the dry blend or press screen without adding a mix. to return to Configuration Setup Created blend should appear under the Application heading located on the Product tab of the Configuration Setup screen. Dry Blend/Product Template indicator. Configure Product Mix 1. When using a Dry Fertilizer Blend, the mix contents and amounts are defined in the Configure Product Mix screen available in the Event Setup Wizard, or Product button in the main menu. Home Field Product Event Settings 2. Select product from the...
Open the catalog to page 9All Ag Leader catalogs and technical brochures
 2024 PRODUCT GUIDE
11 Pages
 Strip Till
21 Pages
 2022 PRODUCTS & SERVICES
11 Pages
 GPS 6000
22 Pages
 2016 PRODUCTS & SERVICES
19 Pages
- Agricultural software
- On-board multi-purpose instrument
- GNSS receiver
- Tractor multi-purpose instrument
- Digital control system
- Guiding system
- Depth sensor
- Real-time software
- GPS receiver
- GLONASS receiver
- Analysis software
- Multi-purpose instrument with screen
- RTK receiver
- Crop input control system
- Automated auto steering kit
- Touch screen control system
- Spraying control system
- Precision agriculture software
- Seeding control system
- Farm machinery antenna