CHUTE TRAILER

CHUTE TRAILER
The Chute Trailer is designed for transporting Arrowquip cattle chutes, facilitating easy loading and movement between locations.
Safety Precautions
Operators must read and understand the manual before use. Key precautions include avoiding loose clothing, ensuring assembly on stable surfaces, and not modifying equipment. The maximum towing speed is 50 km/h (30 mph), and children under 18 should not be near the operating machine.
Risk Assessment
Conduct a risk assessment and establish safe work procedures. Ensure all users are trained, maintain tire pressure at 80 psi, and check wheel lug nuts at specified intervals.
Operating the Chute Trailer
Attach the safety chain, secure the chute with a strap, and inspect for damage regularly. Ensure all bolts are tightened before and after use.
Trailer Wheel Maintenance
Proper wheel torque is crucial. Use a torque wrench to apply the correct torque, starting bolts by hand to prevent cross-threading. Check and re-torque after initial use and periodically.
Assembly of the Chute Trailer
The trailer requires assembly upon delivery. Key steps include inserting wheels, connecting main rails, and using a winch to adjust the chute. Secure the chute with a load strap, ensuring it is not placed directly behind the head gate.
Warranty
Product registration is required for warranty claims. Modifications void the warranty. Register online or via phone/email.
Troubleshooting Guide
Common issues include trailer fishtailing, rear end dragging, and chute tipping. Solutions involve checking axle orientation, receiver height, and ensuring level ground for loading/unloading.
Catalog excerpts

CHUTE TRAILER PRODUCT MANUAL
Open the catalog to page 1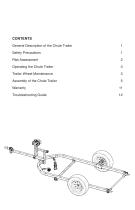
General Description of the Chute Trailer 1 Operating the Chute Trailer 3 Trailer Wheel Maintenance 3 Assembly of the Chute Trailer 5
Open the catalog to page 3
PLEASE FOLLOW ALL SAFETY INSTRUCTIONS PROVIDED IN THIS MANUAL BEFORE OPERATION. ARROWQUIP DOES NOT ACCEPT RESPONSIBILITY FOR ANY ACCIDENTS OR INJURY WHEN THIS SAFETY MANUAL HAS NOT BEEN READ IN FULL AND KEPT WITH THE PRODUCT AT ALL TIMES. OPERATORS OF THIS PRODUCT TAKE AND ACCEPT RESPONSIBILTY FOR ANY HARM OR INJURY TO THE ANIMAL OR OPERATOR WHEN IT PERTAINS TO HOW THE EQUIPMENT IS USED AND MAINTAINED. Please keep this manual for frequent reference and to pass on to new users or owners. General Description of the Chute Trailer The Chute Trailer is specifically designed for the Arrowquip lineup...
Open the catalog to page 4
WARNING: READ BELOW BEFORE OPERATION. 1. Ensure the operator understands the contents of this manual before using the chute trailer. 2. Do not wear loose-fitted clothing. 3. When assembling and disassembling the chute trailer,ensure the parts are located on a firm, level, dry surface which is free of rocks and other trip hazards. 4. Do not make any modifications to Arrowquip equipment. Non-factory modifications to the equipment can reduce the safety for the operator and will void warranty. 5. Maximum speed 50km/30mph. 6. Do not tow loaded trailer without strap in place. 7. DO NOT ALLOW CHILDREN...
Open the catalog to page 5
3. Check wheel lug nuts after 10, 25, 50 miles of use, ensure torqued to a.This applies to first time use and wheel change. 4. Ensure that all equipment is securely fastened onto the trailer before moving or connecting to a vehicle. WARNING: EXCEEDING THE ABOVE LISTED TORQUE LIMITS CAN DAMAGE STUDS AND/OR NUTS,AND OVER TIME MAY LEAD TO FRACTURES AND DANGEROUS WHEEL SEPARATION. Operating the Chute Trailer 1. Make sure safety chain is attached to the vehicle. 2. Ensure all pins and lock clips are in place. 3. Secure chute to the trailer with the strap. 4. Ensure all bolts are properly tightened...
Open the catalog to page 6
Be sure to use only fasteners matched to the cone angle of your wheel – usually 60° or 90°. The proper procedure for attaching your wheels is as follows: 1. Start all bolts or nuts by hand to prevent cross-threading. 2. Tighten bolts or nuts in the sequence shown for wheel torque requirements. 3. The tightening of the fasteners should be done in stages. Following the recommended sequence, tighten fasteners per wheel torque requirements diagram. 4. Wheel nuts/bolts should be torqued before first road use and after each wheel removal. Check and re-torque after the first 10 miles, 25 miles, and...
Open the catalog to page 7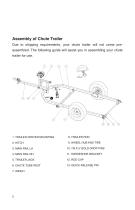
Assembly of Chute Trailer Due to shipping requirements, your chute trailer will not come preassembled. The following guide will assist you in assembling your chute trailer for use. 1. TRAILER CENTER MOUNTING 10. 7/8 X 5’ GOLD DROP PINS 6. CHUTE TUBE REST
Open the catalog to page 8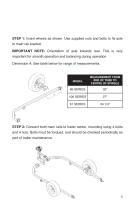
STEP 1: Insert wheels as shown. Use supplied nuts and bolts to fix axle to main rail bracket. IMPORTANT NOTE: Orientation of axle towards rear. This is very important for smooth operation and balancing during operation. Dimension A: See table below for range of measurements. STEP 2: Connect both main rails to trailer center, mounting using 4 bolts and 4 nuts. Bolts must be torqued, and should be checked periodically as part of trailer maintenance.
Open the catalog to page 9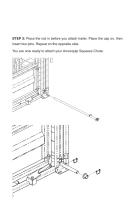
STEP 3: Place the rod in before you attach trailer. Place the cap on, then insert two pins. Repeat on the opposite side. You are now ready to attach your Arrowquip Squeeze Chute.
Open the catalog to page 10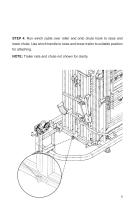
STEP 4: Run winch cable over roller and onto chute hook to raise and lower chute. Use winch handle to raise and lower trailer to suitable position for attaching. NOTE: Trailer rails and chute not shown for clarity.
Open the catalog to page 11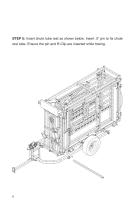
STEP 5: Insert chute tube rest as shown below. Insert .5" pin to fix chute rest tube. Ensure the pin and R-Clip are inserted while towing.
Open the catalog to page 12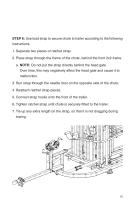
STEP 6: Use load strap to secure chute to trailer according to the following instructions. 1. Separate two pieces of ratchet strap. 2. Place strap through the frame of the chute, behind the front 2x2 frame. a. NOTE: Do not put the strap directly behind the head gate. Over time, this may negatively affect the head gate and cause it to 3. Run strap through the needle door on the opposite side of the chute. 4. Reattach ratchet strap pieces. 5. Connect strap hooks onto the front of the trailer. 6. Tighten ratchet strap until chute is securely fitted to the trailer. 7. Tie up any extra length on the...
Open the catalog to page 13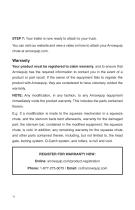
STEP 7: Your trailer is now ready to attach to your truck. You can visit our website and view a video on how to attach your Arrowquip chute at arrowquip.com. Warranty Your product must be registered to claim warranty, and to ensure that Arrowquip has the required information to contact you in the event of a product or part recall. If the owner of the equipment fails to register the product with Arrowquip, they are considered to have voluntary voided the warranty. NOTE: Any modification, in any fashion, to any Arrowquip equipment immediately voids the product warranty. This includes the parts...
Open the catalog to page 14
Troubleshooting Guide 1. Trailer ‘fishtails’ when towed. a. Please ensure that axles are properly inserted and facing backwards. See page 6. 2. Rear end drags when crossing uneven ground. a. Ensure that you have the receiver on your vehicle set at the correct height. 3. Chute tips over when winding up the trailer. a. Ensure you load and unload chute on level ground.
Open the catalog to page 15All Arrowquip catalogs and technical brochures
 HYDRASQUEEZE
16 Pages
 Q-CATCH 86 SERIES SQUEEZE CHUTE
12 Pages
 MANUAL CHUTE MAINTENANCE
8 Pages
