
- Catalogs
- AvMap Navigation
- G7 Dataseed USER MANUAL

- Products
- Catalogs
- News & Trends
- Exhibitions
G7 Dataseed USER MANUAL

G7 Dataseed USER MANUAL
- Capabilities of G7 Dataseed: The device can record sowing tracks, automatically command a weeder, and export tracks with high precision.
- Electrical Connections: Installation is facilitated by a bracket and harness with connectors. It requires a power supply voltage of 10-35 Vdc and a 2A protection fuse.
- Installation of Receiver: Accurate positioning is essential for effective weeding, and installation should be performed by a qualified technician.
- Connecting the Receiver: A 9-pin serial connector is used to link the receiver to the G7 Dataseed.
- Receiver Positioning: The receiver must be centered and correctly oriented on the tool for accurate data collection.
- Height from Ground: The receiver should be positioned away from signal disturbances, and its height must be measured for configuration.
- Turning On: Ensure the display is connected and power is supplied, following the steps to power on and off the device.
- Multi-Touch Display: Supports gestures such as tap, scroll, zoom, and rotate for navigation.
- Connecting ECU Dataseed: Compatible with tools having electro-hydraulic frames and solenoid valves, with a specific connection scheme for setup.
- ECU Dataseed Errors: Solutions for communication errors between the display and ECU are indicated by LED lights.
- Recording Tracks: Steps to record a new sowing track, including data entry and system accuracy checks.
- Repeating Tracks: Instructions for repeating a saved track for weeding, ensuring correct installation and setup.
- Satellites Configuration: Essential settings for the GNSS receiver, including antenna position and terrain compensation.
Catalog excerpts

USER MANUAL Updated to 1.0.xR software version (where x indicates all 1.0 software versions)
Open the catalog to page 1
Index 1. Introduction 1.1 What you can do with G7 Dataseed 1.2 Electrical connections 1.3 How to install the receiver 1.3.1 How to connect the receiver to G7 Dataseed 1.3.2 Receiver position - orientation 1.3.3 Receiver position – Transverse axis 1.3.3.1 Seeder / planter installation 1.3.3.2 Weeder installation 1.3.4 Receiver position - Height from the ground 1.4 Turning the G7 Dataseed on 1.5 How to use multi-touch display 1.6 How to connect ECU Dataseed to the implement 1.6.1 ECU Dataseed troubleshooting 2. Main menu and basic operations 2.1 Recording a sowing track 2.2 Weeding phase: repeating...
Open the catalog to page 3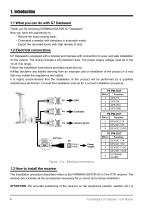
1. Introduction 1.1 What you can do with G7 Dataseed Thank you for choosing FARMNAVIGATOR G7 Dataseed! Now you have the opportunity to: - Record the exact sowing track; - Command a weeder with translator in automatic mode; - Export the recorded tracks with high density of dots. 1.2 Electrical connections G7 Dataseed is equipped with a bracket and harness with connectors for easy and safe installation on the vehicle. The wiring includes a 2A protection fuse. The power supply voltage must be in the 10-35 Vdc range. Follow the installation instructions provided inside the box. AvMap disclaims any...
Open the catalog to page 4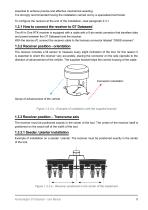
essential to achieve precise and effective mechanical weeding. It is strongly recommended having the installation carried out by a specialized technician. To configure the receiver at the end of the installation, read paragraph 2.3.1 1.3.1 How to connect the receiver to G7 Dataseed The All in One RTK receiver is equipped with a cable with a 9-pin serial connector that transfers data and power between the G7 Dataseed and the receiver. With the device off, connect the receiver cable to the harness connector labeled “GNSS receiverr”. 1.3.2 Receiver position - orientation The receiver includes a...
Open the catalog to page 5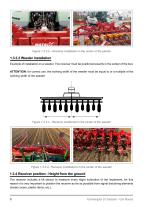
Figure 1.3.3.b - Receiver installation in the center of the planter 1.3.3.2 Weeder installation Example of installation on a weeder. The receiver must be positioned exactly in the center of the tool. ATTENTION: for correct use, the working width of the weeder must be equal to or a multiple of the working width of the seeder! Figure 1.3.3.c - Receiver positioned in the center of the weeder Figure 1.3.3.d - Receiver installations in the center of the weeder 1.3.4 Receiver position - Height from the ground The receiver includes a tilt sensor to measure every slight inclination of the implement,...
Open the catalog to page 6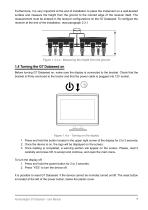
Furthermore, it is very important at the end of installation to place the implement on a well-leveled surface and measure the height from the ground to the colored edge of the receiver itself. The measurement must be entered in the receiver configurations on the G7 Dataseed. To configure the receiver at the end of the installation, read paragraph 2.3.1 Figure 1.3.4.a - Measuring the height from the ground 1.4 Turning the G7 Dataseed on Before turning G7 Dataseed on, make sure the display is connected to the bracket. Check that the bracket is firmly anchored to the tractor and that the power cable...
Open the catalog to page 7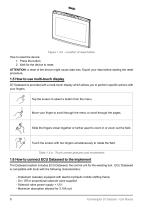
Figure 1.4.b - Location of reset button How to reset the device: 1. Press the button; 2. Wait for the device to reset. ATTENTION: a reset of the device might cause data loss. Export your data before starting the reset procedure. 1.5 How to use multi-touch display G7 Dataseed is provided with a multi-touch display which allows you to perform specific actions with your fingers. Tap the screen to select a button from the menu. Move your finger to scroll through the menu or scroll through the pages. Slide the fingers closer together or further apart to zoom in or zoom out the field. Touch the screen...
Open the catalog to page 8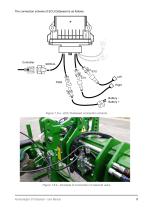
The connection scheme of ECU Dataseed is as follows: Figure 1.6.a - ECU Dataseed connection scheme Figure 1.6.b - Example of connection of solenoid valve Farmnavigator G7 Dataseed – User Manual
Open the catalog to page 9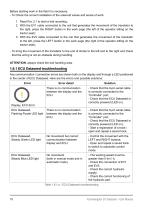
Before starting work in the field it is necessary: - To Check the correct installation of the solenoid valves and sense of work: 1. Read Par. 2.1 to start a trial recording; 2. With the EV1 cable connected to the coil that generates the movement of the translator to the right, press the RIGHT button in the work page (the left of the operator sitting on the tractor seat); 3. With the EV2 cable connected to the coil that generates the movement of the translator to the left, press the LEFT button in the work page (the right of the operator sitting on the tractor seat); - To bring the movement of...
Open the catalog to page 10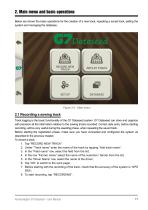
2. Main menu and basic operations Below are shown the basic operations for the creation of a new track, repeating a saved track, setting the system and managing the database. Figure 2.0 - Main menu 2.1 Recording a sowing track Track logging is the basic functionality of the G7 Dataseed system. G7 Dataseed can store and organize with precision all the information relative to the sowing tracks recorded. Correct data entry, before starting recording, will be very useful during the weeding phase, when repeating the saved track. Before starting the registration phase, make sure you have connected...
Open the catalog to page 11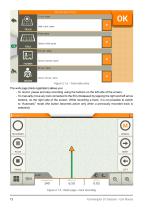
Figure 2.1.a - Track data entry The work page (track registration) allows you: - To record, pause and stop recording using the buttons on the left side of the screen; - To manually move any tool connected to the ECU Dataseed by tapping the right and left arrow buttons, on the right side of the screen. While recording a track, it is not possible to switch to “Automatic” mode (the button becomes active only when a previously recorded track is selected); Figure 2.1.b - Work page - track recording 12 Farmnavigator G7 Dataseed – User Man
Open the catalog to page 12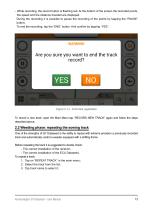
- While recording, the record button is flashing red. At the bottom of the screen the recorded points, the speed and the distance traveled are displayed. During the recording it is possible to pause the recording of the points by tapping the “PAUSE” button; To end the recording, tap the “END” button. And confirm by tapping “YES”. Figure 2.1.c - End track registration To record a new track, open the Main Menu tap “RECORD NEW TRACK” again and follow the steps described above. 2.2 Weeding phase: repeating the sowing track One of the strengths of G7 Dataseed is the ability to repeat with extreme...
Open the catalog to page 13All AvMap Navigation catalogs and technical brochures
 4G agri
2 Pages
 g7Farmnavigator
4 Pages
 FARMNAVIGATOR Product Line
16 Pages
 All in One RTK
2 Pages
 G7 USER MANUAL
90 Pages

- Digital control system
- Guiding system
- Crop input control system
- Spraying control system
- Automated auto steering kit
- Touch screen control system
- Seeding control system
- Agriculture machine auto steering kit
- Tractor auto steering kit
- ISO 11783 control system
- Fertilizer application control system
- Harvesting control system
- GSM receiver
- Multifunction telemetry system
- Steering system receiver