- Catalogs
- Behlen Country
- 70141-Haysmart-Bale-Feeders
70141-Haysmart-Bale-Feeders

70141-Haysmart-Bale-Feeders
Thank you for purchasing the Haysmart Bale Feeder. Behlen Country has been providing quality equipment for over 75 years. For any inquiries, please contact the Customer Service Center.
Hardware Kit
Includes:
- Part A: Chain 1/4 Gr 40 x 70¾” Zinc Plated - 12 pieces
- Part B: Bolt Hex 3/8 X 1 1/2 Grade 5 Plated - 12 pieces
- Part C: Lock Nut Flanged - Whiz 3/8 Zinc Plated - 12 pieces
- Part D: Washer Wrought 3/8 Plated - 12 pieces
- Part E: Chain Ring - 1 piece
Assembly Instructions
Step One - Bolt Sections Together
The feeder comes in three sections. Align these sections with the Top Supporting Straps at the top. Use Parts B, C, and D to bolt the sections together. Ensure all nuts are tightened after connecting all sections.
Step Two - Attaching Chains
Attach the chains (Part A) to the Bale Feeder using the slot in the Top Supporting Strap. Repeat for all twelve chains.
Step Three - Assembling the Chain Ring
Attach the chains to the Chain Ring (Part E) to form the cone of the bale feeder. Once all chains are attached, the feeder is ready for use.
Catalog excerpts

Haysmart Bale Feeders26120512 & 26120537 THANK YOU FOR PURCHASING THIS PRODUCT Congratulations on your purchase. Behlen Country has been in the business of providing quality equipment to landowners for more than 75 years. Our equipment will provide many years of service when maintained by the operator and used in accordance with the capabilities of the product. For questions about this product, or for parts inquiries, please contact our Customer Service Center listed below. Top Supporting Strap with slot for the chain to the top Part C Parts B & D Step One - Bolt Sections Together The HaySmart Bale Feeder comes in three sections. Align the sections with the Top Supporting Straps with the slot for the chain to the top as shown. Bolt these sections together, using Parts B, C and D. Slip the 3/8” washer (Part D) onto the 3/8” bolt (Part B) and place it through the angle of two sections as shown in the illustration at left. Secure each section together with 3/8” nuts (Part C). Tighten all nuts after all three sections have been connected. Using the same process, connect all three sections together. Now all the nuts can be tightened. Behlen COUNTRY CUSTOMER SERVICE CENTER PO Box 569 Ph: 800-447-2751
Open the catalog to page 1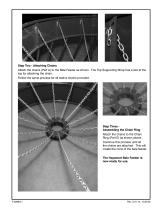
Step Two - Attaching Chains Attach the chains (Part A) to the Bale Feeder as shown. The Top Supporting Strap has a slot at the top for attaching the chain. Follow the same process for all twelve chains provided. Step Three Assembling the Chain Ring Attach the chains to the Chain Ring (Part E) as shown above. Continue this process until all the chains are attached. This will create the cone of the bale feeder. The Haysmart Bale Feeder is now ready for use.
Open the catalog to page 2All Behlen Country catalogs and technical brochures
 Magnum Dog Kennel
2 Pages
 70090-MX-V-Chute
2 Pages
 70076-M1-Squeeze-Chute
14 Pages
 70112-Poly-Electric-Drinkers
6 Pages

- Jympa field cultivator
- Jympa mounted field cultivator
- Drinking system
- Vertical tiller
- Jympa field cultivator with roller
- 2-section disc tiller
- Grooming mower
- Power cultivator
- Gate
- Livestock gate
- Metal gate
- Rear-mount grooming mower
- Metal waterer
- PTO-driven grooming mower
- Trough waterer
- Plastic drinking system
- Agricultural rotary cutter
- Cattle waterer
- Mounted disc tiller
- Loadout