


LUMIA 8

LUMIA 8
Catalog excerpts

Instructions manual for the artificial egg incubator LUMIA 8 Incubator in HEAT-RESISTANT ABS
Open the catalog to page 1
Translation of the original instructions 1 – Warnings for safe utilisation When using electrical appliances it is always required to adhere to some basic safety precautions, including the following: READ THE INSTRUCTIONS IN THEIR ENTIRETY. 2. Use the appliance only with electrical system features complying with the label affixed on the appliance and with this manual. 3. The appliance must be powered with low safety voltage only, which corresponds to the marking on the appliance, and must only be used with the supplied power supply unit. 4. Do not touch hot surfaces (there is a resistor in the...
Open the catalog to page 2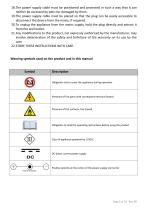
18.The power supply cable must be positioned and protected in such a way that it can neither be accessed by pets nor damaged by them. 19.The power supply cable must be placed so that the plug can be easily accessible to disconnect the device from the mains, if required. 20.To unplug the appliance from the mains supply, hold the plug directly and extract it from the wall outlet. 21.Any modifications to this product, not expressly authorised by the manufacturer, may involve deterioration of the safety and forfeiture of the warranty on its use by the user. 22.STORE THESE INSTRUCTIONS WITH CARE. Warning...
Open the catalog to page 3
Electronic format copy of this instructions manual can be downloaded from the site www.borotto.com or can be requested writing to the e-mail address [email protected] specifying the product and manual revisio
Open the catalog to page 4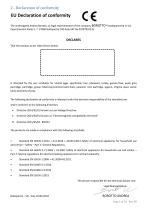
2 - Declaration of conformity EU Declaration of conformity The undersigned Andrea Borotto, as legal representative of the company BOROTTO® headquartered in Via Papa Giovanni Paolo II, 7 37060 Buttapietra (VR) Italy VAT No 03787910235 That the product as per label shown below: Is intended for the use: incubator for animal eggs, specifically: hen, pheasant, turkey, guinea fowl, quail, grey partridge, partridge, goose, Muscovy/common/wild duck, peacock, rock partridge, pigeon, Virginia quail, exotic birds and birds of prey. The following declaration of conformity is released under the exclusive...
Open the catalog to page 5
3 - Presentation of the manual This manual contains the instructions for the installation, use and relative maintenance of incubator model LUMIA 8. The manual consists of various sections, each one of which deals with a series of topics, divided into chapters and paragraphs. The general index lists all the topics dealt with by the entire manual. This manual is intended for users of the equipment, and concerns its technical life after its production and sale. In the event it should be subsequently be transferred to third parties for any reason (sale, loan for use, or any other reason), the incubator...
Open the catalog to page 6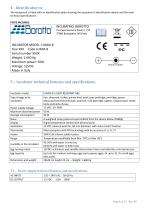
4 - Identification te The equipment is fitted with an identification plate showing the equipment's identification details and the main technical specifications. PLATE FACSIMILE INCUBATOR MODEL: LUMIA 8 Year XXX Code LUMIA 8 Serial number XXXX Weight: 1.660 Kg Maximum power: 50W Voltage: 12VDC Made in Italy
Open the catalog to page 8
6 – General information The LUMIA 8 series incubator has been designed for hatching chicks of hen, pheasant, guinea fowl, quail, grey partridge, grouse, ducks (Muscovy/ common/wild duck, goose, etc.), peacock, turkey, rock partridge, pigeon, Virginia quail, exotic birds and birds of prey. The incubator is made with a special engineering polymer in high HEAT-RESISTANT ABS, which makes the machine solid and sturdy. The material is also provided with special BIOMASTER® silver-based ion antimicrobial additive to destroy any bacterial flora that may develop inside the incubator. The incubator is equipped...
Open the catalog to page 9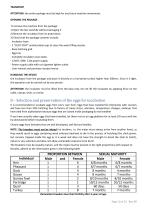
ATTENTION: the entire package must be kept for any future machine movements. OPENING THE PACKAGE To remove the machine from the package: 1) Open the box carefully without damaging it 2) Remove the incubator from its protections. 3) Check that the package contents include: - Incubator base. - 2 "DUST STOP" antimicrobial caps to close the water filling nozzles. - Base hatching grid. - Egg tray. - Complete incubator cover plate. - 12VDC 60W 5.0A power supply. - Power supply cable with car cigarette lighter outlet. - User manual and purchase receipt invoice . HANDLING THE DEVICE the incubator from...
Open the catalog to page 10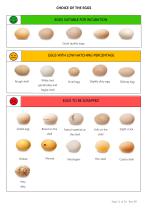
CHOICE OF THE EGGS CHOICE OF THE EGGS EGGS SUITABLE FOR INCUBATION Good quality eggs EGGS WITH LOW HATCHING PERCENTAGE Rough shell fragile shell Thin shell Slight crack Coarse shell Very dirty
Open the catalog to page 11
The embryo begins developing before incubation and, therefore, it needs proper care, otherwise there will be a decrease in the hatching percentage. Below are some rules that will be helpful in obtaining suitable eggs for incubation: 1. Collect the eggs at least 5 times a day to prevent environmental contamination. Never incubate eggs that have been at a temperature lower than 5°C or higher than 24°C. Over this figure the germinating cell developing in an abnormal way, it still develops when incubated but the chick will die during hatching! NEVER store the eggs in the refrigerator. 2. Do not incubate...
Open the catalog to page 12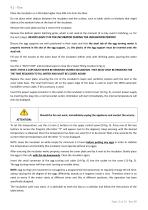
9.1 - Use Place the incubator on a flat table higher than 500 mm from the floor. Do not place other objects between the incubator and the surface, such as table cloths or blankets that might obstruct the aeration holes at the base of the incubator. Remove the cover plate and lay it next to the incubator. Remove the bottom plastic hatching grate, which is not used at the moment (it is only used in hatching, i.e. for the last 3 days). NEVER LEAVE IT IN THE INCUBATOR DURING THE INCUBATION PERIOD! Ensure the egg supports are well positioned in their seats and that the steel tab of the egg turning...
Open the catalog to page 13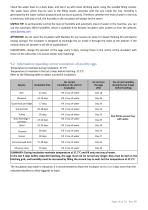
Check the water level on a daily basis, and top it up with clean drinking water using the suitable filling nozzles. The water level, which may be seen in the filling nozzle, coincides with the one inside the tray. Humidity is generated by the water surface produced and not by its quantity. Therefore, whether the level of water in the tray is minimum, half way or full, the humidity in the incubator will always be the same! USEFUL TIP: to permanently control the level of humidity and automatic input of water in the machine, you can use the automatic SIRIO humidifier, which is available from Borotto...
Open the catalog to page 14All BOROTTO catalogs and technical brochures
 LUMIA 8/16 Incubator
20 Pages
 Instructions manual SIRIO
12 Pages
 LUMIA 16
20 Pages
 REAL series
20 Pages