
Catalog excerpts

Instructions manual for the artificial egg hatch REAL series incubators REAL 12 SEMI AUTOMATIC REAL 24 SEMI AUTOMATIC REAL 49 SEMI AUTOMATIC REAL 49 PLUS AUTOMATIC in HEAT-RESISTANT ABS
Open the catalog to page 1
1 - Warnings for safe utilisation When using electrical appliances, it is always required to adhere to some basic safety precautions. The following must also be read in its entirety: 1. Use the appliance only with electrical system features complying with the label affixed on the appliance and with this manual. 2. Do not touch hot surfaces (there is a resistor in the appliance). Wait for at least 10 minutes even after switching off in the event you should need to access hot parts for cleaning or maintenance. 3. Do not place the appliance near sources of heat. 4. Keep away from the reach of...
Open the catalog to page 2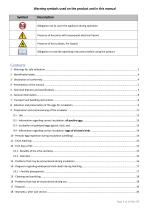
Warning symbols used on the product and in this manual
Open the catalog to page 3
2 - Identification plate The equipment is fitted with an identification plate showing the equipment's identification details and the main technical specifications. MODEL REAL INCUBATOR Via Papa Giovanni Paolo II, 7/A 37060 Year XXX Code RXX Serial number XXXX Weight XXXXX Maximum power XXXX Voltage 230 V 50/60 Hz IP 24 Made in Italy 3 - Declaration of conformity EU Declaration of conformity The undersigned Andrea Borotto, as legal representative of the company BOROTTO® headquartered in Via Papa Giovanni Paolo II, 7 37060 Buttapietra (VR) Italy VAT No 03787910235 DECLARES That the product as...
Open the catalog to page 4
Attention, prior to performing any operation, carefully read the instructions manual. 4 - Presentation of the manual This manual contains instructions regarding installation, maintenance and use of all models of REAL series egg incubators. The manual consists of various sections, each one of which deals with a series of topics, divided into chapters and paragraphs. The general index lists all the topics dealt with by the entire manual. This manual is intended for users of the equipment, and concerns its technical life after its production and sale. In the event it should be subsequently be...
Open the catalog to page 5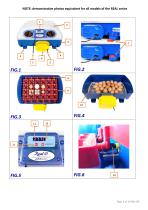
NOTE: demonstrative photos equivalent for all models of the REAL series
Open the catalog to page 6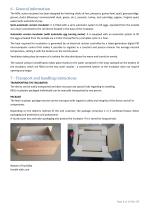
6 - General information The REAL series incubator has been designed for hatching chicks of hen, pheasant, guinea fowl, quail, grey partridge, grouse, ducks (Muscovy/ common/wild duck, goose, etc.), peacock, turkey, rock partridge, pigeon, Virginia quail, exotic birds and birds of prey. Semi-automatic version incubator: it is fitted with a semi automatic system to tilt eggs, operated from the outside via a lever connected to the cell device located in the base of the incubator. Automatic version incubator (with automatic egg turning motor): it is equipped with an automatic system to tilt the...
Open the catalog to page 8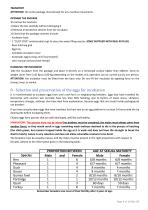
TRANSPORT ATTENTION: the entire package must be kept for any machine movements. OPENING THE PACKAGE To remove the machine: 1) Open the box carefully without damaging it 2) Remove all protective devices from the incubator 3) Check that the package contents include: - Incubator base - 2 "DUST STOP" antimicrobial caps to close the water filling nozzles. (ONLY SUPPLIED WITH REAL 49 PLUS) - Base hatching grid - Egg tray - Complete incubator cover - Automatic egg turning unit (if purchased) - User manual and purchase receipt HANDLING THE INCUBATOR Take the incubator from the package and place it...
Open the catalog to page 9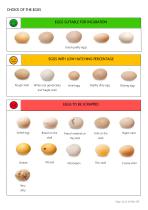
CHOICE OF THE EGGS EGGS SUITABLE FOR INCUBATION Good quality eggs EGGS WITH LOW HATCHING PERCENTAGE Rough shell Thin shell Slight crack Coarse shell Very dirty
Open the catalog to page 10
The embryo begins developing before incubation and, therefore, it needs proper care, otherwise there will be a decrease in the hatching percentage. Below are some rules that will be helpful in obtaining suitable eggs for incubation: 1. Collect the eggs at least 5 times a day to prevent environmental contamination. Never incubate eggs that have been at a temperature lower than 5°C or higher than 24°C. Over this figure the germinating cell starts developing in an abnormal way, it still develops when incubated but the chick will die during hatching! NEVER store the eggs in the refrigerator. Do...
Open the catalog to page 11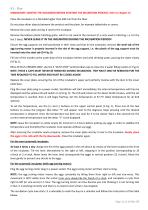
9.1 - Use MANDATORY: SANITISE THE INCUBATOR BEFORE STARTING THE INCUBATION PROCESS: refer to Chapter 15 Place the incubator on a flat table higher than 500 mm from the floor. Do not place other objects between the product and the plane, for example tablecloths or covers. Remove the cover plate and lay it next to the incubator. Remove the bottom plastic hatching grate, which is not used at the moment (it is only used in hatching, i.e. for the last 3 days). NEVER LEAVE IT IN THE INCUBATOR DURING THE INCUBATION PERIOD! Ensure the egg supports are well positioned in their seats and that (in the...
Open the catalog to page 12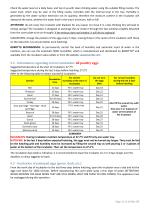
Check the water level on a daily basis, and top it up with clean drinking water using the suitable filling nozzles. The water level, which may be seen in the filling nozzle, coincides with the internal level in the tray. Humidity is generated by the water surface extension not its quantity, therefore the moisture content in the incubator will always be the same, whether the water level in the tray is minimum, half or full! ATTENTION: do not cover the incubator with blankets for any reason nor close it in a box thinking this will lead to energy savings! The incubator is designed to exchange...
Open the catalog to page 13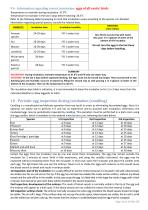
9.4 - Information regarding correct incubation: eggs of all exotic birds Temperature to maintain during incubation: 37.0°C Temperature to maintain in the last 3 days before hatching: 36.5°C Refer to the following table by keeping in mind that incubation varies according to the species. For detailed information regarding special species, consult the relative texts. Extract the eggs from the incubator one by one and check them immediately. The egg may remain outside the incubator for 2 minutes at most. With a little experience, and using the suitable instrument, the eggs may be inspected...
Open the catalog to page 14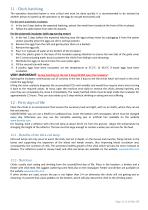
11 - Chick hatching The operation described below is very critical and must be done quickly, it is recommended to be assisted by another person to speed up the operation so the eggs do not get excessively cold. For the semi automatic incubator: A. In the last 3 days before the expected hatching, extract the metal lever located at the front of the incubator. B. Follow the table below from letter B onwards. For the automatic incubator (with egg turning motor) A. In the last 3 days before the expected hatching stop the egg turning motor by unplugging it from the power socket, possibly when the...
Open the catalog to page 15All BOROTTO catalogs and technical brochures
-
LUMIA 8/16 Incubator
20 Pages
-
Instructions manual SIRIO
12 Pages
-
LUMIA 16
20 Pages
-
LUMIA 8
20 Pages


