- Catalogs
- Canarm AgSystems
- Comfy Calf Suites
Comfy Calf Suites

Comfy Calf Suites
- Comfy Calf Suites offer improved feeding and visibility compared to enclosed shelters.
- Enhanced air quality and plastic dividers help prevent disease spread among calves.
- Dividers are removable for cleaning or group penning as calves grow.
- A vented back wall promotes airflow, reducing airborne organisms and moisture.
- Available in various sizes with customizable options.
- Standard package includes plastic planks, galvanized posts, pail holders, and ID cards.
- Optional accessories: calf pail hold-downs, bottle holders, hay feeders, and manual locks.
- Includes steps for assembling stationary and hoop style suites, with illustrations and part numbers.
- Instructions for ordering parts and packages, emphasizing size and style specifications.
- Optional parts and accessories can be ordered separately.
- Plastic Cap: 1.5” x 72” or 96”.
- Plastic Plank: 10” x 72” or 96”.
- Galvanized Fronts: 24", 30", 36" sizes.
- Stainless Steel Channels: 41” and 51” heights.
- Handle Installation: Attach handle using flange nuts and nylon locks.
- Post and Channel Installation: Anchor posts and attach channels at specified centers.
- Divider Panel Installation: Secure divider panel with an eye pin.
- Gate and Latch Installation: Install and level the gate, attach latch with U-bolts.
- Pail Holder Installation: Secure with washers.
- Vented Back Wall Installation: Assemble and secure back wall planks.
- Stainless Steel Calf Pail Hold Down
- Bolt On Bottle Holder
- Quick Install Bottle Holder
- Hay Feeder
- Manual Lock
Catalog excerpts
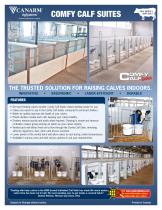
COMFY CALF SUITES PUTTING INNOVATION TO WORK THE TRUSTED SOLUTION FOR RAISING CALVES INDOORS. INNOVATIVE No more feeding calves outside. Comfy Calf Suites makes feeding easier for you. Calves are easier to see in the Comfy Calf Suites compared to enclosed shelters. Better air quality improves the health of your calves. Plastic dividers isolate each calf, keeping your calves healthy. Dividers remove quickly and easily when required. Cleaning is simple and removal of dividers makes group penning an option as your calves mature. • Vented back wall allows fresh air to flow through the Comfy Calf Suite, removing airborne organisms, dust, odors and excess moisture. • Lower panels of the vented back wall allow calves to nest during colder temperatures. • Available in various sizes and with various options to suit your requirements. “Dealing with baby calves in the BSM (brand) individual Calf Suite has made life much easier. Labor time has been cut in half. No more bending over to get inside a covered hutch.” Dennis Rieman, Rieman-way Dairy, Ohio Subject to Change without notice. Visit www.comfycalfsuites.com for more information, photos, testimonials and a vi
Open the catalog to page 1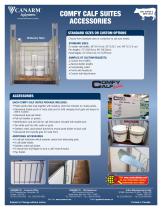
PUTTING INNOVATION TO WORK COMFY CALF SUITES ACCESSORIES STANDARD SIZES OR CUSTOM OPTIONS CALF SUITES-2 SEPT/2017 Tl1 Stationary Style Choose from standard sizes or customize to suit your needs: STANDARD SIZES: On center stall widths: 36" (91.4 cm), 42" (106.7 cm), 48" (121.9 cm) Pen lengths: 72" (182.9cm), 96" (243.8cm) Panel heights: 41" (104.1cm), 51" (129.5cm) SAMPLES OF CUSTOM REQUESTS: • Custom front widths • Special divider lengths • Freestanding suites • Fronts with headlocks • Custom wall attachments ACCESSORIES EACH COMFY CALF SUITES PACKAGE INCLUDES: • Plastic planks that snap together...
Open the catalog to page 2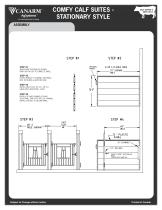
PUTTING INNOVATION TO WORK COMFY CALF SUITES STATIONARY STYLE STEP #1 SNAP PLANK TOGETHER AS SHOWN. SNAP CAP ON LAST TO COMPLETE PANEL. STEP #2 FASTEN HANDLE TO CHANNEL (O[PTIONAL) BOLT ON CHANEL w/SUPPLIED HDW. STEP #3 INSTALL DBL POSTS, 36”, 42”, 48” O.C. HANG GATES AND INSTALL LATCH. STEP #4 INSTALL 24” WIDE CHANNEL AT BACK. SLIDE PANEL THRU POST INTO 24” CHANNEL. INSTALL EYE BOLT TO SECURE PANEL. Subject to Change without notice.
Open the catalog to page 3
AgSystems" PUTTING INNOVATION TO WORK COMFY CALF SUITES STATIONARY STYLE r CALF SUITES-4 ,Z -—— SEPT/2017 :E ASSEMBLY ILLUS. Subject to Change without notice. Printed in Canada
Open the catalog to page 4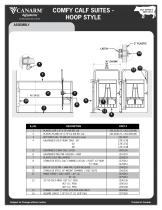
AgSystems" PUTTING INNOVATION TO WORK COMFY CALF SUITES -HOOP STYLE r CALF SUITES-5 ,Z -—— SEPT/2017 iS ASSEMBLY ILLUS. Subject to Change without notice.
Open the catalog to page 5
AgSystems™ PUTTING INNOVATION TO WORK CALF PAIL HOLDER & HOLD DOWN ASSEMBLY r CALF SUITES-6 ,Z -—— SEPT/2017 :E 1241148 CALF PAIL HOLDER ASSEMBLY 1241120 CALF HEAD HOLE REDUCER Subject to Change without notice.
Open the catalog to page 6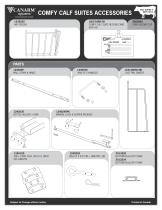
COMFY CALF SUITES ACCESSORIES PUTTING INNOVATION TO WORK CALFCARD-50 COMFY CALF SUITE RECORD CARD (BOX 50) 2060892 CARD HOLDER CLIP CALF RECORD Date of Birth: Name: Sire: Dam: Weight: Colostrum: Medication: Other: PARTS 1240205 WALL STRAP & HINGE 1241280SS-ND CALF PAIL DIVIDER 1240245PK MANUAL LOCK & FLIPPER PACKAGE 1240100 GALV. 2-WAY CALF LATCH (1 ONLY) (NO U-BOLTS) 2013220 BOTTOM PLUG/20’ PLANK 2013224 BOTTOM PLUG/24’ PLANK Subject to Change without notice.
Open the catalog to page 7
ORDERING GUIDELINES ■PUTTING INNOVATION TO WORK 7 Stationary Style ** Easy order packages include double post, plank divider and hardware, calf front, latch, pails, pail holder, quick attach. Just add a row end if required. See page CALF SUITES-P1.** NOTE: Back wall NOT INCLUDED in package. Comfy Calf Suites as Parts 1. Order fronts - Specify length - One for each suite 2. Order double posts & wall hinges - one double post for each pen & end of row OR - order 1 wall hinge for end of row, instead of double post 3. Order side panels - one for each double post - 6' & 8' panels can be purchased...
Open the catalog to page 8
^CANARM AgSystems™ PUTTING INNOVATION TO WORK INSTALLATION INSTRUCTIONS Installation or product problems? Call 1-800-260-5314
Open the catalog to page 9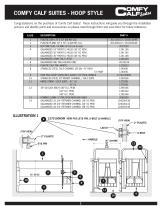
COMFY CALF SUITES - HOOP STYLE Congratulations on the purchase of Comfy Calf Suites! These instructions will guide you through the installation process and identify parts and accessories so please read through them and save them for future reference. ILLUS. PLASTIC CAP 1.5” X 72” (OR 96” LG) PLASTIC PLANK 10” X 72” LG (OR 96” LG) BOTTOM PLUG / PLANK 20’ LG (cut to size) GALVANIZED 24" FRONT (2 HOLE) (36" OC PEN) GALVANIZED 30" FRONT (2 HOLE) (42" OC PEN) GALVANIZED 36" FRONT (2 HOLE) (48" OC PEN) GALVANIZED 2-WAY CALF LATCH GALVANIZED DBL PAIL HOLDER ONLY PLASTIC CALF PAIL (WHITE) STAINLESS STEEL...
Open the catalog to page 10
INSTALLATION: Step #1: Install handle to front channel (2 flange nuts on outside and 2 nylon locks on inside of channel). *TIGHTEN*. Snap planks together for dividers. TIP: Slide hoop strap onto divide before putting channels on planks. Install front and back channels, then snap on top cap. Drill through plastic with a 1/4” bit, then fasten channels with 1/4” x 2 1/2” hex bolts. Step #2: Install hoop strap to divider panel approximately 10” from the front with 3/8” x 3” hex bolts and 2” square washers and lock nut which are to be installed on the plank side. Fasten the 24” SS channels to the...
Open the catalog to page 11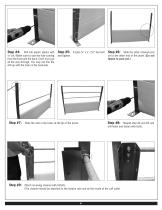
Drill into plastic planks with ¼” bit. (Make sure to star the hole coming from the front and the back. Don’t try to go all the way through. You may not line the drill up with the hole on the backside. Step #5: Fasten ¼” x 2 - 2½” hex bolt and tighten. Step #6: Slide the other channel post on to the other end of the plank. (Do not fasten to post yet.) Step #8: Repeat step #4 and #5 and Slide the rails in the holes at the tip of the posts. drill holes and fasten with bolts. Step #9: Attach receiving channel with U-Bolts. (The channel should be attached to the bottom rails and on the inside of the...
Open the catalog to page 12All Canarm AgSystems catalogs and technical brochures
 SERCO HVLS FAN
3 Pages
 DC INDUSTRIAL CEILING FANS
2 Pages
 FGC FIBERGLASS FANS
1 Page
 PENNING
26 Pages
 LIFT CRATE
2 Pages
 WATERER OPTIONS
15 Pages
 POLUTRY FLOORING
7 Pages
 INFRA RED BROODERS
3 Pages
 PLASTIC WALL EXHAUST FANS
4 Pages
 ROUND PORTABLE FANS
1 Page
 BASKET TYPE CIRCULATING FANS
2 Pages
 FLICKER FREE LED LIGHT DIMMER
14 Pages
 NANO
NANO2 Pages
 BIRD SCALE
1 Page
 NURSERY FEEDERS
5 Pages
 INTEGRA FARROWING FLOORING
28 Pages
 FARROWING CRATES
23 Pages
 GATES
GATES41 Pages
 GREEN SERIES SD-EC
1 Page
 LED HIGH BAY LIGHT
8 Pages
 TIE STALLS
10 Pages
 ExhaustFans
13 Pages
 iFeed
iFeed1 Page
 Flooring
25 Pages
 Tiestalls
10 Pages
 Freestalls
34 Pages
 Plastic Box Stir Fans
2 Pages
 PBKD Series
1 Page
 HVR DRUM Fans
1 Page
 HPWP Series
3 Pages
 HAF Series
1 Page
 CP Ceiling Fans
3 Pages
 CCU Series
1 Page
 CA-AG Series
2 Pages
 CA Series
1 Page
 Panel Fan
1 Page
 PRF Poly Round Fans
1 Page
 LF Series
1 Page
 MTC-4C
1 Page
 SUNNE Thermostat
1 Page
 RANCO Thermostat
1 Page
 K Kontrol Series
1 Page
 Heat Lamp Bulbs
1 Page
 Heat Lamps
3 Pages
 Hog Drinkers
5 Pages
 Waterers
15 Pages
 CCS Promo
4 Pages


