- Catalogs
- Farmscan AG Pty. Ltd.
- jackal v2
jackal v2
1 /28Pages
jackal v2
1 /28Pages
Catalog excerpts

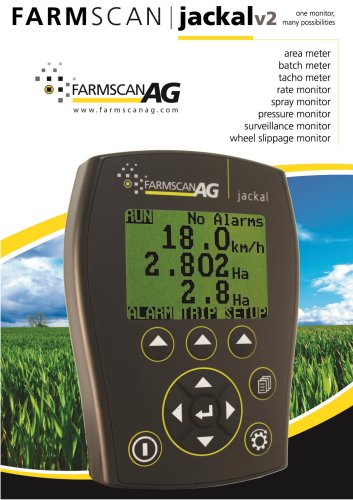
area meter batch meter tacho meter rate monitor spray monitor pressure monitor surveillance monitor wheel slippage monitor
Open the catalog to page 1
General Description TABLE OF CONTENTS General Description __________________________ 1 Available Connections (Refer Page 3) __________ 12 Flow Meter (Wizard) _________________________ 13 Available Connections (Refer Page 3) __________ 13 Option 1 : Target Method (auto cal with a known volume) _______________________________ 13 Power Connection _________________________ 4 Overview __________________________________ 5 Button Functions __________________________ 5 Screen Layout _______________________________ 6 More information on screen _________________ 6 Main Menu (Setup Overview) __________________...
Open the catalog to page 2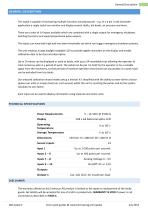
General Description GENERAL DESCRIPTION The Jackal is capable of monitoring multiple functions simultaneously – e.g. In a 4 bin / tank Airseeder application a single Jackal can monitor and display several shafts, bin levels, air pressure and more. There are a total of 14 inputs available which are combined with a single output for emergency shutdown, batching functions and speed proportional pulse outputs. The inputs can have both high and low alarm thresholds set which can trigger emergency shutdown systems. The unit employs a large daylight readable LCD to provide legible characters on the...
Open the catalog to page 3
INSTALLATION PARTS LIST REF PART NUMBER 11 Way Input Plug 1 each Green & Grey colour MOUNTING & INSTALLATION The Jackal is provided with a suction window mount. Slide mount onto unit and push sideways to lock into place. Make sure you hear a click of the mount locking into place. Place in a convenient position on the windscreen and using the toggle lever pictured, push all the way to the bottom until lever locks into position. Note: Monitor should be mounted in a clearly visible position in the cab for the operator, but not in a position where it is subject to intense heat or moisture. July 2013...
Open the catalog to page 4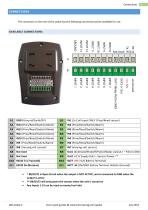
CONNECTIONS The connector on the rear of the Jackal has the following connection points available for use. AVAILABLE CONNECTIONS AM-Jackal-2 more quick guides @ www.farmscanag.com/jackal July 2013
Open the catalog to page 5
POWER CONNECTION Power connection must come direct from the battery terminals. WARRANTY IS VOID if power is not connected as described in this section. 1. Connect power cable supplied DIRECTLY TO BATTERY 2. Ring terminals are used for battery connection and the end with Ferrules attached is used to connect to the rear Jackal. (Refer page 3 for connection instructions) 3. Connect Ground to BATT -VE, Terminal B11 using the RED with BLACK stripe wire 4. Connect +12 Volts (+battery terminal) to BATT +VE, Terminal B10 using the red wire 5. Ensure that the battery connection to the Jackal is +12 Volts...
Open the catalog to page 6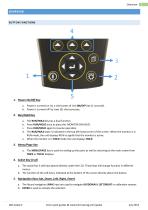
OVERVIEW BUTTON FUNCTIONS Power On/Off Key a. Power is turned on by a short press of the ON/OFF Key (1 second). b. Power is turned off by two (2) short presses. a. The RUN/HOLD key has a dual function. b. Press to place the 'MONITOR ON HOLD'. c. Press RUN/HOLD again to resume operation. d. The RUN/HOLD state is indicated in the top left hand corner of the screen. When the monitor is in RUN mode, the unit displays RUN to signify that the monitor is active. e. When the monitor is in HOLD mode the unit displays HOLD a. The MENU/PAGE key is used for setting up the ports as well as returning to the...
Open the catalog to page 7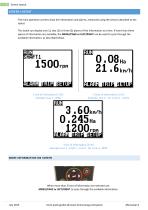
Screen Layout SCREEN LAYOUT The main operation screens show live information and alarms, measured using the sensors attached to the Jackal. The Jackal can display one (1), two (2) or three (3) pieces of live information at a time. If more than three pieces of information are available, the MENU/PAGE or LEFT/RIGHT can be used to cycle through the available information, as described below. 1 line of information (1 UP) Example: Line 1 – RPM 2 lines of information (2 UP) Example: Line 1 – Ha | Line 2 – km/hr 3 line of Information (3 UP) Example: Line 1 - km/hr. | Line 2 - Ha | Line 3 - RPM MORE INFORMATION...
Open the catalog to page 8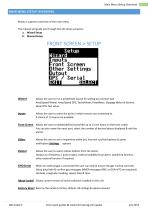
Main Menu (Setup Overview) Below is a generic overview of the main menu. The manual will guide you through two (2) setup scenarios. FRONT SCREEN > SETUP llnputs rront Screen Dther Settings Output Wizard Allows the user to run a predefined wizard for setting up common task Area/Speed Wheel, Area/Speed GPS, TachoMeter, FlowMeter, Slippage Meter & Generic Wizard for fast setup. inputs Allows the user to select the ports in which sensors are connected to. A choice of 13 inputs are available Front Screen Allows the user to enable/define/move/edit up to 13 line items on the front screen You can also...
Open the catalog to page 9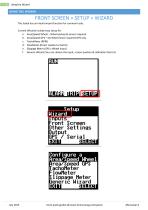
FRONT SCREEN > SETUP > WIZARD The Jackal has an inbuilt wizard function for common tasks. Current Wizards include easy setup for: a. Area/Speed Wheel - Wheel pickup & sensor required b. Area/Speed GPS - No Wheel Senor required GPS only d. FlowMeter (Direct readout or batch) e. Slippage Meter (GPS v Wheel Input) f. Generic Wizard (You can choose the input, screen position & calibration factors) rront Screen Dther Settings Output Configure a Area/Speed Mheel irea/Speed GPS achoMeter louMeter lippage Meter ieneric Mizard July 2013 more quick guides @ www.farmscanag.com/jackal AM-Jackal-2
Open the catalog to page 10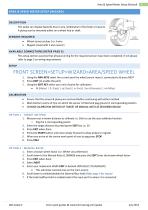
Area & Speed Meter Setup (Wizard) The Jackal can display Speed & Area in any combination of km/mph or ha/acre. A pickup can be mounted either on a wheel hub or shaft. SENSORS REQUIRED • Wheel sensor pickup 2 or 3 wire • Magnet (Used with 2 wire sensor) AVAILABLE CONNECTIONS (REFER PAGE 3) This setup section assumes that physical wiring for the required sensors have been completed. If not please refer to page 3 on wiring requirements 1. Using the NAV KEYS select the current port the wheel sensor input is connected to & press NEXT 2. Press EDIT (to enable the port) 3. Using the EDIT KEY select...
Open the catalog to page 11
Area & Speed Meter Setup (Wizard) CALIBRATION (CONTINUED) 4. Scroll down to Alarm Beep and EDIT the number of audible beeps to be heard on the selected port if an alarm sounds. 6. Choose your units of display • Ha (Hectares) | Ac (Acres) | mA2 (Meters squared) | KmA2 (Kilometers squared) 8. You can now EDIT the audible alarm points for a Min & Max range to be notified of a problem 10. Create a name for your port if desired by pressing EDIT 11. Use the UP/DOWN/LEFT/RIGHT to change the letters. (Max 3 letters) 12. Select EXIT when done 14. Confirm that you wish to display km/hr. or mph on the next...
Open the catalog to page 12

Archived catalogs
 AgGuide
4 Pages
- Digital control system
- Crop input control system
- Spraying control system
- Touch screen control system
- Smart control system
- Seeding control system
- Connected control system
- ISO 11783 control system
- GPS control system
- Fertilizer application control system
- Automatic control system
- Harvesting control system
- Variable-rate control system
- Agriculture monitor