

GP-1000

GP-1000
Background Information: Berm flaming is a weed management technique first used in Michigan in 1963. It is primarily applied in grapevine berms and now also in fruit and nut orchards to control weeds and insect habitats, reducing the need for herbicides.
Practices and Techniques: Flaming can be conducted year-round, with summer applications every two weeks and winter applications for plant residue removal. The burners target weeds in rows and under tree canopies, operating at an average speed of 3 mph at 45 psi, consuming 11 to 21 gallons of fuel per hour, which doubles with the alley attachment.
Assembly Instructions:
- GP-1000 Trailer Assembly: Slide the axle into the frame, secure hubs, and attach tires and trailer jack.
- Tank Installation: Secure the tank with valve guards and tension bolts.
- Mast Assembly: Assemble brass tees, solenoid assemblies, and control heads, attaching them to the mast.
- Boom Arm and Torch Assembly: Attach arms to the mast, adjust torch bars, and connect hoses.
- Alley Attachment Assembly (Optional): Bolt brackets and adjust torch bars for desired height.
Operating Instructions:
- Start-up Procedure: Check for leaks, light torches, and adjust regulators to 45-65 psi.
- Lighting Procedure: Turn on the tank valve, adjust the regulator, and light torches one side at a time.
- Shut-Down Procedure: Turn off the tank valve and allow gas to burn out.
- Operating Tips: Best results occur with little wind and when weeds are emerging. Adjust torches after sundown for optimal flame pattern.
Check List for Daily Start Up and Warnings: Includes a checklist for safety and proper operation, emphasizing leak testing and ventilation.
Importance of Purging: Proper purging of LP-Gas containers is crucial to remove contaminants like water and air, preventing system issues and costly service calls.
Introduction
This document provides guidelines for handling and maintaining LP-Gas containers, highlighting methanol injection and air purging to prevent system issues.
Specifications and Requirements
- Methanol must be added when refilling to neutralize moisture and prevent icing. Use genuine absolute anhydrous methanol (99.85% pure).
- The recommended amount is 1 pint of methanol per 100 gallons of water capacity.
- Avoid substitutes as they are ineffective.
Importance of Air Purging
- Failure to purge air can lead to excessive pressure, pilot light extinguishment, and slow filling.
- Proper purging ensures faster transfer, prevents pump stalling, and reduces energy consumption.
- Never purge with liquid propane as it is ineffective and can cause chilling and moisture condensation.
Proper Purging Process
- Use a vacuum pre-purged tank and verify the vacuum before filling.
- Inject methanol through the service valve before filling with LP-Gas.
- Connect a hose to inject LPG to neutralize vacuum pressure.
Filling Process
- After methanol and LPG injection, proceed with normal filling procedures.
Troubleshooting
- Start with a clean, new tank and perform methanol injection before filling.
- For flame out issues, check and clean the fuel strainer.
- For low flame, check and clean torch orifices.
- Ensure electrical connections are secure and valves are clear if no fuel reaches torches.
Contact Information
For installation or operation problems, contact Flame Engineering at 1-800-255-2469.
Catalog excerpts
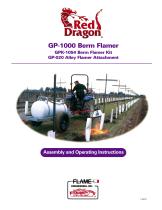
GP-1000 Berm Flamer GPK-1054 Berm Flamer Kit GP-020 Alley Flamer Attachment Assembly and Operating Instructions
Open the catalog to page 1
Table Of Contents Assembly Instructions 2-7 Start-up, Lighting and Operating Instructions 8 Check List for Daily Start Up and Warnings 9 Proper Purging Of LP-Gas Container 10 Vacuum Pre-Purged Domestic Tanks 11 Background Information Grapevine berm flaming is an excellent method of weed management. The first recorded flaming of grapevine berms occurred in Michigan in 1963 (NGPA 35), which also included a study of flaming blueberries and strawberries. The GP 750 and GP 1000 were originally designed for flaming grapevine berms but have been adapted for use in fruit and nut orchards....
Open the catalog to page 2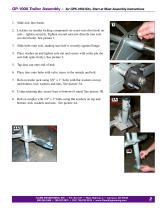
GP-1000 Trailer Assembly – for GPK-1054 Kits, Start at Mast Assembly Instructions 1. Slide axle into frame. 2. Locktite (or similar locking compound) set-screw into divot hole on axle – tighten securely. Tighten second setscrew directly into axle (no divot hole). See picture 1. 3. Slide hubs onto axle, making sure hub is securely against flange. 4. Place washer on and tighten axle nut and secure with cotter pin (be sure hub spins freely). See picture 2. 5. Tap dust cap onto end of hub. 6. Place tires onto hubs with valve stems to the outside and bolt. 7. Bolt on trailer jack using 3/8” x 1” bolts...
Open the catalog to page 3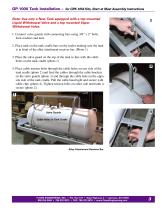
GP-1000 Tank Installation – for GPK-1054 Kits, Start at Mast Assembly Instructions Note: Use only a New Tank equipped with a top mounted Liquid Withdrawal Valve and a top mounted Vapor Withdrawal Valve. 1. Connect valve guards with connecting bars using 3/8” x 2” bolts, lock-washers and nuts. 2. Place tank on the tank cradle bars on the trailer making sure the tank is in front of the alley attachment receiver bar. (Photo 1) 3. Place the valve guard on the top of the tank in line with the cable holes on the tank cradle (photo 1) 4. Place cable tension bolts through the cable holes on one side...
Open the catalog to page 4
GP-1000 and GPK-1054 Kit – Mast Assembly Use thread sealant or Teflon® tape on all non-flared fittings (Refer to picture 1 for steps 1 through 3) 1. Assemble brass tee (1A) onto bottom of nipple bracket (1B). 1D 2. Assemble left and right solenoid/by-pass assemblies (1C) into right and left tee outlets – assemble so that the U-shaped hoses will face forward. 1C 3. Assemble control head (1D) (regulator and gauge control assembly) to top of nipple – assemble so top elbow points toward the rear of unit. (Refer to picture 2 for steps 4 through 6) 4. Assemble mast onto trailer using 3/8” x 1” bolts...
Open the catalog to page 5
GP-1000 and GPK-1054 Kit – Boom Arm and Torch Assembly 1. Bolt arms onto mast with 7/16” x 3” bolt, lock-nut. Make sure set screws (1A) are facing up. 2. Slide square tubing (mark L & R) into the corresponding arms with the spring pin (2A) towards the back and tighten the set screw (2B). See picture 2. 3. Assemble torch bar with spring hinge pin (3A) toward the front and secure with 3/8” x 3” bolt and lock nut. See picture 3. 1A 4. Place springs on top and bottom set of pins on each arm and secure with 5/16” retainer caps. See picture 4. 5. Adjust arms to desired height with the 3/4” x 5” bolt...
Open the catalog to page 6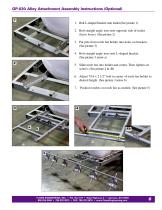
GP-020 Alley Attachment Assembly Instructions (Optional) 1 1. Bolt L-shaped bracket onto trailer.(See picture 1) 2. Bolt straight angle iron onto opposite side of trailer (leave loose). (See picture 2) 3. Put pins from torch bar holder into holes on brackets. (See picture 3) 4. Bolt straight angle iron onto L-shaped bracket. (See picture 3 arrow a) 5. Slide torch bar into holder and center. Then tighten set screws. (See picture 4 & 4b) 6. Adjust 7/16 x 2 1/2” bolt in center of torch bar holder to desired height. (See picture 3 arrow b) 7. Position torches on torch bar as needed. (See picture...
Open the catalog to page 7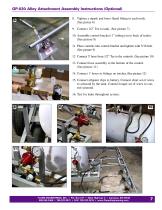
GP-020 Alley Attachment Assembly Instructions (Optional) 8. Tighten a nipple and brass flared fitting to each torch. (See pictue 6) 9. Connect 1/2” Tee to tank. (See picture 7) 10. Assemble control bracket (1” tubing) on to back of trailer. (See picture 8) 11. Place controls into control bracket and tighten with 5/16 bolt. (See picture 9) 12 Connect 5’ hose from 1/2” Tee to the controls. (See picture 10) 13. Connect hose assembly to the bottom of the control. (See picture 11) 14. Connect 1’ hoses to fittings on torches.(See picture 12) 15. Connect alligator clips to battery. Connect short set...
Open the catalog to page 8
GP-1000 and GPK-1054 – Lighting and Operating Instructions Start-up Procedure: Note: Burp your Gauges. On the top of the pressure gauges, there is a little tab. At start-up, pull this tab up for a few seconds and then push it back in. Step 1: Turn off all valves prior to lighting torches. Step 2: Turn on tank valve slowly, press red master switch on & leak test all connections from the tank to the pilot bypass needle valves using soapy water or leak detector on every connection. If leaks are found, turn off tank valve and open the needle valve allowing the lines to bleed. Fix all leaks and start...
Open the catalog to page 9
Check List for Daily Start Up and Warnings WARNING! Use Extreme Caution — flames from this unit can cause serious injury or death. Do Not Operate this unit when leaks are present. Operate only in well ventilated areas. 1. 2. 3. 4. Fuel Tank Valve. . . . . . . . . . . . . . . . . . . . . . . . . . . . . . . . . . . . . . . . . . . . . . . . OFF Pilot Valve(s) . . . . . . . . . . . . . . . . . . . . . . . . . . . . . . . . . . . . . . . . . . . . . . . . . . OFF Regulator(s) . . . . . . . . . . . . . . . . . . . . . . . . . . . . . . . . . . . . . . . . . . . . . . . . . . OFF Control Switch ....
Open the catalog to page 10
Proper Purging Of LP-Gas Container The Importance of Purging A very important step which must not be overlooked by LP-Gas distributors is the importance of properly purging new LP-Gas containers. Attention to this important procedure will promote customer satisfaction and greatly reduce service calls on new installations. Consider the following: • Both ASME and DOT specifications require hydrostatic testing of vessels after fabrication. This is usually done with water. • Before charging with propane, the vessel will contain the normal amount of air. Both Water and Air are Contaminants They seriously...
Open the catalog to page 11All Flame Engineering, Inc. catalogs and technical brochures
 Propane Flare Literature
2 Pages
 Row Crop flamer literature
8 Pages
 GF-2011 Instruction Manual
7 Pages
 Poultry Instruction Manual
15 Pages
 Product Catalog
48 Pages
 GP-750
12 Pages
 Roofing Catalog
20 Pages


