- Catalogs
- GQF Manufacturing Company
- 1200E SERIES INSTRUCTIONS
1200E SERIES INSTRUCTIONS

1200E SERIES INSTRUCTIONS
Catalog excerpts

1200E SERIES INSTRUCTIONS For All 1200E series Incubators & Hatchers including 110 and 220 Volt models The items listed below should be included with your incubator. Hatcher models will not include the sample egg trays. TOP LATCH UNINSTALLED FOR SHIPPING No. 3048 CORD SET No. 4500 MOISTURE PAN No. 3018 THERMOMETER X4 No. 3066 HATCHING TRAY & 3068 COVER READ THE FOLLOWING BEFORE STARTING The location of the incubator is important to successful operation. A thermostatically controlled room temperature between 75 F to 80 F (24 C to 27 C) degrees with fresh air without drafts is ideal. Room temperatures from 55 F to 90 F (13 C to 32 C) are acceptable but good temperature control in the incubator is obtained when the room temperature is held within a few degrees. The back of the incubator and the right side where the vents are located should be placed no closer to a wall or barrier than 12 inches (30 cm) in order to have free air exchange within the room. Avoid areas of strong sunlight or air ducts that could influence the temperature in the incubator. LOCATION TESTING It is suggested that a small number of inexpensive eggs be used during the first setting to establish the operator’s procedure and the incubators desired operation. (See warranty on last page.) Allow the incubator to run for at least half a day in order to warm the cabinet and stabilize the operation. When operating as expected the eggs may be placed in the turning racks. Plastic trays may be used to hold the eggs upright with the small end down. GQF offers plastic trays for different size eggs which will allow maximum capacity with proper air flow around eggs. Goose, turkey and other large eggs maybe too tall to stand on end. If so they should be placed with large/small end oriented to the parallel turning axis of the tray. Extremely large eggs may be secured with rows of “V” shaped hardware cloth fastened to the turning rack or a removable tray (see accessories). Sliding metal trays are also an option.
Open the catalog to page 1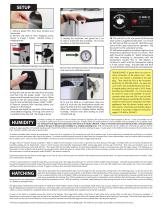
1. Remove plastic film from door window and thermostat. 2. Remove red label & silver shipping screws shown in Image 1 below. Discard screws & shipping block. Image 1 3. Remove cardboard shipping brace and discard. 4. Plug the cord set into the side of the incubator and then into the proper outlet. Turn on the power switch located next to the cord set. When turned on the fan should begin to blow. Level trays to remove hatching drawer (1202E, 1220E) 5. Remove contents from hatching drawer and replace it in the bottom. 6. Locate and install the top latch which was left uninstalled for shipping....
Open the catalog to page 2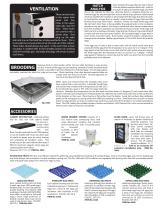
HATCH ANALYSIS There are two holes in the upper back panel and two holes in the upper right side near the door. These holes are covered with a plastic plug. One plug on the right side and one on the back has a hole punched in them. This is to provide the necessary flow of air into and out of the cabinet. These holes should always stay open. In the event that a dryer incubator is needed refer to the humidity section on working with the humidity pan. Normally the plugs will remain in place at all times. Start checking the eggs that are due to hatch a full day before expected hatch day. Look for...
Open the catalog to page 3
PARTS FRONT DIAGRAM PART NUMBER Diagram Part Number Item Description Diagram Number Item Description Humidity wick pads (2) Off/On switch with fuse Fuse 250-V 5amp fast blow Analog Electronic Thermostat Heater/Fan Assembly Door gasket Turner assembly 110V (after 2007 production) Complete door latch (1) IEC/USA cord set for cabinet Black vent plugs Back panel Turner timer motor (attached to thermostat panel) Hatching tray CLEANING & SERVICE The incubator may be cleaned of feather dust and hatching debris with a damp cloth and mild soap, for those surfaces accessible from the front door. Finish...
Open the catalog to page 4All GQF Manufacturing Company catalogs and technical brochures
 HOVA BATOR TM MODEL 2370
4 Pages
 1602N THERMAL AIR
4 Pages
 Model 1588 Hova-Bator
4 Pages
 UNIVERSAL BOX BROODER
5 Pages
 catalog
16 Pages


- Hopper feeder
- Hatchery
- Chicken egg incubator
- Egg container
- Multi-access hopper feeder
- Setter tray
- Digital egg incubator
- Automatic turning egg incubator
- Plastic setter tray
- Duck egg incubator
- Plastic hopper feeder
- Goose egg incubator
- Turkey egg incubator
- Box type egg incubator
- Cabinet egg incubator
- Chicken egg setter tray
- Transport cage
- Plastic transport cage
- Poultry hopper feeder
- Transport setter tray