- Catalogs
- GQF Manufacturing Company
- HOVA-BATOR FOR MODEL 1583, 2362N & 220 VAC VARIANTS
HOVA-BATOR FOR MODEL 1583, 2362N & 220 VAC VARIANTS

HOVA-BATOR FOR MODEL 1583, 2362N & 220 VAC VARIANTS
Catalog excerpts

NOTE: It is recommended that you operate the incubator with a small quantity of inexpensive eggs to be assured of your operating procedure and the performance of the incubator, before attempting to hatch large quantities of eggs or expensive eggs. Keep Reptile eggs protected from moving air. (See Warranty on Page 4). An Incubator is designed to bring normal room temperature to the desired temperature. Room temperture of 60°F. or below will reduce the temperature in the incubator. Room temperature change of 10°F. or more will change temperature in incubator & is more pronounced below a temperature of 70°F. The location of the machine is important to successful operation. A room temperature from 70° to 80°F. is ideal, and fresh air without drafts is necessary. Be sure no direct sunlight strikes the incubator and that it sets level. A consistant room temperature within a few degrees is best. Unpack the incubator from box. Use thermostat bracket as handle to remove the incubator top from inside the bottom, where it is packed for shipping. Check for the components listed below. With fan, heat element, pilot light, thermostat bracket, & vent plugs installed. 2362N top shown. Wire Floor Install the Plastic Liner and Wire Floor r ove ips under e cl Slid floor & ner li wireplastic THERMOSTAT SETUP Hova-Bator Bottom Plastic Liner THERMOSTAT ADJUSTING SCREW BRACKET 3006 Snap Switch Thread wing nut onto adjusting screw. Thread adjusting screw assembly into slot until enough of shaft is visible on inside of incubator to accept wafer. Thread wafer onto adjusing screw till it stops, then tighten adjusting screw untill thermostat button clicks. Back wafer off one half turn. Attach Wire Floor to Plastic Liner with Owl Clips then place floor and liner in Hova-Bator Bottom. Arrange the plastic floor as shown using the water troughs and turner power cord notch as reference. Fill Center trough (highlighted) with warm water. Surface area effects humidity not depth; refill trough as necessary to prevent it from drying out. ADJUSTING THE THERMOSTAT Loosen Wing Nut to make adjustments. Turn adjusting screw counterclockwise to raise temperature & clockwise to lower. Re-tighten wing nut to secure the setting. The light will come on when the heat is on. Adjust the temperature for o 100 F. for most eggs. Allow the incubator to operate for at least ½ day to stabilize the setting before putting in eg
Open the catalog to page 1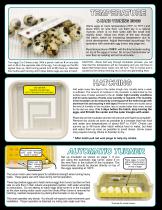
TEMPERATURE & HAND TURNING EGGS Warm eggs to room temperature (70°F. to 75°F.) and place them on wire floor. Let them lay in a natural manner, which is on their sides with the small end slightly down. About two thirds of the way through the hatch, watch for increasing temperature due to chick development. Adjust thermostat accordingly. For operation with automatic egg turner, see page two. Read temperature of 100oF. with the thermometer resting on top of the eggs or turner. Do not put thermometer on wire floor as reading will not be accurate. Turn eggs 2 to 3 times a day. With a pencil, mark...
Open the catalog to page 2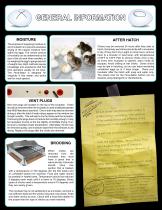
GENERAL INFORMATION MOISTURE AFTER HATCH The purpose of supplying moisture in and incubator is to prevent excessive drying of the natural moisture from within the eggs. The correct amount of humidity can be determined by the size of the air sack when candled, or by weighing the egg to gauge percent of weight loss. Both methods require knowledge and experience that first time operators usually do not have. The Hova-Bator is designed for simplicity in this matter, and works well for most species. Chicks may be removed 24 hours after they start to hatch. Extremely wet chicks should be left in incubator...
Open the catalog to page 3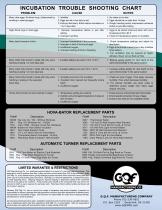
INCUBATION TROUBLE SHOOTING CHART PROBLEM Many clear eggs. No blood rings. (determined by candling or opening eggs) 1. Infertility 2. Eggs too old or too dirty to set. 3. Embryo died early. Either before incubation or 1 to 2 days after. 1. No males or too few. 2. Eggs should be no older than 14 days. 3. Rough handling and/or temperature extremes before or just after setting. Slight blood rings in most eggs. 1. Improper temperature before or just after setting. 2. Improper handling. 1. Eggs to be stored small end down with room temperature 60 to 80 F. 2. Check for temperature spikes in incubator....
Open the catalog to page 4All GQF Manufacturing Company catalogs and technical brochures
 HOVA BATOR TM MODEL 2370
4 Pages
 1602N THERMAL AIR
4 Pages
 Model 1588 Hova-Bator
4 Pages
 1200E SERIES INSTRUCTIONS
4 Pages
 UNIVERSAL BOX BROODER
5 Pages
 catalog
16 Pages


- Hopper feeder
- Hatchery
- Chicken egg incubator
- Egg container
- Multi-access hopper feeder
- Setter tray
- Digital egg incubator
- Automatic turning egg incubator
- Plastic setter tray
- Duck egg incubator
- Plastic hopper feeder
- Goose egg incubator
- Turkey egg incubator
- Box type egg incubator
- Cabinet egg incubator
- Chicken egg setter tray
- Transport cage
- Plastic transport cage
- Poultry hopper feeder
- Transport setter tray