- Catalogs
- GQF Manufacturing Company
- INSTRUCTIONS For model 1502 - 1527 - 1536 - 1550 - 1570 incubators and 220 Volt equals
INSTRUCTIONS For model 1502 - 1527 - 1536 - 1550 - 1570 incubators and 220 Volt equals

INSTRUCTIONS For model 1502 - 1527 - 1536 - 1550 - 1570 incubators and 220 Volt equals
Catalog excerpts

INSTRUCTIONS For model 1502 - 1527 - 1536 - 1550 - 1570 incubators and 220 Volt equals NOTE: It is recommended that you operate the incubator with a small quantity of inexpensive eggs to be assured of your operating procedure and the performance of the incubator before attempting to hatch large quantities of eggs or expensive eggs. (See warranty on page 6) LOCATION The location of the incubator is important to successful operation. A thermostatically controlled room temperature between 75oF to 80oF (24oC to 27oC) degrees with fresh air without drafts is ideal. Room temperatures from 55oF to 90oF (13oC to 32oC) are acceptable but good temperature control in the incubator is obtained when the room temperature is held within a few degrees. A room temperature that changes 10oF (5oC) from day to night could result in a ½ degree change inside the incubator. The back of the incubator where the vents are located should be placed no closer to a wall or barrier than 12 inches (30cm) in order to have free air exchange within the room. Avoid areas of strong sunlight or air ducts that could influence the temperature in the incubator. SET UP Unpack the incubator and plug the electrical cord into the proper voltage socket. If used in countries other than the USA or Europe the electric plug may have to be removed and a suitable type plug installed. When plugged in, the incubator fan will blow air towards the door and the light near the cord set will shine provided the room temperature is below 94F (34C). For setting incubators such as the 1502 locate the turner switch on the upper left outside near the rear of the incubator. Toggle this switch to the momentary on position (it will have to be held in this position). With the incubator door open, the trays should be seen to turn slowly while holding the switch in this position. Releasing the toggle switch will return it to the center position, which is the off position for the turner. Using this switch will allow the racks in the incubator to be leveled in order to install or remove the egg trays. Moving the toggle switch to the opposite position will cause the toggle to snap in place. This is the automatic turning position. Be sure that the egg trays are fully pushed in so that they do not obstruct the racks from turning before putting the switch in the automatic position. The switch must be in the automatic position in order for the incubator to turn the eggs every two hours automatically. TEST FOR ASSURANCE THAT TURNER IS WORKING: It is recommended that each week the following test be preformed: Using the toggle switch, run the turner until the trays are level and return the switch to the ON position. Look to see if the trays remain level. If not, then re-level so that they remain level. Put the switch in the ON position. Check the tray level after 3 hours. If trays are not level then the turner is operating properly. If no turning has taken place, then timer may need to be replaced. There are vent holes in the back of the incubator. Three at the top and three at the bottom. The outer vents have moveable covers while the center vents have no covers. For normal operation, the outer vents are closed. Do not cover the center vents, as constant fresh air exchange is necessary for the development of the eggs. The incubator comes with a moisture pan and wick pads. Normally the moisture pan is filled with water and placed on the fan shelf between the runners. The wick pad is added when additional moisture is required usually at time of hatch. If the optional automatic moisture pan is used, place the tank on top of the incubator and attach the hose to the moisture pan nipple. Next thread the shut off clamp on to the hose so that it will be between the quick disconnect and the tank. Attach the hose to the tank nipple and fill the tank with water. Depth of the water in the moisture pan is not important for humidity but may be adjusted by bending the brass float arm slightly. Toggle Switch Humidity Control Vents Humidity Pan with wick pad 1
Open the catalog to page 1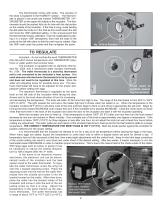
The thermometer comes with wicks. The purpose of the wicks is explained in the HUMIDITY section. The thermometer is placed in the small hole marked THERMOMETER / HYGROMETER on the upper left outside of the incubator. The thermometer should be pushed fully into its hole with the dial portion on the outside of the incubator. If the hole is snug, avoid twisting the dial while the probe is in the hole as this could loosen the dial and move the 100F-calibrated setting. In the unusual event that the thermometer looses calibration, it can be recalibrated by placing it in a known 100F atmosphere, then...
Open the catalog to page 2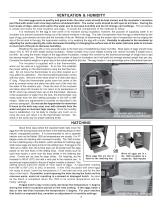
VENTILATION & HUMIDITY For most eggs such as poultry and game birds, the outer vents should be kept closed, and the incubator’s moisture pan filled with water until a few days before scheduled hatch. The center vents should be left open at all times. During the last couple of days, add a wick pad to the water pan to increase humidity and do not change vent settings. This procedure is simple and works for most locations and eggs. It avoids the complexities of the methods to follow. It is necessary for the egg to lose some of its moisture during incubation; however, the purpose of supplying water...
Open the catalog to page 3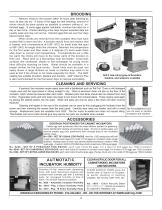
BROODING Remove chicks to the brooder within 24 hours after hatching as soon as they are dry. If some of the eggs are late hatching, removal of chicks should be done quickly as possible to prevent chilling of unhatched eggs. If some eggs appear hatchable, continue the hatch for a day or two more. Chicks hatching a few days beyond expected date are usually weak and may not survive. Discard eggs that are over four days beyond hatch date. When chicks are removed from the incubator they must have a place that is warm and dry. A brooder should have one section that is heated, with a temperature of...
Open the catalog to page 4
GENERAL INCUBATOR OPERATING INSTRUCTIONS FOR SEVERAL SPECIES OF BIRDS Bobwhite Quail Incubation period (days) 23-24 Temperature (F) Cotumix Quail Temperature during final 3 days of incubation (F) Humidity during final 3 days 90-94 of incubation (wet bulb, F) Duck Muscovy Goose Guinea Pheasant Peafowl Chicken, Turkey Chukar * % Weight loss: Total weight loss from beginning to end of Incubation should be 12%-15% for morst eggs % Weight Loss = Original wt. - Present wt. x 100% Average Daily Wt. = Original wt. Loss Required Side Mounting Bracket Side Mounting Bracket Side View Foot for mounting to...
Open the catalog to page 5All GQF Manufacturing Company catalogs and technical brochures
 HOVA BATOR TM MODEL 2370
4 Pages
 1602N THERMAL AIR
4 Pages
 Model 1588 Hova-Bator
4 Pages
 1200E SERIES INSTRUCTIONS
4 Pages
 UNIVERSAL BOX BROODER
5 Pages
 catalog
16 Pages


- Hopper feeder
- Hatchery
- Chicken egg incubator
- Egg container
- Multi-access hopper feeder
- Setter tray
- Digital egg incubator
- Automatic turning egg incubator
- Plastic setter tray
- Duck egg incubator
- Plastic hopper feeder
- Goose egg incubator
- Turkey egg incubator
- Box type egg incubator
- Cabinet egg incubator
- Chicken egg setter tray
- Transport cage
- Plastic transport cage
- Poultry hopper feeder
- Transport setter tray