Mini
Mini
- Download and Connect: Users must download the HIKMICRO Viewer app for Android and enable OTG on their smartphones before connecting the device using a Type-C to Type-C cable.
- App Operations: The app allows users to adjust temperature measurement parameters, including emissivity and distance. Users can switch palette colors, adjust level and span, and choose between auto and manual modes for temperature range adjustments.
- Calibration: The device can be manually calibrated and performs periodic self-calibration to optimize image quality and measurement accuracy.
Catalog excerpts
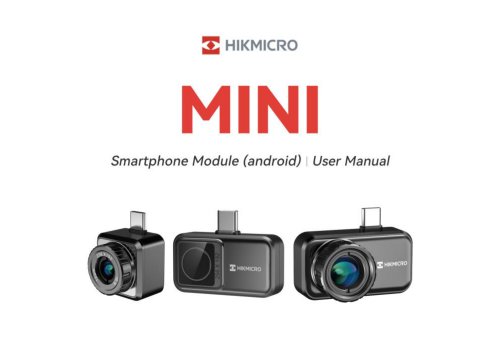
Smartphone Module (android) I User Manual
Open the catalog to page 1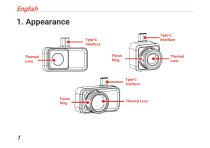
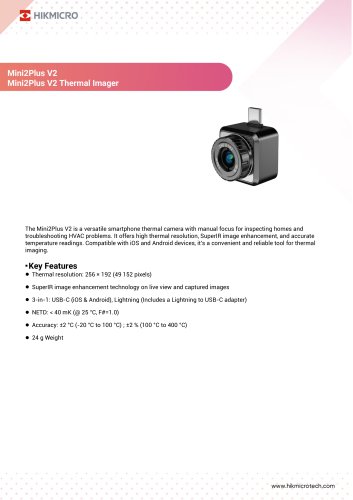
1. Appearance Type-C Interface Type-C Interface Focus Ring Thermal Lens Thermal Lens Type-C Interface Focus Ring Thermal Lens
Open the catalog to page 5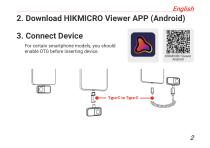
2. Download HIKMICRO Viewer APP (Android) 3. Connect Device For certain smartphone models, you should enable OTG before inserting device.
Open the catalog to page 6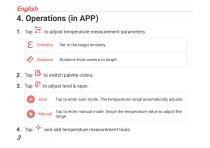
^ Distance Distance from camera to target. Auto Tap to enter auto mode. The temperature range automatically adjusts. Manual ^aP t0 enter manual mode. Swipe the temperature value to adjust the
Open the catalog to page 7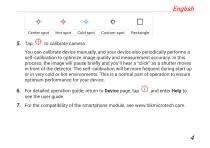
Center spot Hot spot Cold spot Custom spot Rectangle You can calibrate device manually, and your device also periodically performs a self-calibration to optimize image quality and measurement accuracy. In this process, the image will pause briefly and you'll hear a “click” as a shutter moves in front of the detector. The self-calibration will be more frequent during start up or in very cold or hot environments. This is a normal part of operation to ensure optimum performance for your device. 6. For detailed operation guide, return to Device page, tap © and enter Help to see the user guide. 7....
Open the catalog to page 8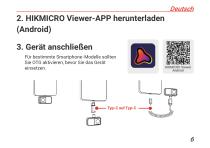
2. HIKMICRO Viewer-APP herunterladen (Android) 3. Gerät anschließ en Fü r bestimmte Smartphone-Modelle sollten Sie OTG aktivieren, bevor Sie das Gerä t einsetzen.
Open the catalog to page 10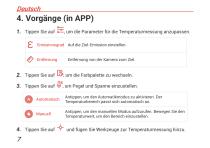
, um die Parameter fü r die Temperaturmessung anzupassen. Emissionsgrad Auf die Ziel-Emission einstellen. Entfernung , um Pegel und Spanne einzustellen. Antippen, um den Automatikmodus zu aktivieren. Der Temperaturbereich passt sich automatisch an. Antippen, um den manuellen Modus aufzurufen. Bewegen Sie den Temperaturwert, um den Bereich einzustellen. Entfernung von der Kamera zum Ziel. und fü gen Sie Werkzeuge zur Temperaturmessung hinzu.
Open the catalog to page 11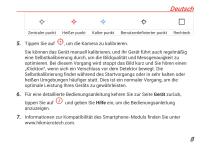
Zentraler punkt Kalter punkt Benutzerdefinierter punkt Sie kö nnen das Gerä t manuell kalibrieren, und Ihr Gerä t fü hrt auch regelmä ß ig eine Selbstkalibrierung durch, um die Bildqualitä t und Messgenauigkeit zu optimieren. Bei diesem Vorgang wird stoppt das Bild kurz und Sie hö ren einen „Klickton“, wenn sich ein Verschluss vor dem Detektor bewegt. Die Selbstkalibrierung findet wä hrend des Startvorgangs oder in sehr kalten oder heiß en Umgebungen hä ufiger statt. Dies ist ein normaler Vorgang, um die optimale Leistung Ihres Gerä ts zu gewä hrleisten. Fü r eine detaillierte Bedienungsanleitung...
Open the catalog to page 12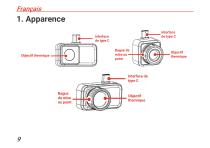
1. Apparence Interface de type C Bague de mise au point Objectif thermique Interface de type C Bague de mise au point Objectif thermique Objectif thermique
Open the catalog to page 13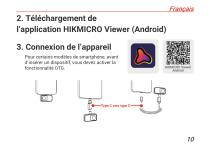
2. Téléchargement de l’application HIKMICRO Viewer (Android) 3. Connexion de l’appareil Pour certains modè les de smartphone, avant d’insérer un dispositif, vous devez activer la fonctionnalité OTG.
Open the catalog to page 14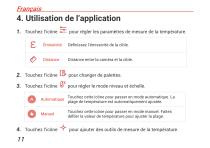
4. Utilisation de l’application Touchez l’icône É missivité Définissez l’émissivité de la cible. Distance entre la camé ra et la cible. Touchez l’icône pour changer de palettes. Touchez l’icône pour ré gler le mode niveau et é chelle. Touchez cette icô ne pour passer en mode automatique. La plage de tempé rature est automatiquement ajusté e. Touchez cette icô ne pour passer en mode manuel. Faites dé filer la valeur de tempé rature pour ajuster la plage. Touchez l’icône pour ré gler les paramè tres de mesure de la tempé rature. pour ajouter des outil
Open the catalog to page 15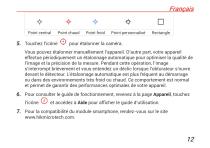
Point central Touchez l’icône Point chaud Point froid Point personnalisé pour é talonner la camé ra. Vous pouvez étalonner manuellement l’appareil. D’autre part, votre appareil effectue pé riodiquement un é talonnage automatique pour optimiser la qualité de l’image et la précision de la mesure. Pendant cette opération, l’image s’interrompt brièvement et vous entendez un déclic lorsque l’obturateur s’ouvre devant le détecteur. L’étalonnage automatique est plus fréquent au démarrage ou dans des environnements trè s froid ou chaud. Ce comportement est normal et permet de garantir des performances...
Open the catalog to page 16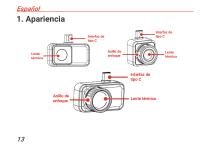
1. Apariencia Interfaz de tipo C Lente térmica Lente térmica Lente térmic
Open the catalog to page 17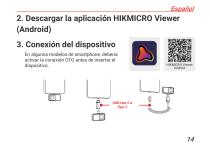
2. Descargar la aplicació n HIKMICRO Viewer (Android) 3. Conexió n del dispositivo En algunos modelos de smartphone, debería activar la conexió n OTG antes de insertar el dispositivo.
Open the catalog to page 18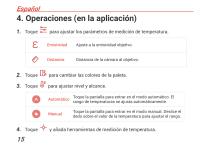
4. Operaciones (en la aplicació n) Toque Ajuste a la emisividad objetivo. Distancia de la cá mara al objetivo. para cambiar las colores de la paleta. para ajustar nivel y alcance. para ajustar los pará metros de medició n de temperatura. Automá tico Toque la pantalla para entrar en el modo automá tico. El rango de temperaturas se ajusta automá ticamente. Toque la pantalla para entrar en el modo manual. Deslice el dedo sobre el valor de la temperatura para ajustar el rango. y añ ada herramientas de medició n de tempe
Open the catalog to page 19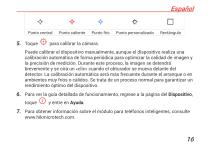
Punto central Punto caliente Punto frío Punto personalizado para calibrar la cá mara. Puede calibrar el dispositivo manualmente, aunque el dispositivo realiza una calibració n automá tica de forma perió dica para optimizar la calidad de imagen y la precisió n de medició n. Durante este proceso, la imagen se detendrá brevemente y se oirá un « clic» cuando el obturador se mueva delante del detector. La calibració n automá tica será má s frecuente durante el arranque o en ambientes muy fríos o cá lidos. Se trata de un proceso normal para garantizar un rendimiento ó ptimo del dispositivo. Para ver...
Open the catalog to page 20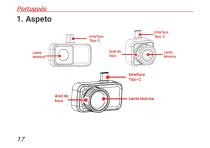
1. Aspeto Interface Tipo-C Interface Tipo-C Lente térmica Lente térmica Interface Tipo-C Lente térmic
Open the catalog to page 21