Pocket series

Pocket series
Catalog excerpts

Pocket Thermal Camera | Quick Start Guide
Open the catalog to page 1
Charge for 3h with supplied cable Q > Charge for > 30mins with supplied cable while device is off
Open the catalog to page 2
English Pocket Thermal Camera Deutsch Pocket-Wärmebildkamera Taskukokoinen lämpökamera Čeština Kapesní termokamera Termisk kamera i lommeformat Italiano Termocamera tascabile Português Câmara térmica portátil Termisk lommekamera Norsk Español Cámara térmica de bolsillo Français Caméra thermique de poche Thermische pocketcamera Карманная тепловизионная камера Slovenčina Vrecková termografická kamera Polski Kieszonkowa kamera termowizyjna M
Open the catalog to page 3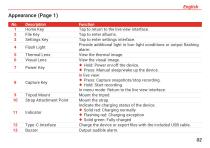
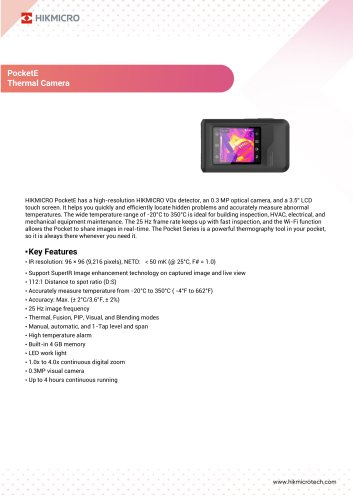
10 Strap Attachment Point Tap to return to the live view interface. Tap to enter settings interface. Provide additional light in low-light conditions or output flashing alarm. View the thermal image. View the visual image. ♦ Hold: Power on/off the device. ♦ Press: Manual sleep/wake up the device. ♦ Press: Capture snapshots/stop recording. ♦ Hold: Start recording. In menu mode: Return to the live view interface. Indicate the charging status of the device. ♦ Solid red: Charging normally ♦ Flashing red: Charging exception ♦ Solid green: Fully charged Charge the device orexportfiles with the included...
Open the catalog to page 5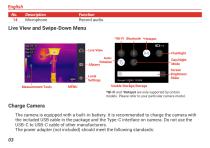
Description Microphone Function Record audio. Live View and Swipe-Down Menu *Wi-Fi Bluetooth *Hotspot Live View AutoRotation Albums Screen Brightness Slider Local Settings Measurement Tools Day/Night Mode Usable Storage/Storage *Wi-Fi and *Hotspot are only supported by certain models. Please refer to your particular camera model. Charge Camera The camera is equipped with a built-in battery. It is recommended to charge the camera with the included USB cable in the package and the Type-C interface on camera. Do not use the USB-C to USB-C cable of other manufacturers. The power adapter (not included)...
Open the catalog to page 6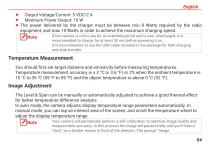
♦ Minimum Power Output: 10 W ♦ The power delivered by the charger must be between min 8 Watts required by the radio equipment, and max 10 Watts in order to achieve the maximum charging speed. I /INote If the camera is not in use for an extended period and is over-discharged, it is —1 recommended to charge for at least 30 min before powering it on. It is recommended to use the USB cable included in the package for both charging and data transfer. You should first set target distance and emissivity before measuring temperatures. Temperature measurement accuracy is ± 2 °C (± 3.6 °F) or 2% when the...
Open the catalog to page 7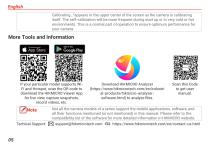
Calibrating..."appears in the upper center of the screen as the camera is calibrating itself. The self-calibration will be more frequent during start up or in very cold or hot environments. This is a normal part ofoperation to ensure optimum performance for your camera. Scan this Code If your particular model supports Wi- Download HIKMICRO Analyzer Fi and Hotspot, scan the QR code to (https://www.hikmicrotech.com/en/industri download the HIKMICRO Viewer App al-products/hikmicro-analyzer- for live view, capture snapshots, software.html) to analyze files. n^Note Not ^e camera models of a series...
Open the catalog to page 8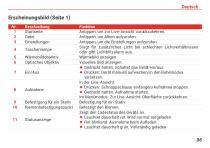
Beschreibung Startseite Datei Einstellungen Wärmebildobjektiv Optisches Objektiv Befestigung für ein Stativ Riemenbefestigungspunkt Funktion Antippen, um zur Live-Ansicht zurückzukehren. Antippen, um Alben aufzurufen. Antippen, um die Einstellungen aufzurufen. Sorgt für zusätzliches Licht bei schlechten Lichtverhältnissen oder gibt Lichtblitzalarm aus. Wärmebild anzeigen. Visuelles Bild anzeigen. � Gedrückt halten: Schaltet das Gerät ein/aus. � Drücken: Gerät manuell aufwecken/in den Ruhemodus versetzen. In der Live-Ansicht: � Drücken: Schnappschüsse einfangen/Aufnahme stoppen. � Gedrückt halten:...
Open the catalog to page 9
Summer Mikrofon Funktion Zum Aufladen des Geräts oder zum Exportieren von Dateien mit dem mitgelieferten USB-Kabel. Akustischen Alarm ausgeben. Audio aufnehmen. Live-Ansicht und Nach-unten-wischen-Menü *WLAN Bluetooth *Hotspot Live-Ansicht Automatische Drehung Alben Lokale Einstellungen Messwerkzeuge Tag/Nachtmodus Schieberegler für Helligkeit Verwendbarer Speicher/Speicher *WLAN und *Hotspot werden nur von bestimmten Modellen unterstützt. Orientieren Sie sich bitte am jeweiligen Kameramodell. Kamera aufladen Die Kamera verfügt über einen eingebauten Akku. Es wird empfohlen, die Kamera über da...
Open the catalog to page 10
Deutsch mitgelieferte USB-Kabel und die Type-C-Schnittstelle an der Kamera aufzuladen. Verwenden Sie kein USB-C-auf-USB-C-Kabel anderer Hersteller. Das Netzteil (nicht im Lieferumfang enthalten) sollte die folgenden Standards erfüllen: � Ausgangsspannung/-strom: 5 VDC/2 A � Mindestausgangsleistung: 10 W Wenn die Kamera längere Zeit nicht benutzt wird und zu stark entladen ist, wird empfohlen, sie mindestens 30 Minuten lang aufzuladen, bevor sie wieder eingeschaltet wird. Es wird empfohlen, das im Lieferumfang enthaltene USB-Kabel sowohl zum Aufladen als auch zur Datenübertragung zu verwenden....
Open the catalog to page 11
Deutsch Bildqualität und Messgenauigkeit zu optimieren. Bei diesem Vorgang wird stoppt das Bild kurz und Sie hören einen „Klickton“, wenn sich ein Verschluss vor dem Detektor bewegt. Die Aufforderung „Bild wird kalibriert …“ erscheint in der oberen Mitte des Bildschirms, während sich das Gerät selbst kalibriert. Die Selbstkalibrierung findet während des Startvorgangs oder in sehr kalten oder heißen Umgebungen häufiger statt. Dies ist ein normaler Vorgang, um die optimale Leistung Ihrer Kamera zu erzielen. Weitere Werkzeuge und Informationen Wenn Ihr Modell WLAN und Hotspot unterstützt, scannen...
Open the catalog to page 12
Deutsch Funktionen. Weitere Informationen finden Sie in der Kompatibilitätsliste der Software auf der HIKMICRO-Website. Technischer Support: us.html
Open the catalog to page 13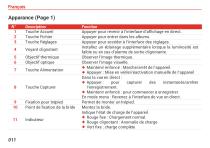
Description Touche Accueil Touche Fichier Touche Réglages Voyant clignotant Objectif thermique Objectif optique Touche Alimentation Touche Capturer Fixation pour trépied Point de fixation de la bride Fonction Appuyer pour revenir à l’interface d’affichage en direct. Appuyer pour entrer dans les albums. Appuyer pour accéder à l’interface des réglages. Installez un éclairage supplémentaire lorsque la luminosité est faible ou en cas d'alarme de sortie clignotante. Observer l’image thermique. Observer l’image visuelle. � Maintenir enfoncé : Marche/arrêt de l’appareil. � Appuyer : Mise en veille/réactivation...
Open the catalog to page 14