Electronic Rising Plate Meter
1 /8Pages

Electronic Rising Plate Meter
1 /8Pages
Catalog excerpts

For your convenience the following are the current equations promoted by Dexcel since May 2001 Please refer to Page 8 of this booklet on how to alter and select the appropriate equation. Equations may change without notice and are influenced by seasonal differences. If you are unsure of the current equation contact Dexcel. There are also different equations suited to summer wet and irrigated pasture which are not recorded here. FARMWORKS Precision Farming Systems Technical Support Email: [email protected] FARMWORKS TOOLS FOR MAXIMUM GROWTH Electronic Rising Plate Meter Instruction Manual
Open the catalog to page 1
Should you require further information please contact: FARMWORKS Precision Farming Systems 8 Manchester Square PO Box 433, Feilding 5600 New Zealand Tel: +64 (0)6 323 9059 Fax: +64 (0)6 323 1371 Email: [email protected] www.farmworkspfs.co.nz FARMWORKS Precision Farming Systems -Technical Support Email: [email protected] Tel: 0900 55512 FarmWorks Plate Meter 11. Warranty Your Electronic Counter has a six month warranty from date of purchase. In the unlikely event your counter fails to operate as it should, please return it to FarmWorks with an accompanying note explaining what...
Open the catalog to page 2
Today DEXCEL are promoting a new range of equations to more accurately reflect the changes in the growth stages of the pasture. There may be some modifications to these equations depending on the season and the influences of management practices.eg irrigation. Check with your DEXCEL or other consultant consultant for the latest equations. At the time of printing the current equations are reported on the back cover of this booklet b. Ensure you are using the correct technique (see page 10) 3. The height reading does not equal the distance the shaft drops down That is correct. The height the meter...
Open the catalog to page 3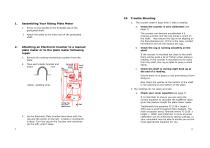
Assembling Your Rising Plate Meter 1. Screw on the handle to the threaded top of the graduated shaft. The counter doesn’t beep when I take a reading a. The counter can become uncalibrated if it receives a knock and the cog jumps a notch on the shaft. Also ensure the cog is not slipping on the blue/stainless pin. If this is the case, contact FarmWorks and we will replace the cog. 2. Attach the plate to the lower end of the graduated shaft. Attaching an Electronic Counter to a manual plate meter or to the plate meter following repair 1. Take each plastic bracket and insert the Check the cog is...
Open the catalog to page 4
Make sure the plate is fully closed to the bottom end of the shaft. If you have difficulty keeping the plate closed, bind some tape around the top of the shaft and the rack. Place the shaft onto the back of the Electronic Counter, fitting the Cog into the slit of the shaft. The Cog should be situated mid-way in the slit. Hold the Plate Meter with the plate to the right and the mechanical counter bracket pointing up (if you have one). The slit in the shaft where the cog fits should face toward you. Place the plastic brackets onto the shaft, aligning the holes in the brackets with the holes on...
Open the catalog to page 5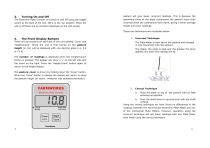
pasture will give lower, incorrect readings. This is because the The Electronic Plate Counter is turned on and off using the toggle downward force of the plate compresses the pasture more than switch at the back of the unit. Off is in the ‘up’ position. When the occurred when the calibrations were down, giving a lower average unit is off there are no numbers displayed on the LCD screen. height and cover readings. These two techniques are illustrated below. The Front Display Buttons There are two buttons on the front of the unit labeled ‘Cover’ and Incorrect Technique The Plate Meter is held above...
Open the catalog to page 6
7. Replacing the Battery. The Electronic Counter is powered by a single 9v battery. The use of an Alkaline battery is recommended though a standard heavy duty battery (costing much less) will still work well. An Alkaline battery used should give 40-50 hours continuous use. A NiCad rechargeable battery may also be used. Before you replace the battery make sure the unit is turned off. Remove the counter from the black tube and loosen the screw in the middle of the back of the counter. Remove the battery retainer clip from the bottom of the counter. Remove the battery and take off the leads. Press...
Open the catalog to page 7
stored in each memory bank. You will know to change the memory bank because the unit will start giving very incorrect readings. Enter your Cover Equation. To enter your own cover equation: a. To change the memory bank: a. The ‘add’ number is 4 digits long and can range from 0 to 9999. The first digit will be blinking. Press the ‘Height/Count’ button to change this digit to a value between 0 and 9. When it is correct press the ‘Cover’ button. The next digit will blink. Repeat this process until the display changes to the ‘multiply’ number. Hold down both buttons while turning the unit on. When...
Open the catalog to page 8All Jenquip catalogs and technical brochures
 Electronic Platemeter Model EC09
12 Pages
 Jenquip
29 Pages
