- Catalogs
- Logosol AB
- Big Mill System
Big Mill System
1 /52Pages

Big Mill System
1 /52Pages
Catalog excerpts

Read this manual before starting to use this equipment. This manual contains safety instructions. Warning! Failure to follow the instructions can cause serious injury.
Open the catalog to page 1
Big Mill System Welcome to Logosol! We are pleased that you have placed your trust in us by choosing the Timberjig, and we promise to do our best to satisfy your expectations. Logosol began production of our flagship product, the Logosol Sawmill, in 1988. Since then we have delivered more than 15,000 sawmills to satisfied customers around the world. The first Timberjig was delivered in 1990. So far, every owner of a Timberjig we have talked to has been delighted with this simple, but functional, equipment. Many customers have, however, looked for a product that is a little more outfitted than...
Open the catalog to page 3
Information about this manual Whenever this symbol appears, a tip follows that will simplify or improve the results. LOGOSOL is constantly developing its products. For that reason we reserve the right to make changes in the design and construction of our products. Text: Mattias Byström Translation: Anna Olsgren Byström Illustrations: Mattias Byström First edition: 2003-04-08 Latest revision: 2009-09-03 Copyright 2003 LOGOSOL, Härnösand, Sweden Manual, Article No: 9999-000-9999 Timberjig directions used in this manua
Open the catalog to page 4
Table of Contents Subject: Safety Instructions Wooden Aids Work Site Wooden Aids Wooden Aids Work Site Guide Rail Supports Height Setting Guide Rail Extension Sawing Long Logs Safety Instructions Guide Rails Supports EXT Big Mill PRO Double Guide Rails Oversized Logs Demands for Sawing Precision Troubleshooting / Tips Stationary Sawmill Upgrading: Logosol Sawmill Seasoning Timber Cutting Equipment Manufacturer Declaration
Open the catalog to page 5
Safety Instructions, 2 pages “WARNING!“ Pay extra attention when this symbol appears in the text. For your own safety, do not begin working with the Timberjig before having read and understood the entire manual. Also read the manual and safety instruction for the chainsaw you are using. Incorrect use of the Timberjig can cause life-threatening injuries. Cutting tools: Never place your hands or tools past the scale bail while the chain saw is running. Use protective gloves when operating the Timberjig. Risk of cutting injuries when handling the saw chain. The cutting equipment can be hot immediately...
Open the catalog to page 6
When using a petrol-driven chainsaw: Fire danger! Turn the motor off before filling with petrol. Petrol is extremely flammable. Burn injuries can be life-threatening. If you spill fuel, clean the area immediately. If you get fuel on your clothing, change at once. Tighten the petrol tank cover to minimize the risk of its vibrating loose during operation. Starting the chainsaw mounted on the Timberjig. Read the manual and safety instructions for the chainsaw. Contact the chainsaw manufacturer if any of the information is not clear or understood. The chainsaw may not be started on the guide rail....
Open the catalog to page 7
1. Assembling the Timberjig (A) Fit two plastic rollers to the underside of the side plate. The rollers are adjustable inwards and outwards. Position them so that their edges are in line with the outer edge of the side plate. (2x M6x16 screws, 2x M6 washers, 2x M6x18 special nuts.) (B) Fit the inner plastic rollers in the bottom plate tracks. These rollers should not rotate. (2x M6x14 screws, 2x M6 washers, 2x M6x12 special nuts.) (C) Insert the star knobs through the hexagonal holes in the dimension lock and screw on the collar nuts, with the collar towards the dimension lock, approximately...
Open the catalog to page 8
Timberjig components: The quantities indicated are included in the basic Timberjig kit. Component Quantity Article no. Assembly angle iron 8 4900-001-0030 Wood screw 20 mm 48 9999-000-9999 Manual 1 0458-395-0140 Logosol nut M8 2 4510-723-3402 Washer 11x28x2 2 9291-021-0180 All articles in this manual can be ordered from Logosol. Build a unit that perfectly suits your needs by using original components.
Open the catalog to page 9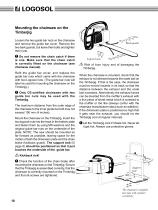
Mounting the chainsaw on the Timberjig Loosen the two guide bar nuts on the chainsaw and remove the guide bar cover. Remove the two bark guards, but leave their bolts and tighten their nuts. Do not remove the chain catch if there is one. Make sure that the chain catch is correctly fitted on the chainsaw (see chainsaw manual). Refit the guide bar cover, and replace the guide bar nuts which came with the chainsaw with two Logosol nuts. (The guide bar nuts will later be used for mounting the chainsaw on the Timberjig.) Only CE-certified chainsaws with two guide bar nuts may be used with the Timberjig....
Open the catalog to page 10
2. Preparations – Timberjig Wooden Aids Sawing with the Timberjig requires certain preparations. Building a straight, wooden guide rail. The idea behind the Timberjig design was to create a fully functioning sawmill at a reasonable price. As the basic unit of the Big Mill System, the Timberjig is designed to be easily expanded and work together withother components. Make a straight guide rail out of two, preferably planed, boards, ca 22 mm thick (1 inch) and 120-150 mm wide (5-6 inches). The guide rail should be 40 cm longer than the logs you plan to saw. Do not make the guide rail longer than...
Open the catalog to page 11
The Work Site – Wooden Aids Sawing – Wooden Aids Prepare your work site on a clear and level ground. The easiest way to support a log that you are about to saw is to place it across two parallel, smooth, and level logs. The height of your support logs should not exceed 50 cm (20 inches). If logs are used as a work bench, remember to keep them from rolling by using e.g. wedges. Make sure you do not saw on an upward slope. It is better that the log bed is somewhat higher on the side you start sawing on, in order to ensure that you saw slightly downwards. Screw a 30 mm (1 1/8 inch) wood block on...
Open the catalog to page 12
7. Fasten the log securely, paying special attention that it will not move when the Timberjig is mounted on the guide rail. This is a prerequisite for smooth and safe sawing. One method is to screw a board into the log end, making sure that it makes contact with the ground. Tip risk. Check that the log is fastened well. Use at least two wood screws, 4x80 mm (1/4”x3 1/8”) or larger. An alternative is a log clamp (art. no. 4900-001-0400) for fastening the log. Setting the wooden guide rail. Do not start your chainsaw until you have read and understood both the chainsaw and the Timberjig manual....
Open the catalog to page 13All Logosol AB catalogs and technical brochures
 B1001 HYDRAULIC
64 Pages
 B751 PRO BAND SAWMILL
92 Pages
 F2+ CHAIN SAWMILL
52 Pages
 Product Catalog 2022
68 Pages
 F2 Chain sawmill
16 Pages
 Multi-Head Planer/Moulders
40 Pages
 product_catalogue
96 Pages
 big_mill_system_manual
52 Pages
 moulding_catalogue
92 Pages
 b1001
b100192 Pages
