
- Catalogs
- NP STRUCTURES
- EasyBuild


EasyBuild

EasyBuild
This document provides comprehensive assembly instructions for the EasyBuild Polytunnel by Northern Polytunnels. It includes necessary tools, safety warnings, and a detailed step-by-step guide for construction.
Essential tools include a spade, wire cutters, string, spirit level, tape measure, Stanley knife, scissors, ladders, drill, spanners, hammer, marking sticks, and specific drill bits.
Instructions for setting up foundations using string lines and markers are provided, emphasizing the importance of checking alignment and measurements for hoop spacing and diagonal lengths.
Guidance on installing base rails using spirit levels and spanners is given, highlighting the need for a level base rail, especially if side ventilation is installed.
Details on assembling hoops and ridge bars are included, specifying the use of specific bolts and nuts, and the importance of aligning etched ends.
Instructions for installing corner braces to ensure structural stability are provided, including leveling the polytunnel using end hoops.
Detailed instructions for assembling door frames, both top and bottom, with measurements and alignment checks for single and double doors.
Guidance on installing gable end base rails with emphasis on using the correct tools and hardware.
Details on optional brace bars and side ventilation installation, including necessary components.
Instructions on applying the polythene cover, using anti-hot spot tape and wiggle wire, stressing the importance of maintaining tension and proper alignment.
Further instructions on side ventilation installation, including the use of curtain tubes and spring hooks.
A reminder to check all alignments and tighten all components to ensure the structural integrity of the polytunnel.
The document provides detailed instructions for assembling and installing a polytunnel using the trenched fixing method, as well as guidance on fitting sliding and PVC doors.
Outlines materials and tools needed, including anti-hot spot tape, wiggle wire, polythene cover, and various hand tools. Specifies a 25cm trench for securing the polythene cover.
- Covering (Trenched Fixing Method): Involves digging a trench, placing anti-hot spot tape on hoops, unrolling and positioning the polythene, and securing it with wiggle wire.
- Sliding Door Installation: Includes laying out parts, inserting brush strips, and assembling the door frame using nuts and bolts.
- PVC Door Installation: Involves positioning the PVC door, ensuring adequate material coverage, and securing it with wiggle wire.
Advises against installation in winds exceeding 15mph and suggests using a net panel for increased ventilation.
Includes contact information for Northern Polytunnels and invites feedback on the EasyBuild product, offering a video guide for visual instructions.
Catalog excerpts

Assembly Instructions Watch Video
Open the catalog to page 1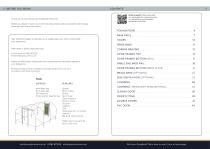
Thank you for purchasing your EasyBuild Polytunnel Before you begin to build, we recommend ensuring all parts are present and having a thorough read of the instructions. 4mm allen key 5mm allen key Tex screw bit Screw anchor insertion bar / \ Your health and saftey is important to us, please take care when constructing your polytunnel. Need help or advice along the way? Call our team on 01282 873120 Email [email protected] Failure to follow these instructions may compromise the structural integrity of your polytunnel. NP Structures ltd accepts no liability for damage resulting from use...
Open the catalog to page 2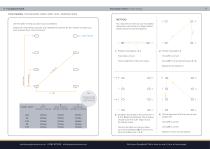
FOUNDATIONS ( CONTINUED) 4 FOUNDATIONS TOOLS NEEDED: TAPE MEASURE, STRING, SPIRIT LEVEL, MARKERS/CANES METHOD: Diagram for illustrative purposes only, reapeat the process for the number of hoops you have ordered (1 per 1.5m increment) N You may wish to mark out your foundation placement with markers or stakes before positioning the actual foundations. Use this table to help you place your foundations Check alignment of the two hoops Check B is correct (should equal B x2) Note All measurements are taken from the centre of the tube TUNNEL WIDTH A B H WIDTH HOOP SPACING DIAGONAL CENTRE TO CENTRE...
Open the catalog to page 3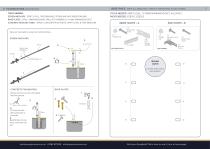
BASE RAILS (SKIP ALL BASE RAIL STEPS IF TRENCHING YOUR COVER) 6 FOUNDATIONS ( CONTINUED) TOOLS NEEDED: SCREW ANCHORS - SPIRIT LEVEL, TAPE MEASURE, SCREW ANCHOR INSERTION BAR BASE PLATES - DRILL, 10MM MASONARY DRILL BIT, HAMMER & 1 X 13MM SPANNER/SOCKET CONCRETE GROUND TUBES - SPADE, CONCRETE/POSTCRETE, SPIRIT LEVEL & TAPE MEASURE TOOLS NEEDED: SPIRIT LEVEL, 1 X 13MM SPANNER/SOCKET, ALLEN KEY PACKS NEEDED: EZB203, EZB202 Set your foundations using the method below. 4X Flanged nuts SCREW ANCHORS 1X Button head 20mm 1X Base rail Corner BASE PLATES CONCRETE FOUNDATION Screw anchors can be concreted...
Open the catalog to page 4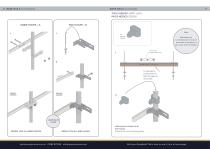
8 BASE RAILS (CONTINUED) BASE RAILS CONTINUED TOOLS NEEDED: SPIRIT LEVEL PACKS NEEDED: EZB200 Maintaining a Level baserail is only of particular importance if you have side ventilation Once level, Tighten base rails To maintain a Level base rail, back fill gaps as necessary FINISHED ASSEMBLY FINISHED ASSEMBLY LEAVE BOLTS LOOSE REPEAT FOR ALL INNER HOOPS Add keyhole clamps to all End hoops (Used to fix corner bracing later) Built your EasyBuild? We’d love to see it (turn to back page
Open the catalog to page 5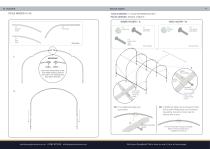
RIDGE BARS TOOLS NEEDED: NONE TOOLS NEEDED: 1 X 13MM SPANNER/SOCKET PACKS NEEDED: EZB201, EZB200 INNER HOOPS = A 1X Swaged Hoop 2X button head bolts 45mm Ensure the etched ends of the two middle sections meet at the centre. The etchings may face either direction. INSIDE POLYTUNNEL HOOP JOINT OUTSIDE POLYTUNNEL Use button head bolts inside the tunnel Use cup square bolts on the outside of the tunnel 3B. If addtional ridge bars purchased, install at this point. Ridge bars can be placed Anywhere, but some holes may be shared with a door. 3A. If no additional ridge bars purchased: REPEAT ON EACH...
Open the catalog to page 6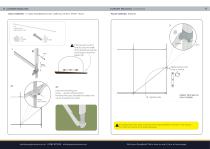
CORNER BRACING CONTINUED TOOLS NEEDED: 1 X 13MM SPANNER/SOCKET, 4MM ALLEN KEY, SPIRIT LEVEL 4X Corner brace 1.85m hole to hole 4X 35mm Button head bolts If the ground is out of level accross the width of the polytunnel use the end hoops to level the polytunnel. Adjust bracket until hoop is vertical INSIDE POLYTUNNEL If you are trenching your Cover - use the exhaust clamp Provided with your foundation to attach the corner bracket to the hoop REPEAT PROCESS ON EACH CORNER If installing side vents, insert a bolt into every hoop/foundation connection. This ensures the hoops are secure as the build...
Open the catalog to page 7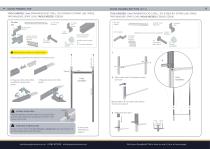
DOOR FRAMES BOTTOM (SOIL) TOOLS NEEDED: 13MM SPANNER/SOCKET, DRILL, TEK SCREW BIT, STRING LINE, SPADE, TAPE MEASURE, SPIRIT LEVEL PACKS NEEDED: EZB206 TOOLS NEEDED: 13MM SPANNER/SOCKET, DRILL, TEK SCREW BIT, STRING LINE, SPADE, TAPE MEASURE, SPIRIT LEVEL PACKS NEEDED: EZB206, EZB216 2x door frame extension 2x door frame Brackets Door frame profile 2x 2.1m sections 1x 0.8m section (single) Or 1x 1.7m section (double) Assemble door frame on a flat surface. Extension tube 1. Slide cotter assembly and extension onto door post. 2. Squeeze door post profile and attach bracket over profile. 2x door...
Open the catalog to page 8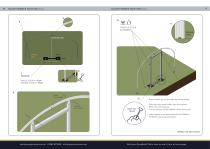
DOOR FRAMES BOTTOM (SOIL) DOOR FRAMES BOTTOM (SOIL) 11. CHECK LEVELS & ALIGNMENT GROUND LEVEL CENTER LINE STRING LINE MEASURE SINGLE DOOR X = 85CM DOUBLE DOOR X = 175CM OUTSIDE POLYTUNNEL BACK FILL HOLES If door posts do not fit under the hoop, either: Drop the door post further into the ground Raise the end hoop up Cut any excess off the bottom of the door post Lintel height is recommended to be 1,945mm 2,000mm above ground level. REPEAT FOR EACH DOOR Built your EasyBuild? We’d love to see it (turn to back page
Open the catalog to page 9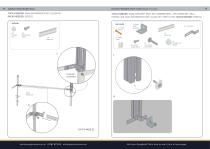
GABLE END BASE RAIL DOOR FRAMES BOTTOM (BASE PLATE) TOOLS NEEDED: 13MM SPANNER/SOCKET, ALLEN KEY PACKS NEEDED: EZB202 TOOLS NEEDED: 10MM MASONRY DRILL BIT, HAMMER DRILL, TEK SCREW BIT, DRILL, STRING LINE, 13MM SPANNER/SOCKET, ALLEN KEY, SPIRIT LEVEL PACKS NEEDED: EZB220 PER DOOR 2x sleeve Anchor 2x base plate Brackets 2x Base rails 2x single cotter FINISHED ASSEMBLY Inside Polytunnel Built your EasyBuild? We’d love to see it (turn to back page
Open the catalog to page 10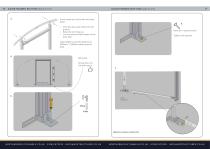
DOOR FRAMES BOTTOM (BASE PLATE) DOOR FRAMES BOTTOM (BASE PLATE) If door posts do not fit under the hoop, either: • • • Drop the door post further into the ground Raise the end hoop up Cut any excess off the bottom of the door post 6. Hammer in sleeve anchor Tighten with spanner Lintel height is recommended to be 1,945mm - 2,000mm above ground level. String line Check door is in line with hoops 80CM SINGLE DOOR 170CM DOUBLE DOOR Inside Polytunnel REPEAT AT EACH DOOR POST
Open the catalog to page 11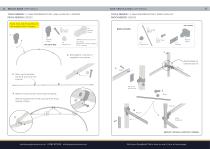
BRACE BARS (OPTIONAL) SIDE VENTILATION (OPTIONAL) TOOLS NEEDED: 1 X 13MM SPANNER/SOCKET, 4MM ALLEN KEY, LADDERS PACKS NEEDED: EZB220 Note: 2.5m and 3m tunnels are not supplied with V hangers TOOLS NEEDED: 1 X 13MM SPANNER/SOCKET, 4MM ALLEN KEY PACKS NEEDED: EZB204 7X Button head bolts 35mm Crop bar(s) (Dependent on width supplied as 1 or 2 pieces) 2. Bolt together crop bars, if supplied in two peices Add brackets to bottom base rail 2. 3. Open up the keyhole clamps & push over the crop bar 90cm from the base rail 4. Bolt the crop bar to the lower keyhole clamps Bolt the support bars to the crop...
Open the catalog to page 12All NP STRUCTURES catalogs and technical brochures
 EnviroPro
31 Pages
- Greenhouse
- Shelter
- Livestock pen
- Plastic film
- Calf pen
- Tunnel type greenhouse
- Venlo greenhouse
- Color film
- Greenhouse film
- Outdoor hutch
- Group coop
- Multi span greenhouse
- Greenhouse with gutter
- Gardening greenhouse
- White film
- Polyethylene film
- Greenhouse with steel framework
- Transparent film
- Steel hutch
- Aluminum frame greenhouse