
- Catalogs
- NP STRUCTURES
- EnviroPro


EnviroPro

EnviroPro
The document provides comprehensive assembly instructions for the EnviroPro Single Span polytunnel, including necessary tools, safety precautions, and a liability disclaimer for improper assembly.
A list of essential tools such as stakes, spirit level, spade, tape measure, and various hand tools is provided.
Emphasizes the importance of adhering to instructions to ensure structural integrity and safety.
Includes a detailed list of components like hex nuts, bolts, and brackets with their respective codes and descriptions.
- Planning Foundations: Select a level site, avoid stony ground, and maintain at least 1 meter of working space around the structure.
- Foundation Measurements: Use diagrams and measurements for accurate layout.
- Installing Base Plate Foundations: Instructions for positioning and securing base plates with anchor bolts.
- Installing Concrete Foundations: Steps for digging holes, pouring concrete, and setting ground tubes.
Describes the use of steel box profiles in construction and the importance of familiarization to avoid confusion.
- Base Rails: Instructions for assembling and positioning base rails using brackets and cotters.
- Hoop Assembly: Steps for assembling hoops and installing ridge bars.
Details on configuring and fitting brace bars and gable end frames, including installing lintel brace bars.
Instructions for configuring and installing crop bars with various hanger configurations.
Guidance on installing side rails and curtains, including manual and motorized winders.
Instructions for applying anti-hot spot tape, preparing polythene, and covering the polytunnel using wiggle wire.
Emphasizes the importance of following each step carefully to ensure the structural integrity and functionality of the polytunnel.
Focuses on maintaining structural integrity and ensuring proper installation of components such as hoops, ridge bars, brace bars, gable ends, and side rails.
Ensure the base rail is level, crucial for side ventilation. Backfill gaps as necessary to maintain ground level.
Assemble each hoop by slotting together five pieces and securing with M8 nuts and bolts. Different configurations are provided for tunnels ranging from 5 to 9 meters in width.
Start at the front hoop, attaching the first ridge bar piece with nuts and bolts. Connect subsequent ridge tube lengths for each inner hoop, trimming the final ridge tube at the rear hoop.
Raise two outer hoops for tensioning the cover. Attach brace bars using keyhole brackets and ensure all hoops are vertical before tightening.
Assemble lintels and attach to hoops. Specific configurations are provided for different tunnel widths, with instructions on fitting door posts and side rails.
Assemble side rail brackets and attach to hoops. Install curtains by attaching keder profiles and feeding PVC curtains into the profiles.
Fabrication dimensions should adhere to specified tolerances, ensuring all machined surfaces are square and parallel.
Follow the detailed steps and configurations provided for successful assembly of polytunnels, ensuring all components are securely fastened and aligned.
Catalog excerpts

Single Span Assembly Instructions
Open the catalog to page 1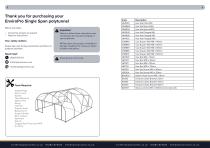
• Check that all parts are present Your safety matters Please take care during construction and follow all guidance provided. [email protected] northernpolytunnels.co.uk Important Failure to follow these instructions may compromise the structural integrity of your polytunnel. NP Structures Ltd accepts no liability for damage resulting from misuse or failure to follow instructions. Tools Required Stakes/Pegs Spirit Level Spade Tape Measure Marker Pen String Hammer Stanley Knife Battery Drill Angle Grinder Wire Cutters Spanners Gloves Goggle/Eye Protection/PPE G-clamp
Open the catalog to page 2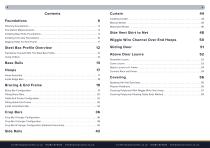
Steel Box Profile Overview 12 Side Vent Skirt to Net 48 Wiggle Wire Channel Over End Hoops 50 Above Door Louvre 52 northernpolytunnels.co.uk • 01282 873120 • [email protected] northernpolytunnels.co.uk • 01282 873120 • [email protected]
Open the catalog to page 3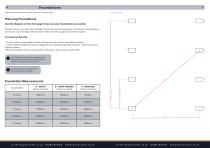
Tools needed: tape measure, string, spirit level, markers/canes Choose a level, even site where possible. Avoid stony ground, especially if trenching in the polythene, as this may cause damage. Allow at least 1 metre of working space around the structure. • Use string (thin polypropylene twine) and pegs to plan out your foundation positions • Use the table provided to check the diagonal and hoop spacing measurements — this ensures your layout is square. • Mark the stringline at each hoop position and place a ground tube at each mark. The diagram is for illustrative purposes only. Repeat the layout...
Open the catalog to page 4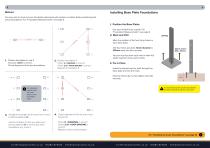
Installing Base Plate Foundations Method You may wish to mark out your foundation placement with markers or stakes before positioning the actual foundations. For “Foundation Measurements” see page 6. 1. Position the Base Plates 6 Drill four holes per plate: 12mm diameter x 100mm deep into the concrete. The stringline should touch the outer edge of your foundation tubes. Use the stringline to help you place your last foundations (N) as well as any other foundations e.g. 3 and 4. 3. Stringline the length of the tunnel from 1 and 2 to last foundations (N). Vacuum out dust from each hole to allow...
Open the catalog to page 5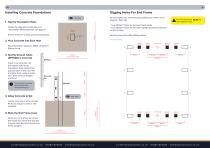
Installing Concrete Foundations Digging Holes For End Frame At each gable end, mark the post positions as shown in the diagram. Then dig: 1. Dig the Foundation Holes Follow the diagram for hole size. For “Foundation Measurements” see page 6. 2. Pour Concrete into Each Hole • Two 300mm² holes for the door frame posts • Two 300mm² holes for the outer upright posts (not required on 5m tunnels) Ensure holes are evenly spaced and aligned. Centre point 500mm Concrete block width Side View Let the concrete cure for at least 48 hours (longer in cold or wet weather). 5. Mark the End Frame Lines Once set,...
Open the catalog to page 6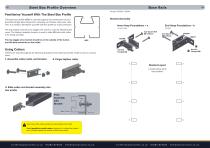
Steel Box Profile Overview Base Rails Pack(s): CSS206, CSS204 Familiarise Yourself With The Steel Box Profile Bracket Assembly This steel box profile (WBP) is used throughout the construction of your EnviroPro Single Span Polytunnel, including end frames, base rails, side rails. It is useful to familiarise yourself with this profile to avoid confusion. Inner Hoop Foundations = a Using Cotters Cotters are used throughout for attaching brackets to the steel box profile. Cotters come REVin various A sizes. 1. MANUFACTURER IS TO ENSURE THAT ANY FABRICATIONS ARE PRODUCED TRUE & SQUARE TO GOOD ENGINEERING...
Open the catalog to page 7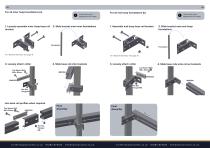
For all inner hoop foundations (a) 1. Loosely assemble inner hoop base rail bracket Leave bolts handtightened at this stage. 2. Slide bracket onto inner foundations Leave bolts handtightened at this stage. 1. Assemble end hoop base rail bracket For “Bracket Assembly” see page 13 2. Slide bracket onto end hoop foundations For “Bracket Assembly” see page 13 3. Loosely attach cotter 4. Slide base rail onto brackets 3. Loosely attach cotter 4. Slide base rails onto corner brackets Cup Square Bolt M8 x 40mm Join base rail profiles when required Cup Square Bolt M8 x 40mm Final Assembly northernpolytunnels.co.uk...
Open the catalog to page 8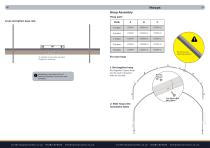
Hoop AssemblyHoop partsLevel and tighten base rails Width For each hoop Maintaining a level base rail is of particular importance if you have side ventilation. 2. Slide hoop onto foundation tubes northernpolytunnels.co.uk • 01282 873120 • [email protected] northernpolytunnels.co.uk • 01282 873120 • [email protected]
Open the catalog to page 9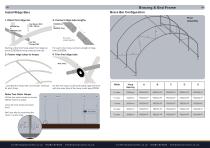
Install Ridge Bars Bracing & End Frame 19Brace Bar Configuration1. Attach first ridge bar 2. Connect ridge tube lengths Starting at the front hoop, attach first ridge bar piece (CSS308) to hoop using nut and bolt. 3. Fasten ridge tubes to hoops For each inner hoop, connect a length of ridge tube (CSS309)... ...and attach to hoop with nut and bolt. Continue for each hoop. On the rear hoop, cut the protruding ridge bar flush with the outer face of the hoop. Insert plug RPP50. northernpolytunnels.co.uk • 01282 873120 • [email protected] northernpolytunnels.co.uk • 01282 873120 • [email protected]...
Open the catalog to page 10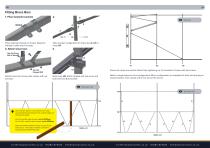
Fitting Brace Bars 1. Place keyhole brackets Place keyhole brackets on hoops. Splay the bracket to slide over the hoop. Note bracket configuration for brace bar A & B on hoop H2. 3. Attach brace bars Attach brace bars to key hole clamps with nut and bolt. Ensure all hoops are vertical before fully tightening up. Fix brackets to hoops with tek screws. Refer to image below for final configuration. Mirror configuration to complete the front end bracing as pictured below. Then repeat at the rear end of the tunnel. Note hoop H3. Attach bracket with tek screw and bolt brace bar A to bracket. Top down...
Open the catalog to page 11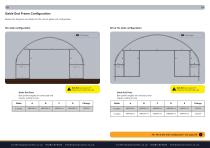
Review the diagrams and tables for the correct gable end configuration. 6m & 7m wide configuration Box profile lengths are oversized and require cutting to size. Box profile lengths are oversized and require cutting to size. northernpolytunnels.co.uk • 01282 873120 • [email protected] northernpolytunnels.co.uk • 01282 873120 • [email protected]
Open the catalog to page 12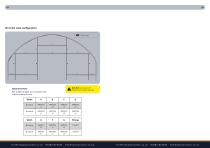
8m & 9m wide configuration Front view Side Rail only required if polytunnel includes side rails. Gable End Parts Box profile lengths are oversized and require cutting to size. Width northernpolytunnels.co.uk · 01282 873120 · info@npstruc tures.co.uk northernpolytunnels.co.uk · 01282 873120 · info@npstruc tures.co.u
Open the catalog to page 13All NP STRUCTURES catalogs and technical brochures
 EasyBuild
23 Pages
- Greenhouse
- Shelter
- Livestock pen
- Plastic film
- Calf pen
- Tunnel type greenhouse
- Venlo greenhouse
- Color film
- Greenhouse film
- Outdoor hutch
- Group coop
- Multi span greenhouse
- Greenhouse with gutter
- Gardening greenhouse
- White film
- Polyethylene film
- Greenhouse with steel framework
- Transparent film
- Steel hutch
- Aluminum frame greenhouse
- VirtualExpo Group
- Our Partners
- Recruitment
- Testimonials