- Catalogs
- Penta TMR Incorporated
- SPREADERS MANUAL
SPREADERS MANUAL

SPREADERS MANUAL
Catalog excerpts

HYDRA-SPREAD OPERATOR’S MANUAL MACHINE INFORMATION HYDRA-SPREAD MODEL SERIAL NUMBER DATE OF PURCHASE DEALER INFORMATION DEALER NAME ADDRESS PHONE NUMBER MANUFACTURED BY Penta Spreaders Inc. 23589 INDUSTRIAL ROAD THAMESVILLE, ONTARIO N0P 2K0 CANADA CONTACT INFORMATION E-MAIL: [email protected] WEBSITE: www.pentaequipment.com PLEASE READ AND UNDERSTAND THIS MANUAL BEFORE OPERATING YOUR HYDRA-SPREAD MANURE SPREADER!
Open the catalog to page 1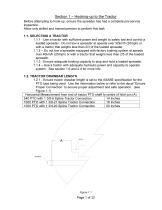
Section 1 - Hooking-up to the Tractor Before attempting to hook-up, ensure the spreader has had a complete pre-service inspection. Allow only skilled and trained persons to perform this task 1.1. SELECTING A TRACTOR 1.1.1 - Use a tractor with sufficient power and weight to safely tow and control a loaded spreader. Do not tow a spreader at speeds over 32km/h (20mph) or with a tractor that weighs less than 2/3 of the loaded spreader. 1.1.2 - Do not tow a spreader equipped with factory braking system at speeds over 40km/h (25mph) or with a tractor that weighs less than 2/5 of the loaded spreader....
Open the catalog to page 4
1.3. TRACTOR LIFT ARMS 1.3.1 Three point hitch arms must be lowered to prevent interference with and damage to the cylinder tower (see figure 1.2) 1.4. HITCH PIN & SAFETY CHAINS 1.4.1 - Use a hitch pin and safety chains with certified rating equal to or greater than the weight of a loaded spreader. 1.5. PTO SHAFT 1.5.1 - Ensure correct PTO shaft (refer to section four – Pre-service Inspection). Using an improper shaft will invalidate your warranty and cause damage to your machine and tractor. 1.5.2 - Connect the PTO shaft to the tractor. Ensure PTO shaft is securely locked onto the tractor shaft....
Open the catalog to page 5
1.7. TEST RUN THE SPREADER 1.7.1 – Remove all persons from the area of the spreader 1.7.2 – Raise and lower the endgate to ensure smooth operation. Leave the endgate in the fully raised position. 1.7.3 – Extend and retract the push-gate. Be sure the endgate is fully raised before extending the push-gate 1.7.4 – Engage the PTO and give the beaters a brief run. 1.8. OPERATING THE SPREADER 1.8.1 – You are now ready to begin using the spreader. Proceed to Section 2 – Operating the Spreader.
Open the catalog to page 6
Section 2 – Operating the Spreader Before attempting to use the spreader, ensure all tractor connections are correct. Allow only skilled and trained persons to operate this equipment. 2.1. OPERATE WITHIN RATED CAPACITY 2.1.1 – Maximum gross operating weight is determined by the lesser of two factors 1) The capability of the towing vehicle 2) The maximum gross weight capacity of the manure spreader, refer to section 5.5 2.1.2 – Be sure the tractor (or other towing vehicle) has adequate power, weight, and braking capacity to safely handle the towed vehicle. !Gross Load is the Combined Weight of...
Open the catalog to page 7
2.4. SEQUENCING VALVE 2.4.1 It is recommended that all machines be equipped with a sequencing valve to ensure that the endgate is always open when the push-off cylinder is in motion. 2.4.2 – Pressure requirements and Flow ability of the sequence valve hydraulic system. Serial 5000 to 5417 – This range of machines has a maximum flow rating of 8 GPM. Minimum pressure required to operate this valve is 2200 psi. Maximum Pressure 3000 psi. Serial 5418 on – This range of machines has a maximum flow rating of 10 GPM. Minimum pressure required to operate this valve is 2200 psi. Maximum Pressure 3000...
Open the catalog to page 8
2.6. CLEANING AND STORAGE 2.6.1 – At the end of each work day, clean any buildup of manure from the machine. 2.6.2 – On horizontal beater models, dump the beater pan. 2.6.3 – On vertical beater models, clean the area around and under the beaters. 2.6.4 – Remove any material that has accumulated on the beaters. 2.6.5 – Visually inspect the machine for damage, incorrectly inflated tires and wear. 2.6.6 – Park the spreader on level ground and block the wheels.
Open the catalog to page 9
Allow only suitably skilled and trained persons to perform maintenance operations. Shut off the tractor and take steps to ensure no person can start up this equipment while you are working on it. 3.1. GENERAL INFORMATION 3.1.1 - Check wheel bolts Check wheel bolts hourly and re-torque if necessary for at least the first day of operation. Check daily for the first week, and every 50 hours thereafter. See the information in Section 6 for proper wheel bolt torque values. 3.1.2 - Beater bearings and driveline bearings HYDRA-SPREAD bearings are triple-lip-sealed and lifetime-lubricated. Keep bearings...
Open the catalog to page 10
3.2. EVERY 8 HOURS 3.2.1 – Roller chains Lubricate roller chains with a good quality chain lubricant. Check and adjust chain tighteners if necessary to take up any slack in the chains. 3.2.2 – PTO shaft Lubricate the universal joints, telescoping shafts, and shield bearings, using a premium quality multi-purpose grease. Fill each fitting with grease until new grease is seen coming out of the joint. Refer to section 4.8 to determine which PTO shaft your machine is equipped with. Each HYDRA-SPREAD shear bolt protected PTO shaft has 6 grease points (see figure 3.1). Sheild bearing grease points...
Open the catalog to page 11
Each HYDRA-SPREAD CV-Joint PTO Shaft has 8 grease points (see figure 3.3) Figure 3.3 - CV-Shaft PTO grease information 3.2.3 – Axle pivot points Lubricate the axle pivot points using a premium quality multi-purpose grease (see figure 3.4 ). Fill with grease until new grease comes out of joints Figure 3.4 – Axle Grease Location 3.2.4 – Tires Visually inspect tires for damage. Visually check for noticeably low air pressure. If necessary refer to the tire information in Section 6 and inflate to the correct pressure
Open the catalog to page 12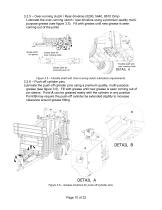
3.2.5 – Over-running clutch / Rear driveline (5290, 5440, 8610 Only) Lubricate the over-running clutch / rear driveline using a premium quality multipurpose grease (see figure 3.5). Fill with grease until new grease is seen coming out of the joints. A Grease point for splines Grease point for Over-running clutch Flexible shaft with over-running clutch Grease point for universal joints (2) Figure 3.5 – Flexible shaft with Over-running clutch lubrication requirements. 3.2.6 – Push-off cylinder pins. Lubricate the push-off cylinder pins using a premium quality, multi-purpose grease (see figure 3.5)....
Open the catalog to page 13All Penta TMR Incorporated catalogs and technical brochures
 Hagedorn Parts Manual
73 Pages
 DB50 OWNERS MANUAL
62 Pages
 Operators manual 3030
30 Pages
 FEED BETTER
20 Pages
 FEEDS FIELDS
12 Pages
 TILLAGE PRODUCTS
12 Pages
 DUMP BOXES
8 Pages

- Cart
- Agricultural trailer
- Tandem axle wagon
- Dump cart
- Feed mixer
- Vibro-cultivator
- Vertical mixer
- Towed mixer
- Side discharge mixer
- Trailer with hydraulic braking
- 2-auger mixer
- Rigid tine vibro-cultivator
- Towed manure spreader
- Single-auger mixer
- Mixer with weighing system
- PTO-driven mixer
- Verticals beaters manure spreader
- 3-axle trailer
- Stationary mixer