

- Products
- Catalogs
- News & Trends
- Exhibitions
Loadbar Assembly plus Cables

Loadbar Assembly plus Cables
- Remove the packers (90mm tube) at the entry end of the Autodrafter.
- Lift the Cradle and slide the loadbar with the cable end facing you.
- Secure the Loadbar Base using 4x M10x30 bolts and nuts.
- Attach the Loadbar to the Cradle with 2x M10x25 bolts.
- Run the loadbar cable from the bottom rails to the top, leaving approximately 300mm at the other end.
- Tie any excess cable at the bottom rail to keep it organized.
- Remove packers (90mm tube) at the exit end of the Autodrafter.
- Repeat the process of lifting the Cradle, sliding the loadbar, and securing it with bolts as previously described.
- Ensure excess cable is tied to the bottom rail for neatness.
- Attach the Indicator mount on the T-bracket and connect the loadbar cables to the Indicator.
- Secure the PAD6 box and Air box using M8x55 Bolt and M8x16 Bolt & Locknut.
Catalog excerpts
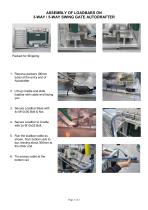
ASSEMBLY OF LOADBARS ON 3-WAY / 5-WAY SWING GATE AUTODRAFTER 1. Remove packers (90mm tube) at the entry end of Autodrafter 2. Lift up Cradle and slide loadbar with cable end facing you. 3. Secure Loadbar Base with 4x M10x30 Bolt & Nut 4. Secure Loadbar to Cradle with 2x M10x25 Bolt 5. Run the loadbar cable as shown, from bottom rails to top, leaving about 300mm at the other end. 6. Tie excess cable at the bottom rail.
Open the catalog to page 1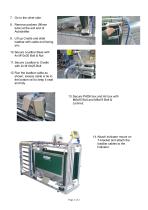
8. Remove packers (90mm tube) at the exit end of Autodrafter. 9. Lift up Cradle and slide loadbar with cable end facing you. 10. Secure Loadbar Base with 4x M10x30 Bolt & Nut 11. Secure Loadbar to Cradle with 2x M10x25 Bolt 12. Run the loadbar cable as shown, excess cable is tie to the bottom rail to keep it neat and tidy. 13. Secure PAD6 box and Air box with M8x55 Bolt and M8x16 Bolt & Locknut. 14. Attach Indicator mount on T-bracket and attach the loadbar cables to the Indicator.
Open the catalog to page 2All Prattley catalogs and technical brochures
 Sheep Conveyor
1 Page
 PAD6 QUICK REFERENCE
2 Pages
 10 ft MOBILE YARD
1 Page