- Catalogs
- Prointegra Ltd.
- Installation and user manual for Meteobot Mini, Micro and Nano
Installation and user manual for Meteobot Mini, Micro and Nano

Installation and user manual for Meteobot Mini, Micro and Nano
This user manual provides detailed instructions for the installation, operation, and de-installation of the Meteobot® Mini, Micro, and Nano weather stations. Adhering to these guidelines is essential for maintaining the product warranty.
- What's in the Box? - Includes components such as a solar panel, electronic board with GPS, rechargeable battery, and various sensors depending on the model.
- General Overview - Visual representation of the Meteobot® models.
- Before Installation - Ensure you have necessary tools and a compatible mobile device. A data SIM card is required for data transmission.
Proper placement is crucial for accurate data collection. The station should be in an open area with GSM coverage, away from heat sources and water bodies.
- Sensors - Specific guidelines for placing temperature, humidity, air pressure, rain, and soil sensors.
- Solar Panel - Must face South and remain unshaded throughout the day.
Detailed steps for installing the pole, sensors, SIM card, battery, and solar panel. Emphasizes the importance of correct orientation and secure connections.
Instructions for downloading and setting up the Meteobot® app to receive data from the weather station. Registration of the station is required.
Details on the GPS functionality for security and tracking purposes.
Guidelines for troubleshooting initial startup, data transmission, GPS positioning, and connectivity issues.
Regular maintenance procedures for sensors and battery to ensure optimal performance.
Instructions for safely uninstalling and replacing components like the battery, solar panel, and sensors.
Common issues such as battery charging problems and data transmission failures, along with solutions.
Technical details of the Meteobot® models.
Guidelines for proper disposal and battery information to minimize environmental impact.
The Meteobot® weather station requires registration through the app by scanning a QR code or entering the serial number and PIN. Users must name the station and its location, and configure sensor data. Initial data may take up to an hour to appear.
Data is sent every 10 minutes by default, but this can be adjusted up to 8 hours. Frequent data transmission increases power consumption, especially in cold weather.
The station includes a GPS tracker that sends location updates if the station is moved. Frequent activation can drain the battery, so secure installation is advised.
LED indicators on the circuit board help diagnose the station's status, including power supply, data transmission, GPS positioning, and connectivity issues.
Regular cleaning of sensors and solar panels is necessary. The battery should be charged if it falls below 3.7 V, and users will receive a low voltage alert.
Instructions are provided for safely uninstalling and replacing components like the battery, solar panel, and sensors. Care must be taken not to damage cables or connectors.
Common issues include battery charging problems, lack of GSM coverage, and sensor data errors. Solutions involve cleaning, replacing components, or contacting support.
The document lists sensor resolutions, ranges, and accuracies, as well as battery and solar panel specifications.
Disposal of the device and battery should follow local regulations to prevent environmental harm. The device is marked according to the EU Waste Electric & Electronic Equipment Directive.
Catalog excerpts

USER MANUAL for Meteobot® Mini / Micro / Nano Thank you for buying a Meteobot® weather station! This user manual contains instructions for installation, correct operation and de-installation of Meteobot® weather stations. Please read the instructions carefully before you begin – the product warranty depends on the correct installation and operation. December 17th, 2020 Version 1.1 Prointegra Ltd. Bulgaria, Varna 9009 2, Todor Penev str. +359 884 833 780 [email protected] www.meteobot.com Meteobot® Mini / Micro / Nano. User Manual
Open the catalog to page 1
Meteobot® Mini / Micro / Nano. User Manual
Open the catalog to page 2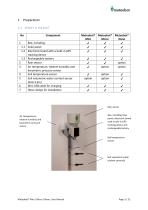
Box, including: 1.1 Solar panel 1.2 Electronic board with a built-in GPS tracking device 1.3 Rechargeable battery 2 Rain sensor 3 Air temperature, relative humidity and barometric pressure sensor 4 Soil temperature sensor 5 Soil volumetric water content sensor (max 3 pcs) 6 Mini USB cable for charging 7 Hose clamps for installation Meteobot® Meteobot® Meteobot® Mini Micro Nano ✔ ✔ ✔ ✔ ✔ ✔ ✔ ✔ ✔ ✔ ✔ ✔ option option Rain sensor Air temperature, relative humidity and barometric pressure sensor Box, including solar panel, electronic board with a built-in GPS tracking device and rechargeable battery...
Open the catalog to page 3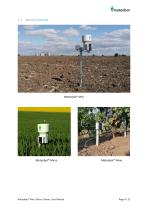
Meteobot® Mini Meteobot® Micro Meteobot® Mini / Micro / Nano. User Manual Meteobot® Nano
Open the catalog to page 4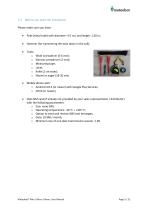
1.3 Before you start the installation Please make sure you have: • Pole (metal tube) with diameter: 4-5 cm, and length: 1,50 m; Hammer (for hammering the tube down in the soil); Wide screwdriver (5-6 mm); Narrow screwdriver (2 mm); Measuring tape; Level; Knife (2 cm wide); Shovel or auger (18-20 cm); Mobile phone with: o Android 4.0.3 (or newer) with Google Play Services; o iOS 8 (or newer); Data SIM card (if already not provided by your sales representative / distributor) with the following parameters: o Size: nano SIM; o Operating temperature: -40 °C ÷ +105 °C; o Option to send and receive...
Open the catalog to page 5
Where to place the weather station? The weather station should be placed at a location with GSM coverage by your mobile operator. In order to get correct measurements, it is important to place the station: • On an even field and at a location, which is representative for the region; • If there is another object nearby (e.g. tree, building, etc.), the station should be installed at a distance at least 4 times longer than the height of the object. Example: if there is a 5-meter-tall tree nearby, the station should be at least 20 meters away from the tree. 2.1 Sensor for temperature, relative humidity...
Open the catalog to page 6
Use a pole (metal tube) with diameter: 4-5 cm, and length: 1,50 m; Hammer the pole 70 cm in the ground; IMPORTANT: Should be perfectly vertical! Install the box / rain sensor by clamping the metal holder to the top of the pole with hose clamps; The box / rain sensor should be facing South; IMPORTANT: The upper opening of the rain sensor should be absolutely horizontal. 3.3 Air temperature, relative humidity and barometric pressure sensor • • Install the sensor using the lower hose clamp of the rain sensor; The sensor should be facing North (opposite the rain sensor). 3.4 Soil temperature sensor...
Open the catalog to page 7
o As close as possible to the roots of your plants. Push the sensor in the slit gently; IMPORTANT: Do not thrust the sensor in the ground by force; If your Meteobot® comes with several volumetric water content sensors, repeat the procedure for each of them; IMPORTANT: The sensor should fit tightly in the soil. If there are air or stones around it, the measurements will be wrong; Mix the soil with water and fill the hole with the mud. IMPORTANT: If the soil above the sensor cracks as a result of drought, compact it. 3.6 SIM card If your Meteobot® comes with an already installed SIM card, skip...
Open the catalog to page 8
Unscrew the bolts, which hold the electronic board to the box, and turn the board slightly downwards; IMPORTANT: Be careful not to snap the antenna cable; Plug the battery cable in the connector on the back of the electronic board; Fasten the electronic board to the box with the bolts. Connect the plug of the solar panel to the corresponding plug on the electronic board. Meteobot® Mini / Micro / Nano. User Manual
Open the catalog to page 9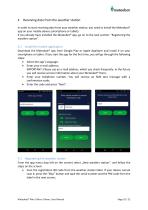
Receiving data from the weather station In order to start receiving data from your weather station, you need to install the Meteobot® app on your mobile device (smartphone or tablet). If you already have installed the Meteobot® app, go on to the next section: “Registering the weather station”. 4.1 Install the mobile application Download the Meteobot® app from Google Play or Apple AppStore and install it on your smartphone or tablet. If you start the app for the first time, you will go through the following steps: • Select the app’s language; • Enter your e-mail address; IMPORTANT: Please use...
Open the catalog to page 10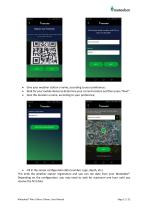
Give your weather station a name, according to your preference; Wait for your mobile device to determine your current location and then press “Next”; Give this location a name, according to your preference; • Fill in the sensor configuration data (number, type, depth, etc.) This ends the weather station registration and you can see data from your Meteobot®. Depending on the configuration, you may need to wait for maximum one hour until you receive the first data. Meteobot® Mini / Micro / Nano. User Manual
Open the catalog to page 11
Data transfer frequency By default, the weather station records data from the sensors and sends them every 10 minutes. The transmission interval can be from 10 minutes up to 8 hours. If you would like a different interval, send a request to the Meteobot® technical support team to [email protected]. IMPORTANT: The more frequently the station sends data, the bigger the power consumption is. During winter the low temperature decreases the useful battery capacity, so too frequent data transmission can deplete the battery. Meteobot® Mini / Micro / Nano. User Manual
Open the catalog to page 12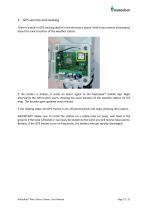
There is a built-in GPS tracking device in the electronic board. With it you receive information about the exact location of the weather station. If the station is shaken, it sends an alarm signal to the Meteobot® mobile app. Right afterwards the GPS tracker starts showing the exact location of the weather station on the map. The location gets updated every minute. If the shaking stops, the GPS tracker turns off automatically and stops showing the location. IMPORTANT: Make sure to install the station on a stable tube (or pole), well fixed in the ground. If the tube is flexible or can easily be...
Open the catalog to page 13All Prointegra Ltd. catalogs and technical brochures
 Presentation of Meteobot
29 Pages
 Meteobot weather stations
4 Pages
 Certificate CE
1 Page


- Wind speed weather station
- Relative humidity weather station
- Precipitation weather station
- Agriculture weather station
- Rain gauge
- Solar-powered weather station
- Wind direction weather station
- Battery-powered weather station
- Weather station with data logger
- Automatic weather station
- Professional weather station
- Evapotranspiration weather station
- Soil moisture weather station
- Precision farming weather station
- Soil temperature weather station
- Frost weather station
- Connected rain gauge
- Electronic rain gauge
- Wireless rain gauge