- Catalogs
- Prointegra Ltd.
- Installation and user manual for weather station Meteobot Pro
Installation and user manual for weather station Meteobot Pro

Installation and user manual for weather station Meteobot Pro
1. Preparation
- What's in the Box? - Includes components for Meteobot Pro and Mini, such as sensors, solar panel, and battery.
- General Overview - Brief introduction to the product.
- Before Installation - Requires a pole, ladder, mobile phone, SIM card, tools, and preparation of the soil moisture sensor.
2. Placement Guidelines
- Location - Ensure GSM coverage and place on an even field, away from heat-emitting objects and water bodies.
- Sensor Placement - Specific heights and orientations for temperature, wind, rain sensors, and solar panel.
3. Installation
- Pole Installation - Use a metal tube with specified dimensions and ensure vertical alignment.
- Component Installation - Detailed steps for installing the box, sensors, and solar panel on the pole.
- Soil Sensors - Instructions for burying soil temperature and moisture sensors, emphasizing proper soil compaction and protection from rodents.
4. Diagnostics
- Initial startup and data transmission checks, including handling no GSM coverage and server connection issues.
5. Data Reception
- Instructions for installing the mobile app, registering the station, and setting data transfer frequency.
6. Maintenance
- Regular checks and cleaning procedures to ensure optimal performance.
7. Troubleshooting
- Solutions for common issues like battery charging problems and incorrect sensor data.
8. Uninstallation
- Steps for safely uninstalling the weather station and its components.
9. Technical Specifications
- Detailed technical data for the Meteobot® components.
10. Environmental Protection
- Guidelines for disposal and battery information to minimize environmental impact.
Diagnostics
There are three LEDs on the circuit board: two on the right (red and green) and one on the left (red). During initial startup, the right LEDs glow continuously, then the red goes out, and the left red blinks quickly. When connected to the GSM network, the right green goes out, and the left red blinks at longer intervals. During data transmission, the right LEDs glow sequentially. If there's no GSM coverage, the left red blinks quickly, and the right LEDs glow continuously. If there's no server connection, the right green remains glowing, indicating a connection issue.
Receiving Data
To receive data, install the Meteobot® app on your mobile device. Register the weather station by scanning the QR code or entering the serial number and PIN. The station records data every 10 minutes and sends it hourly. Frequent data transmission increases power consumption, especially in winter.
Maintenance
Regular maintenance includes cleaning sensors and solar panels, ensuring sensors are vertical, and monitoring battery levels. Replace the soil moisture sensor every two years.
Troubleshooting
For battery charging issues, check the solar panel and connections. If the station doesn't send data, ensure GSM coverage and check the SIM card. For sensor data issues, check connections and cleanliness.
Uninstallation
Follow specific steps to uninstall the weather station or components, ensuring cables are insulated and components are handled carefully.
Technical Specifications
Specifications include sensor resolution, range, and accuracy for various measurements like air temperature, humidity, wind speed, and more.
Environmental Protection
Dispose of the device according to EU directives to prevent environmental harm. The battery should be treated as hazardous waste and disposed of properly.
Catalog excerpts

Thank you for buying Meteobot®! This user manual contains instructions for installation, correct operation and de-installation of Meteobot® weather stations. Please read the instructions carefully before you begin - the product warranty depends on the correct installation and operation. Prointegra Ltd. Bulgaria, Varna 9009 2, Todor Penev str. +359 884 833 780 [email protected] www.meteobot.com
Open the catalog to page 1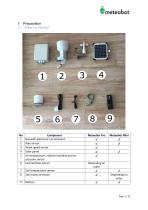
Component Box with electronic circuit board Rain sensor Wind speed sensor Solar panel Air temperature, relative humidity and air pressure sensor Leaf wetness sensor Soil temperature sensor Soil moisture sensor Meteobot Pro ✔ ✔ ✔ ✔ ✔ Depending on order ✔ ✔ ✔
Open the catalog to page 3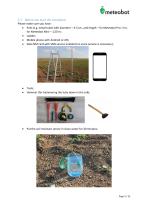
1.3 Before you start the installation Please make sure you have: • Pole (e.g. metal tube) with diameter - 4-5 cm, and length - for Meteobot Pro: 3 m, for Meteobot Mini - 1,50 m; • Ladder; • Mobile phone with Android or iOS; • Data SIM card with SMS service enabled (no voice service is necessary); • Tools; • Hammer (for hammering the tube down in the soil); • Put the soil moisture sensor in clean water for 30 minutes;
Open the catalog to page 5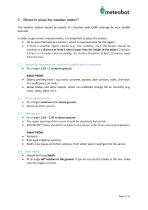
2 Where to place the weather station? The weather station should be placed at a location with GSM coverage by your mobile operator. In order to get correct measurements, it is important to place the station: • On an even field and at a location, which is representative for the region; • If there is another object nearby (e.g. tree, building, etc.), the station should be installed at a distance at least 4 times longer than the height of the object. Example: if there is a 5-meter-tall tree nearby, the station should be at least 20 meters away from the tree. 2.1 Sensor for temperature, relative...
Open the catalog to page 6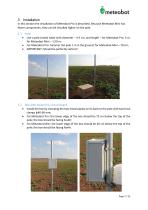
3 Installation In this section the installation of Meteobot Pro is described. Because Meteobot Mini has fewer components, they can be installed higher on the pole. Use a pole (metal tube) with diameter – 4-5 cm, and length – for Meteobot Pro: 3 m, for Meteobot Mini – 1,50 m; For Meteobot Pro: hammer the pole 1 m in the ground; for Meteobot Mini – 70 cm; IMPORTANT: Should be perfectly vertical! 3.2 Box with electronic circuit board • • • Install the box by clamping the two metal planks on its back to the pole with two hose clamps φ40-60 mm; For Meteobot Pro: the lower edge of the box should be...
Open the catalog to page 7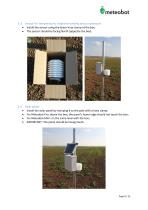
v meteobot 3.3 Sensor for temperature, relative humidity and air pressure • Install the sensor using the lower hose clamp of the box; • The sensor should be facing North (opposite the box). 3.4 Solar panel • Install the solar panel by clamping it to the pole with a hose clamp; • For Meteobot Pro: above the box; the panel's lower edge should not touch the box; • For Meteobot Mini: on the same level with the box; • IMPORTANT: The panel should be facing South.
Open the catalog to page 8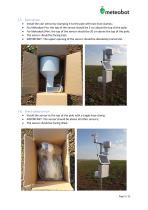
3.5 Rain sensor • Install the rain sensor by clamping it to the pole with two hose clamps; • For Meteobot Pro: the top of the sensor should be 5 cm above the top of the pole; • For Meteobot Mini: the top of the sensor should be 20 cm above the top of the pole; • The sensor should be facing East; • IMPORTANT: The upper opening of the sensor should be absolutely horizontal. 3.6 Wind speed sensor • Install the sensor at the top of the pole with a single hose clamp; • IMPORTANT: The sensor should be above all other sensors; • The sensor should be facing West.
Open the catalog to page 9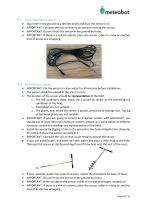
3.7 Soil temperature sensor • Dig a hole in the ground to a desired depth and bury the sensor in it; • IMPORTANT: Compact the soil, so that no air remains around the sensor; • IMPORTANT: Do not thrust the sensor in the ground by force; • IMPORTANT: If there is a risk of rodents, place the sensor cable in a tube or another kind of protective wrapping. 3.8 Soil moisture sensor • IMPORTANT: Put the sensor in clean water for 30 minutes before installation; • The sensor should be placed in the plant's roots; • The location of the sensor should be representative of the field: o The soil conditions...
Open the catalog to page 10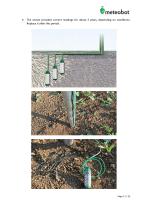
The sensor provides correct readings for about 2 years, depending on conditions. Replace it after this period.
Open the catalog to page 11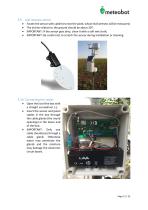
3.9 Leaf wetness sensor • Fasten the sensor with cable ties near the plant, whose leaf wetness will be measured; • The incline relative to the ground should be about 30o; • IMPORTANT: If the sensor gets dirty, clean it with a soft wet cloth; • IMPORTANT: Be careful not to scratch the sensor during installation or cleaning. 3.10 Connecting the cables • Open the lid of the box with a straight screwdriver (-); • Insert the sensor and panel cables in the box through the cable glands (the round openings) in the lower end of the box; • IMPORTANT: Only one cable should pass through a cable gland. Otherwise...
Open the catalog to page 12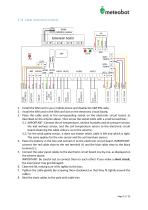
3.11 Cable connection scheme radiation sensor Extension board RED GREEN WIND WIND SOIL TEMPI 1. Install the SIM card in your mobile phone and disable the SIM PIN code; 2. Install the SIM card in the SIM card slot on the electronic circuit board; 3. Place the cable ends in the corresponding socket on the electronic circuit board, as described on the scheme above. Then screw the socket bolts with a small screwdriver.; 3.1. IMPORTANT: Connect the air temperature, relative humidity and air pressure sensor; the leaf wetness sensor, and the soil temperature sensor to the electronic circuit board observing...
Open the catalog to page 13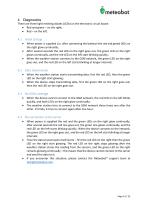
4 Diagnostics There are three light emitting diodes (LEDs) on the electronic circuit board: • Red and green – on the right; • Red – on the left. When power is supplied (i.e. after connecting the battery) the red and greed LEDs on the right glow continually; After several seconds the red LED on the right goes out, the green LED on the right glows continually, and the red LED on the left start blinking quickly; When the weather station connects to the GSM network, the green LED on the right goes out, and the red LED on the left starts blinking at longer intervals. When the weather station starts...
Open the catalog to page 14All Prointegra Ltd. catalogs and technical brochures
 Presentation of Meteobot
29 Pages
 Meteobot weather stations
4 Pages
 Certificate CE
1 Page


- Wind speed weather station
- Relative humidity weather station
- Precipitation weather station
- Agriculture weather station
- Rain gauge
- Solar-powered weather station
- Wind direction weather station
- Battery-powered weather station
- Weather station with data logger
- Automatic weather station
- Professional weather station
- Evapotranspiration weather station
- Soil moisture weather station
- Precision farming weather station
- Soil temperature weather station
- Frost weather station
- Connected rain gauge
- Electronic rain gauge
- Wireless rain gauge