
- Catalogs
- Satconsystem
- FARMNAVIGATOR MANUAL

FARMNAVIGATOR MANUAL

FARMNAVIGATOR MANUAL
The Farmnavigator package includes the device itself, chargers (220V and 12V), a GPS receiver, extension cable, car holder with suction cup, magnet mount, and USB cable. The manual provides detailed instructions on mounting the device using the magnetic car mount and connecting the necessary cables for power and GPS functionality. It emphasizes the importance of not removing the SD card while the software is running to prevent data loss.
The Farmnavigator:
The Farmnavigator menu includes options for managing fields, configuring spray booms, and adjusting settings. Users can create new fields, work on existing ones, and measure field boundaries. The spray boom feature allows for virtual configuration of sprayer sections and nozzles, aiding in precise chemical application.
Farmnavigator Settings:
Users can adjust settings such as working width, guiding lines, GPS receiver offset, area unit, and minimum speed for GPS recording. The device also supports Bluetooth for hands-free calls and has a camera function for rearview display.
Create and Work a Field:
Users can create fields by entering the fields database and selecting 'Create New'. The Farmnavigator records the track, work time, and other metrics. It can also measure field boundaries and position soil samples or obstacles.
Guiding Lines:
The system offers three navigation types: Parallel, Contour, and Tram Line, each suited for different field shapes and existing tram lines. The navigation aid provides directional guidance to maintain alignment with guiding lines.
Fields Database:
The database allows users to edit field data, rename fields, clear obstacles, and export data as .kmz files for use in Google Earth. It reiterates the caution against removing the SD card while the software is active.
Imprint & Copyright:
The manual is owned by Satconsystem, and any reproduction requires written permission. Contact information for support is provided.
Catalog excerpts
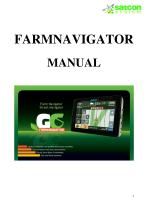
0000®$ Lightbar navigation with parallel and contour tramlines | Field perimeter and area measurement | Virtual Spray Boom Commander Jobs and fields database
Open the catalog to page 1
2.2.3 Measure a field and position soilsamples / obstacles: 12 2.3.1 Edit and export field data 16
Open the catalog to page 2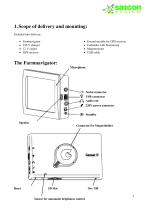
1. Scope of delivery and mounting Included into delivery: • Farmnavigator • 220 V charger • 12 V carger • GPS receiver • Extensioncable for GPS receiver • Carholder with Suctioncup • Magnetmount • USB cable The Farmnavigator: I/O Serial connector ^ USB connector Audio out £ 220V power connector (i) Standby Connector for Magnetholder Sensor for automatic brightness control
Open the catalog to page 3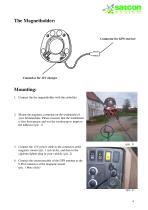
Mounting: 1. Connect the the magnetholder with the carholder . 2. Mount the magnetic carmount on the windshield of your farmmachine. Please reassure that the windshield is free from grease and wet the suctioncup to improve the adhesion (pic. 1) 3. Connect the 12V power cable to the connector at the magnetic mount (pic. 1 red circle), and then to the cigarette lighter plug in your vehicle. (pic. 2) 4. Connect the extensioncable of the GPS antenna to the 9 Pin Connector at the magnetic mount (pic. 1 blue circle)
Open the catalog to page 4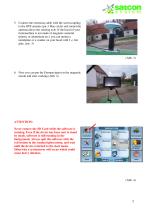
5. Connect the extension cable with the screwcoupling to the GPS antenna (pic.3 blue circle) and mount the antenna above the steering axle. If the hood of your farmmachine is not made of magnetic material (plastic or aluminium etc.) you can mount a metalplate or a washer on your hood with f. e. hot glue. (pic. 3) (Abb. 3) 6. Now you can put the Farmnavigator in the magnetic mount and start working (Abb. 4) ATTENTION: Never remove the SD Card while the software is running. Even if the device has been sent to stand by mode, software is still running in the background. Always quit the software with...
Open the catalog to page 5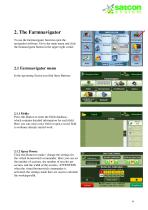
2. The Farmnavigator To use the farmnavigator function open the navigation software. Go to the main menu and click the farmnavigator button in the upper right corner. iPod Steuerung Meine Daten 2.1 Farmnavigator menu In the upcoming Screen you find these Buttons: 2.1.1 Fields: Press this Button to enter the fields database, which contains detailed information for each field. Here you can creat a new field or open a saved field, to continue already started work. 2.1.2 Spray Boom: Click this Button to make / change the settings for the virtual boomswitch commander. Here you can set the number of...
Open the catalog to page 6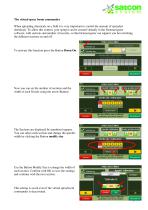
The virtual spray boom commander When spreading chemicals on a field it is very important to control the amount of spreaded chemicals. To allow this control, your sprayer can be created virtually in the Farmnavigator software, with sections and number of nozzles, so that farmnavigator can support you bei switching the different sections on and off. To activate this function press the Button Boom On Now you can set the number of sections and the width of each Nozzle using the arrow Buttons The Sections are displayed by numbered squares. You can select each section and change the specific width...
Open the catalog to page 7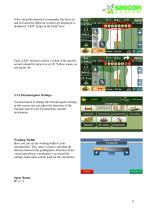
if the virtual Boomswitch commander has been set and activated the different sections are displayed as numbered “LED” lamps in the Field View Each „LED“ indicates with it’s colour if the specific section yhould be turned on or off. Yellow means on red means off. BEABEJTETE FACHE 2.1.3 Farmnavigator Settings: Use this button to change the Farmnavigator settings in this screen you can adjust the functions of the Farmnaviator to your Farmmachine and the attachments Working Width: Here you can set the workingwidth of your farmmachine. This value is used to calculate the distance between the guidinglines.Attention:...
Open the catalog to page 8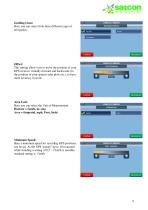
Guiding Lines: Here you can select from three different types of navigation Offset: This setting allows you to move the position of your GPS receiver virtually forward and backwards (to the position of your sprayer oder plow etc.), to have more accuracy in work. Area Unit: Here you can select the Unit of Measurement Hactare = (km/h, m, cm,) Acre = (imperial, mph, Foot, Inch) Minimum Speed: Here a minimum speed for recording GPS positions. can be set. As the GPS “jumps” up to 10 m around while standing a setting of 0,5 – 2 km/h is sensible. standard setting is 1 km/h
Open the catalog to page 9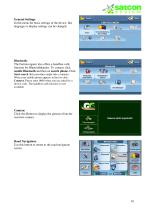
General Settings: In this menu the basic settings of the device, like language or display settings can be changed. Bluetooth: The Farmnavigator also offers a handfree calls function for Bluetoothhandys. To connect click enable Bluetooth and then on search phone. Click Start search (this procedure might take a minute). When your mobile phone appears in the list click Connect. Please enter 0000 when you are asked for a device code. The handfree calls function is now available Camera: Click this Button to display the pictures from the rearview camera . Road Navigation: Use this button to return...
Open the catalog to page 10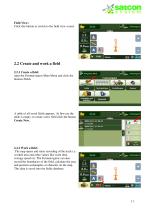
Field View: Click this button to switch to the field view screen 2.2 Create and work a field 2.2.1 Create a field: open the Farmnavigator Main Menu and click the buttons Fields A table of all saved fields appears. At first use the table is empty. to create a new field click the button Create New. 2.2.2 Work a field: The map opens and starts recording of the track i.e. worked area and other values like work time, average speed etc. The Farmnavigator can also record the boundaries of the field, calculate the area and position soilsamples or obstacles on the map. This data is saved into the fields...
Open the catalog to page 11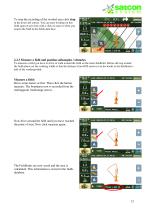
To stop the recording of the worked area click stop in the down left corner. You can start working on this field again at any time with a click on start or when you reopen the field in the fields data base 2.2.3 Measure a field and position soilsamples / obstacles To measure a field you have to drive or walk around the field on the inner fieldlimit. Before driving around the field please set the working width so that the distance from GPS receiver (on the hood) to the fieldlimit is half of the workingwidth. Measure a field: Drive some meters at first. Then click the button measure. The boundarie...
Open the catalog to page 12All Satconsystem catalogs and technical brochures
 The all new G7 Farmnavigator
2 Pages
 Swift Hitch
11 Pages
 G6 Farmnavigator
4 Pages
