Sentek™ SOLO

Sentek™ SOLO
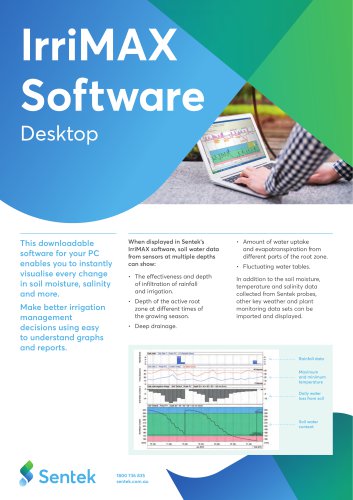
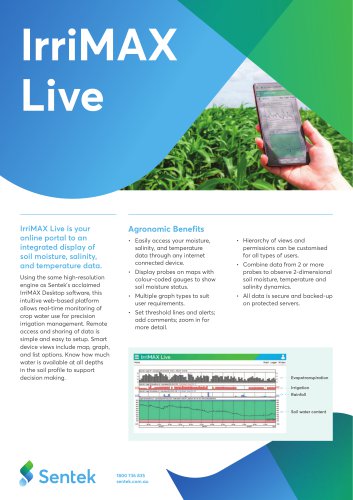
The Sentek SOLO is a cost-effective solution for continuous soil moisture and salinity monitoring, featuring a battery-powered logging probe and a Head Unit for data download via a laptop or SoloPORTER. Data is displayed using Sentek’s IrriMAX software, supporting EnviroSCAN or EasyAG probes with potential upgrades to wireless communication.
Features
- Sentek SOLO Probe: Configurable via Sentek’s software, capable of storing over 2000 samples, and available in EasyAG and EnviroSCAN versions.
- Sentek SOLO Head Unit: Provides power, stores data, and is powered by replaceable AA batteries. It is portable and easy to service.
- Download Options: Data can be downloaded using SoloPORTER or Solo Download Cable, with storage capacity dependent on USB flash drive size.
System Setup
- Hardware Setup: Instructions for assembling probes, connecting cables, and setting up the Head Unit with batteries and mounting brackets.
Compliance and Standards
The Sentek SOLO complies with FCC and CISPR standards for electromagnetic compatibility and is marked with CE, C-tick, and FCC approvals.
Maintenance
Regular maintenance schedules are recommended for probes, cables, and the Head Unit to ensure optimal performance.
Specifications and Warnings
The Head Unit should not be drilled to maintain moisture exclusion integrity. Ensure the latest firmware is installed.
Probe Configuration
Use the Probe Configuration Utility (PConfig) to auto-detect sensors, set sensor depths, and normalize probe readings. Custom calibration coefficients can be entered if needed.
Clock and Logger Settings
Set the probe's clock and sampling interval carefully. The Logger ID should be unique and identifiable.
Power and Sensor Test
Monitor battery voltage, ensuring it remains above 4 volts. Regularly test sensors to ensure they are functioning correctly.
Field Installation
Follow Sentek manuals for installing access tubes and mounting poles. Secure connections and check configurations before use.
Downloading Readings
Data can be downloaded using a Solo Download Cable or SoloPORTER. Ensure proper connections and follow steps for data exchange.
Technical Specifications
Details on RS232 and TTL interface configurations, including pin configurations and voltage supply requirements, are provided.
Product Set-up Checklist
A step-by-step guide for setting up the Sentek SOLO system is provided, including preparation, field installation, and downloading data.
Troubleshooting Guide
Includes troubleshooting steps for common issues with the Solo Head Unit, probe, and SoloPORTER.
Recommended Maintenance Schedules
Maintenance tasks are recommended on a weekly, bi-annual, and annual basis, including checking battery voltage and inspecting for moisture or corrosion.
Catalog excerpts

Sentek™ SOLO Hardware Manual Version 1.4
Open the catalog to page 1
All rights reserved. No part of this document may be reproduced, transcribed, translated into any language or transmitted in any form electronic or mechanical for any purpose whatsoever without the prior written consent of Sentek Pty Ltd. All intellectual and property rights remain with Sentek Pty Ltd. All information presented is subject to change without notice. © 2008-2012 Sentek Pty Ltd Sentek™, SoloPORTER™, EnviroSCAN™ , EnviroSMART™, EasyAG™, TriSCAN™, and IrriMAX™ are trademarks or registered trademarks of Sentek Pty Ltd that may be registered in one or more jurisdictions. Copyright ©...
Open the catalog to page 2
SENTEK SOLO - STATEMENTS OF COMPLIANCE FCC NOTE OF COMPLIANCE AND STATEMENT OF LIABILITY Electro-Magnetic Compliance This equipment has been tested and found to comply with the limits for a Class B digital device, pursuant to part 15 of the FCC rules. These limits are designed to provide reasonable protection against harmful interference in a residential installation. This equipment generates, uses and can radiate radio frequency energy and, if not installed and used in accordance with the instructions, may cause harmful interference to radio communications. However, there is no guarantee that...
Open the catalog to page 3
Copyright © 2008-2012 Sentek Pty Ltd All rights reserved
Open the catalog to page 4
Copyright © 2008-2012 Sentek Pty Ltd All rights reserved
Open the catalog to page 5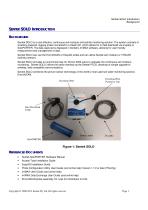
Sentek SOLO Introduction Background SENTEK SOLO INTRODUCTION BACKGROUND Sentek SOLO is a cost effective, continuous soil moisture and salinity monitoring solution. The system consists of a battery powered, logging probe connected to a Head Unit, which allows for in-field download via a laptop or SoloPORTER. The data captured is displayed in Sentek’s IrriMAX software, allowing for user friendly measurement and management of data. Sentek SOLO can use the EnviroSCAN or EasyAG probe and can utilize Sentek soil moisture or TriSCAN (salinity) sensors. Sentek SOLO provides an economical way for Diviner...
Open the catalog to page 6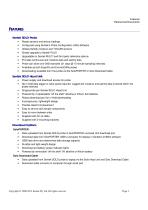
Features Referenced Documents FEATURES Sentek SOLO Probe • • • Reads sensors and stores readings Configured using Sentek’s Probe Configuration Utility Software Utilises Sentek moisture and TriSCAN sensors Simple upgrade to Sentek PLUS Upgradable to Sentek MULTI and third party telemetry options Provides continuous soil moisture data and salinity data Probe can store over 2000 samples (21 days @ 15 minute sampling intervals) Available as both EasyAG and EnviroSCAN probes Downloading available from the probe via the SoloPORTER or Solo Download Cable Sentek SOLO Head Unit • Power supply and download...
Open the catalog to page 7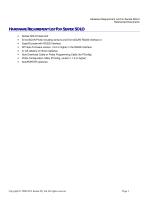
Hardware Requirement List For Sentek SOLO Referenced Documents HARDWARE REQUIREMENT LIST FOR SENTEK SOLO • Sentek SOLO Head Unit EnviroSCAN Probe including sensors and EnviroSCAN RS232 interface or EasyAG probe with RS232 Interface XPI-Solo Firmware version 1.2.2 or higher in the RS232 Interface 4x AA alkaline or lithium batteries Solo Download Cable or Probe Programming Cable (for PConfig) Probe Configuration Utility (PConfig, version 1.7.2 or higher) SoloPORTER (optional) Copyright © 2008-2012 Sentek Pty Ltd All rights re
Open the catalog to page 8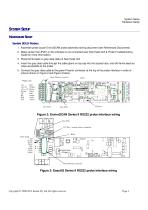
System Setup Hardware Setup SYSTEM SETUP HARDWARE SETUP Sentek SOLO Probes 1. Assemble probe as per EnviroSCAN probe assembly training document (see Referenced Documents) 2. Make certain that JP201 on the interface is not connected (see Solo Head Unit & Probe Troubleshooting Guide for more information). 3. Place ferrite bead on grey data cable of Solo Head Unit 4. Insert the grey data cable through the cable gland on top cap into the access tube, and refit ferrite bead as close as possible to the probe 5. Connect the grey data cable to the green Phoenix connector at the top of the probe interface...
Open the catalog to page 9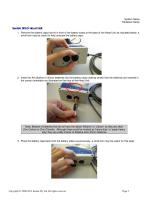
System Setup Hardware Setup Sentek SOLO Head Unit 1. Remove the battery caps that sit in front of the battery tubes at the base of the Head Unit as indicated below, a small coin may be useful to help unscrew the battery caps: 2. Insert the AA alkaline or lithium batteries into the battery tubes making certain that the batteries are inserted in the correct orientation as illustrated on the face of the Head Unit. Note: Beware of batteries that do not have the labels ‘Alkaline’ or ‘Lithium’ as they are often Zinc-Carbon or Zinc-Chloride. Although these could be marked as ‘heavy duty’ or ‘super heavy...
Open the catalog to page 10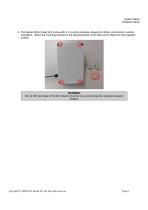
System Setup Hardware Setup 4. The Sentek SOLO Head Unit comes with 2 x mounting brackets, allowing for either a horizontal or vertical orientation. Attach the mounting brackets in the desired position at the back of the Head Unit with supplied screws. WARNING: Do not drill new holes in the Solo Head Unit as this may compromise the moisture exclusion integrity. Copyright © 2008-2012 Sentek Pty Ltd All rights reserved
Open the catalog to page 11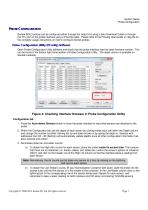
System Setup Probe Configuration PROBE CONFIGURATION Sentek SOLO probes can be configured either through the Head Unit using a Solo Download Cable or through the TTL port on the probe interface using a PConfig cable. Please refer to the PConfig User Guide or Help file for the complete usage instructions on how to configure Sentek probes. Probe Configuration Utility (PConfig) Software Open Probe Configuration Utility software and check that the probe interface has the latest firmware version. This can be found in the bottom right hand section of Probe Configuration Utility. The latest version...
Open the catalog to page 12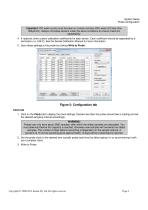
System Setup Probe Configuration Important: VIC water counts must be taken in reverse osmosis (RO) water (EC less than 300μS/cm). Always normalise sensors under the same conditions to ensure maximum repeatability. 4. If required, enter custom calibration coefficients for each sensor. Each coefficient should be separated by a semicolon (i.e. A;B;C). See the Sentek Calibration Manual for more information. 5. Save these settings to the probe by clicking Write to Probe. Figure 5: Configuration tab Clock tab 1. Click on the Clock tab to display the clock settings. Decide how often the probe should...
Open the catalog to page 13All Sentek catalogs and technical brochures
 Sentek RT6
90 Pages
 EnviroSCAN Probe
2 Pages
 Drill & Drop Probe
2 Pages
 Diviner 2000
1 Page
 IrriMAX Software
2 Pages
 IrriMAXLive
2 Pages
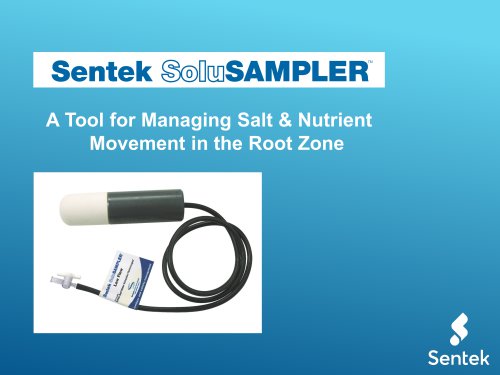 Sentek SoluSAMPLER
5 Pages
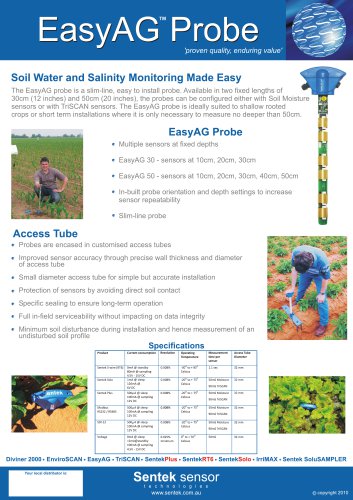 EasyAG
1 Page
 About Sentek
2 Pages
- Agricultural software
- Data management software
- Real-time software
- Soil sampler
- Precision agriculture software
- Temperature data-logger
- Portable soil sampler
- Irrigation software
- Battery-powered data-logger
- Irrigation management software
- Depth soil sampler
- Plant software
- Humidity data-logger
- Electrical conductivity soil sampler
- Soil data-logger
- USB data-logger
- Wireless data-logger
- Android software
- Moisture soil sampler
- Compact data-logger