

- Company
- Products
- Catalogs
- News & Trends
- Exhibitions
SoilSense User Manual

SoilSense User Manual
This document is a user manual for setting up the SoilSense system, which includes a datalogger and sensors for monitoring soil conditions. The setup requires a smartphone, drill/shovel, and measuring tape.
Users must log in or create a new account on the SoilSense platform at app.soilsense.io to begin the installation process.
- Choose a location representative of irrigation practices, such as near a drip system.
- Dig or drill a hole close to the roots to insert sensors into the active root zone.
- Ensure the datalogger is turned off for at least 30 seconds before installation.
- Turn on the datalogger by pressing the button, indicated by a white LED flash.
- Insert sensors in a straight line, maintaining the order of soil layers.
- The top sensor should be in the upper root zone, and the bottom sensor in the lower root zone.
- Insert sensors into undisturbed soil, avoiding air gaps around the blades.
- Note the depth of each sensor in the app before refilling the hole.
Position the datalogger to receive maximum sun exposure for optimal performance.
- White: Device is turning on.
- Green: Good signal.
- Red: Poor signal or connection error.
- Blue: Sensor error.
- Yellow: Low battery.
If a rain gauge is ordered, mount it on a pipe away from trees to prevent leaves from entering the collector.
For further assistance, users can contact SoilSense via email at [email protected] or visit their website at www.soilsense.io.
Catalog excerpts
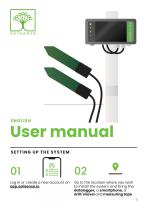
User manual SETTING UP THE SYSTEM Log in or create a new account on app.soilsense.io. Go to the location where you wish to install the system and bring the datalogger, a smartphone, a drill/shovel and measuring tape 1
Open the catalog to page 1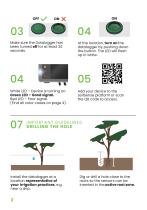
Make sure the Datalogger has been turned off for at least 30 seconds. At the location, turn on the datalogger by pushing down the button. The LED will flash up in white. White LED – Device is turning on. Green LED – Good signal. Red LED – Poor signal. (Find all color codes on page 4). Add your device to the SoilSense platform or scan the QR code to access. Install the datalogger at a location representative of your irrigation practices, e.g. near a drip. Dig or drill a hole close to the roots so the sensors can be inserted in the active root zo
Open the catalog to page 2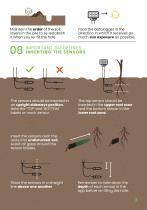
Maintain the order of the soil layers in the pile to re-establish it when you re-fill the hole. Face the datalogger in the direction in which it receives as much sun exposure as possible. The sensors should be inserted in an upright sideways position. Note the ‘TOP’ and ‘BOTTOM’ labels on each sensor. The top sensor should be inserted in the upper root zone and the bottom sensor in the lower root zone. Insert the sensors near the roots into undisturbed soil. Avoid air gaps around the sensor blades. Place the sensors in a straight line above one another. Remember to note down the depth of each...
Open the catalog to page 3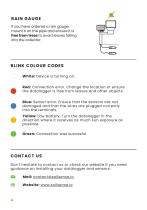
RAIN GAUGE If you have ordered a rain gauge, mount it on the pipe and ensure it is free from trees to avoid leaves falling into the collector. BLINK COLOUR CODES White: Device is turning on. Red: Connection error. Change the location or ensure the datalogger is free from leaves and other objects. Blue: Sensor error. Ensure that the sensors are not damaged and that the wires are plugged correctly into the terminals. Yellow: Low battery. Turn the datalogger in the direction where it receives as much sun exposure as possible. Green: Connection was succesful. CONTACT US Don't hesitate to contact...
Open the catalog to page 4All Soilsense catalogs and technical brochures
 SoilSense Catalogue
8 Pages
- Soil moisture sensor
- Temperature humidity sensor
- Digital moisture sensor
- High-precision moisture sensor
- Wireless data-logger
- Electrical conductivity moisture sensor
- Wireless moisture sensor
- Greenhouse moisture sensor
- Moisture sensor with data logger
- Water potential moisture sensor
- Moisture sensor with analysis software
- Solar-powered data-logger