780 Operators Manual

780 Operators Manual
Operators are responsible for the safe and successful operation of the machine. Key responsibilities include:
- Reading and understanding the user guide before use.
- Following instructions on preparation, operation, safety, maintenance, and repair.
- Using common sense if the machine does not conform to the guide's descriptions.
- Periodically checking the machine's performance, especially in adverse conditions.
- Stopping the machine if expected performance is not achieved and seeking help from a Stanhay Webb dealer for mechanical issues.
- When transporting the machine on public roads, operators must adhere to Road Traffic Regulations.
- The machine is designed for one-man operation, with the operator expected to be in the tractor cab when the machine is in motion.
Operators are advised to record the machine's details, including model, date purchased, serial number, and supplier information.
Catalog excerpts
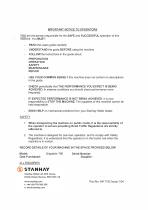
IMPORTANT NOTICE TO OPERATORS YOU are the person responsible for the SAFE and SUCCESSFUL operation of this machine. You MUST: READ this users guide carefully - UNDERSTAND the guide BEFORE using the machine - FOLLOW the instructions in the guide about: PREPARATION OPERATION SAFETY MAINTENANCE REPAIR - USE YOUR COMMON SENSE if this machine does not conform to descriptions in the guide. - CHECK periodically that THE PERFORMANCE YOU EXPECT IS BEING ACHIEVED. In adverse conditions you should check performance more frequently. - IF EXPECTED PERFORMANCE IS NOT BEING ACHIEVED, it is your responsibility...
Open the catalog to page 2
/8h how Unit examples For Work "/ Checks ;-check mq, f: Sinaulaine Coulters (Shoes)-Recommendations 'Coulter Fittm i iLiing oouiusr Preparing Metering U Unit Maintainance Seed Discs Setting Seed Spacing Setting Air Supply
Open the catalog to page 3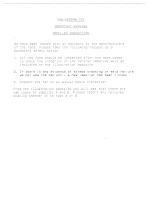
i'MPhLLEH iNSPbCliON We have been issued with an advisory by the manufacturers of the fans. Please take the following.request as a mandatory safety' action. 1. All new fans should be inspected after one days usage to check the integrity of the central impeller weld as indicated on the illustration opposite. 2„ If there is sny evidence of stress cracking or weld fai lure do not use the fan unt i I a new umpener has been fitted. 3. Insoect the fan on an annual basis thereafter. From, the illustration opposite, you will see that there are two types of impeller, A and B. Please repant any failures, stating...
Open the catalog to page 4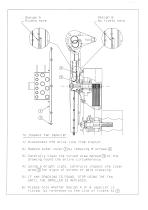
2/.Remove outer cover(T)by removing 8 screws (2) 3/.Carefully clean the curved area marked(3)on the drawing round the entire circumference. 4/.Using a bright light, carefully inspect the clean area(3)for signs of stress or weld cracking. 5/.IF ANY CRACKING IS FOUND, STOP USING THE FAN UNTIL THE IMPELLER IS REPLACED. 6/.Please note whether Design A or B impeller is fitted, by reference to the line of rivets at (4)
Open the catalog to page 5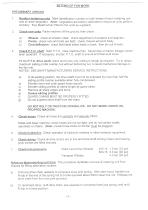
PRELIMINARY CHECKS 1- Number metering units Mark identification number on both halves of each metering unit and on each singulator. (Note: singulators are factory calibrated to ensure all units perform thpv rrmcf rpmain fittorl tn fhn i mite 2. Check row units Raise machine off the ground, then check: a) Wheels: check all wheels rotate: check adjustment of scrapers and cleaners, b) Pivots: check nuts and bolts are tight: check chassis will pivot freely, c) Clod deflectors: check that blade slides freely in track: then pin out of work. 3. Check P.T.O. shaft Start P.T.O., raise machine fully. Adjust...
Open the catalog to page 9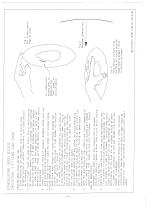
LU QI < CJ CO Q CJ z LO < !—l a cd z a hh uj i— LU \— U0 hh U_ UJ □l -1—1 CD < z z z CD CD Z UJ !—I J_ in u ZD O j*: 3 a to a »-« LO a 3 o t—! t—I ZD TD a n 3 ai ra JD >• 4-J OJ ro 3 r-1 QJ CL e --4 o CJ CJ -i-J OJ -—< -a d QJ c= CL O Z O CO 3: CO ZD Z o h airs DC'—1 O -r-1 3 JZ JZ O UJ U JZ 4-1 CD JZ QJ U CD *ri Z > 3 3 0 3 D D C CO --t - 3 3 3: 03 CD > CD ro g JZ JZ CD ro CD ro QJ z u ' QJ Z TD a z 03 OJ JZ z • 0 a TO -U 01 03 ID TD Z cd ro > o — cn a 3 cn • CD Cl if) 3 *-< a CD a a CD UJ -r-i LLi • 3 <—< ro r—i a) a 3 m~ m a jz ro 3 CD 3 3 . CD 4-J CD u -r-» QJ in S tn - ^ 3 U CD cd ro ro...
Open the catalog to page 10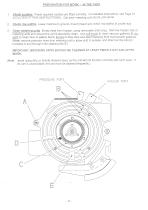
PREPARATION FOR WORK - IN THE YARD 1. Check coulters Check required coulters are fitted correctly. For detailed instructions, see Page 10 (COULTER FITTING INSTRUCTIONS). Clip each metering unit into its unit carrier. 2. Check row widths Lower machine to ground, draw forward and check row widths at coulter tips. 3. Clean metering units Empty' seed from hopper, using removable drain plug. Remove hopper side of metering units and ensure the unit is absolutely clean. Use soft brush to clean vacuum galleries B; dry doth to clean face of gallery block; air line to blow dust and seed dressing from inaccessible...
Open the catalog to page 11
Coulter Depth; -set unit earners to give a sowing depth ■ slightly shallower than the required nominal drilling depth, (Note; -field adjustment of sowing depth is most easily’ achieved by progressively adjusting coulters downwards until until the- desired sowing depth is achieved) . :mpty seed from hoppers, before transporting to field
Open the catalog to page 12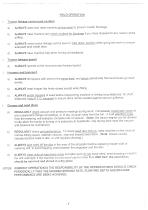
FiELD OPERATION ]. Tractor linkage control and coulters a) ALWAYS lower and raise machine on the move to prevent coulter blockage, b) ALWAYS raise machine and check coulters for blockage if you have stopped for any reason whilst c) ALWAYS move tractor linkage control lever to 'fully down' position when going into work to ensure adequate land wheel drive, d) ALWAYS raise machine fully when turning at headlands. L Tractor forward speed a) ALWAYS operate at the recommended forward speed. L Hoppers and transport a) ALWAYS fill hoppers with seed to the same level, and check periodically that...
Open the catalog to page 14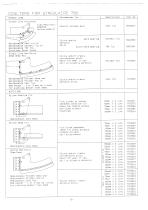
Replaceable Cast tip or Replaceable Ceramic Tip or Replaceable TEK Tip Stainless Steel Sides Replaceable Cast Base Replaceable Polymer Base and P n 1 v m 0 p R i h np Replaceable Cast Rib. 6mm Packer - 1 or 2 may be fit! for planting deeper than 20mm. Sticky and/or abrasive soils Hard Wearing Extra Hard Wearing Sticky and/or trashy non-abrasive soils Watch for wear if the soil is slightly abrasive Sticky and/or trashy abrasive soils Fine,cloddy or stoney seedbeds, (shallow fin shoes can handle stones and clods without blocking) Fine clean seedbeds, (deep fin shoes produce produce minimum soil...
Open the catalog to page 15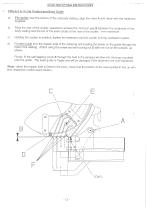
COULTER FITTING INSTRUCTIONS 1. Fitting 2 or 3 Line Coulter and Seed Guide a) Fit coulter over the bottom of the unit body casting, align the holes A and retain with the fasteners supplied, b) Pivot the rear of the coulter upwards to achieve the minimum gap B between the underside of the body casting and the top of the seed chutes at the rear of the coulter, 1 mm maximum, c) Holding the couiter in position, tighten the fasteners until the coulter is firmly clamped in place, d) Fit seed guide C to the hopper side of the metering unit locating the dowel on the guide through the hole in the...
Open the catalog to page 16
2. Fitting Single Line Coulter a) The coulter tip is clamped to the bottom of the unit body casting between stainless steel clamping plates, by two pairs of socket head screws. When fitting, ensure that the vertical rear face of the coulter tip locates firmly against the cut-outs in the clamping plates as shown, to prevent soil entering the seed outlet area, b) When changing from 2 or 3 line coulter to single line, remove the seed guide from the hopper side of the metering unit to allow seed to fall centrally to the furrow bottom.
Open the catalog to page 17All Stanhay catalogs and technical brochures
 STAR
STAR2 Pages
 SEVEN
SEVEN2 Pages
 PROAIR
2 Pages
 870
8702 Pages
 840 Operators Manual
12 Pages
 820 Operators Manual
12 Pages
 785 Operators Manual
108 Pages

