785 Operators Manual

785 Operators Manual
Catalog excerpts

Operators Manual
Open the catalog to page 1
IMPORTANT NOTICE TO OPERATORS YOU are the person responsible for the SAFE and SUCCESSFUL operation of this machine. You MUST: - READ this users guide carefully - UNDERSTAND the guide BEFORE using the machine - FOLLOW the instructions in the guide about : PREPARATION FOR WORK OPERATION SAFETY MAINTENANCE REPAIR - USE YOUR COMMON SENSE if this machine does not conform to descriptions in the guide. - CHECK periodically that THE PERFORMANCE YOU EXPECT IS BEING ACHIEVED. In adverse conditions you should check performance more frequently. - IF EXPECTED PERFORMANCE IS NOT BEING ACHIEVED, it is your responsibility...
Open the catalog to page 2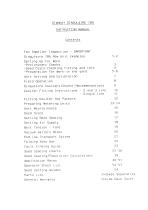
INSTRUCTION MANUAL Fan Impeller Inspection - IMPORTANT Singulame 785 Row Unit Examples 1-2 Setting Up For Work -Preliminary Checks 3 -Seed Discs-checking, fitting and care 4 -Preparation For Work-in the yard 5-6 Unit Setting and Calibration 7 Singulame Coulters (Shoes) -Recommendat ions 9 Coulter Fitting Instructions Fitting Coulter Rib Packers Preparing Metering Units Unit Maintainance Seed Discs Setting Seed Spacing Setting Air Supply Belt Tension - Fans Vacuum Gallery Block End Tow Transport System Folding Yoke Bar Fault Finding Guide Seed Spacing Charts Seed Spacing/Population...
Open the catalog to page 3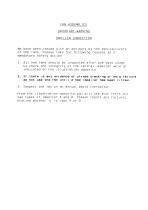
IMPORTANT WARNING IMPELLER INSPECTION We have been issued with an advisory by the manufacturers of the fans. Please take the following request as a mandatary safety action. 1. All new fans should be inspected after one days usage to check the integrity of the central impeller weld as indicated on the illustration opposite. 2. If there is any evidence of stress cracking or weld failure do not use the fan unti I a new impel Ier has been fitted. 3. Inspect the fan on an annual basis thereafter. From the illustration opposite, you will see that there are two types of impeller. A and B. Please report...
Open the catalog to page 4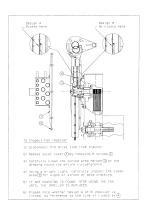
1/.Disconnect PTO drive line fnom tractor. 2/.Remove outer cover (T)by removing B screws (2) 3/.Carefully clean the curved area marked (3)on the drawing round the entire circumference. 4/.Using a bright light, carefully inspect the clean area(3) for signs of stress or weld cracking. 5/.IF ANY CRACKING IS FOUND, STOP USING THE FAN UNTIL THE IMPELLER IS REPLACED. 6/.Please note whether Design A or B impeller is fitted, by reference to the line of rivets at (4)
Open the catalog to page 5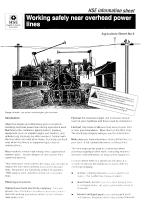
Introduction About five people are killed every year in accidents involving overhead power lines during agricultural work. Machinery (like combines, tipping trailers, loaders); equipment (such as irrigation pipes and ladders); and activities (eg stacking) are often involved. Contact with the lines does not need to be made. Electricity can flash over when machinery or equipment gets close to overhead lines Most incidents involve high voltage lines supported on wooden poles ■ but the dangers of oilier power lines cannot be ignored. This information sheet outlines the steps you can take to reduce...
Open the catalog to page 7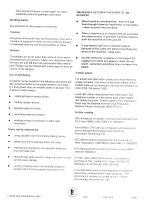
lines can be limited to a safe height- an option especially suited to gateways and tracks. Working safely Key elements of safe systems of work are: Training Everybody who works near overhead power lines with a machine or equipment needs to know what the dangers of overhead lines are and the precautions to follow. Visitors Contractors are at risk when they work on farms where overhead lines are present. • Make sure they know where the lines are and tell them the precautions they need to take. Routes can be marked with safety signs to warn all visitors of the dangers. Use of machinery Accidents...
Open the catalog to page 8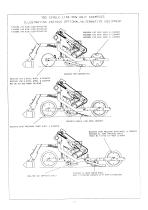
0002073 ZERO PRESSURE FRONT UHEEL A SCRAPER
Open the catalog to page 9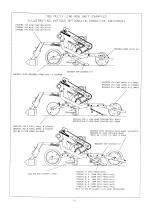
7703333 ZL X 7SMM SEEO PRESS WHEEL 7703336 31 X 100MM SEED PRESS WHEEL 7703335 2L X 100MM SEED PRESS WHEEL ONLY FITTED ON CHASSIS WITH REAR EXTENSIONS
Open the catalog to page 10
PRELIMINARY CHECKS 1. Number metering units Mark identification number on both halves of each metering unit and on each singulator. (Note: singulators are factory calibrated to ensure all units perform similarly: they must remain fitted to the units as supplied). 2. Check row units Raise machine off the ground, then check: a) Wheels: check all wheels rotate: check adjustment of scrapers and cleaners, b) Pivots: check nuts and bolts are tight: check chassis will pivot freely, c) Clod deflectors: check that blade slides freely in track: then pin out of work. 3. Check P.T.O. shaft Start P.T.O.,...
Open the catalog to page 11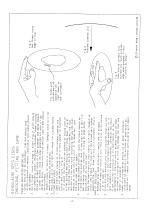
^ iz a in o —• in u to in ZO "a o XT -*-» in ra <-< OTO DC'—* a •«-* d iz jz o (nun aJ 03 DO 03 O C JC in e ID E CD n • aj a s c ID a- jz LU cr < CJ cn a CJ u cn < (—i a cn z a *-i LU h-LU !— cn hh Ll LU cr _ (—i CD < z -J ZD Z CD CJ Z LU X cn cj LU cn m 3 —» ' a. lu e X Q a u u_ LU QJ cd a L0 aj cj a • LD C a -a a do lu a lu n co in r co tn 2 u QJ r-i jz aj AJ u c in o to mL. ro a 3 aj a m aj e • ra aj cn i-i aj U_ QJ cn jz in c •'-< c_ TO ZJ aJ ai jz . AJ AJ O >* C ID 3 in 03 03 O JZ TO do m- in o -r-1 C ID D in c. to in aj aj U •«-* 03 in 3 cn to u in in id QJ 03 cn aj jz C 03 AJ h- a 3 £ id...
Open the catalog to page 12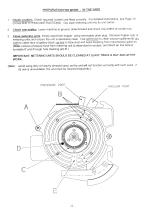
PREPARATION FOR WORK - IN THE YARD 1. Check coulters Check required coulters are fitted correctly. For detailed instructions, see Page 10 (COULTER FITTING INSTRUCTIONS). Clip each metering unit into its unit carrier. 2. Check row widths Lower machine to ground, draw forward and check row widths at coulter tips. 3. Clean metering units Empty seed from hopper, using removable drain plug. Remove hopper side of metering units and ensure the unit is absolutely clean. Use soft brush to clean vacuum galleries B; dry cloth to clean face of gallery block; air line to blow dust and seed dressing from inaccessible...
Open the catalog to page 13
a) Coulter depth: set unit carriers to give a sowing depth slightly shallower than the required nominal drilling depth. (Note: field adjustment of sowing depth is most easily achieved by progressively adjusting coulters downwards until the desired sowing depth is achieved). With the clip in the lower groove, depth adjustment is in 5mm steps: for intermediate settings, fit the clip in the upper groove, b) Seed press wheel depth (if fitted): setting of press wheel depth is identical to coulter depth adjustment: set to same depth as coulters, or as required. (Note: use of seed press wheels is not recommended...
Open the catalog to page 14All Stanhay catalogs and technical brochures
 STAR
STAR2 Pages
 SEVEN
SEVEN2 Pages
 PROAIR
2 Pages
 870
8702 Pages
 840 Operators Manual
12 Pages
 820 Operators Manual
12 Pages
 780 Operators Manual
104 Pages

