
- Catalogs
- strainrite fencing system
- Mains Energizer Guide


- Products
- Catalogs
- News & Trends
- Exhibitions
Mains Energizer Guide

Mains Energizer Guide
Mount the energizer next to an indoor socket and plug it in. Use an insulated HT lead-out or undergate cable to connect the red terminal to the fence and the green terminal to the ground rod. The MX600 model has two live terminals: one high power and one lower power, allowing for the powering of one or two separate fences.
Fence Connection:
The energizer should be installed indoors or in a weatherproof environment. The fence indicator will flash with the pulse of the fence, indicating the effective voltage. A minimum of 3000 volts is required for effectiveness.
Troubleshooting:
If issues arise, check the energizer, fence line, and ground system. The energizer should emit an audible tick and the indicator light should flash. A green light indicates proper function, while a red light suggests the battery needs charging. Perform a flash test by disconnecting the alligator clips and checking for a spark. Use a tester to ensure voltage readings between 7000 and 10000 volts.
Ground System:
Low or no ground voltage is ideal. If high voltage is present on the ground rod, it indicates a problem with the fence line. Improve the system by adding more ground rods, spaced about a yard apart.
Fence Line Maintenance:
Ensure the fence line is clear of vegetation and not touching any non-insulated objects. Check all insulators and connectors for proper function. Netting requires more maintenance to stay clear of the ground and other fencing.
Key Components:
1. Ground terminal
2. Live terminal
3. Low power live terminal
4. Fence indicator
5. Pulse indicator
Safety and Guidelines:
Read the safety guidelines leaflet before installation. The document provides an installation guide for types HLM, HLM2, and HLM3.
Catalog excerpts
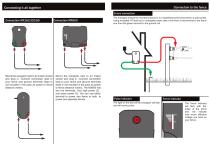
Connecting it all together Fence connection The energizer should be mounted indoors or in a weatherproof environment to a wall socket. Using insulated HT lead-out or undergate cable, take a line from a red terminal to the fence one from the green terminal to the ground rod. Mount the energizer next to an indoor socket and plug in. Connect connection lead to your fence and ground terminals (lead is not included in the pack as power to fence distance varies). Mount the energizer next to an indoor socket and plug in. Connect connection lead to your fence and ground terminals (lead is not included in the pack as power to fence distance varies). The MX600 has two live terminals, One high power (2) , one lower power (3). You can use either terminal to power one fence or both, to power two separate fences. Pulse indicator Fence indicator The light on the front of the energizer will fash red with every pulse. The fence indicator will fash with the pulse of the fence and will indicate how much effective voltage you have on your fence.
Open the catalog to page 1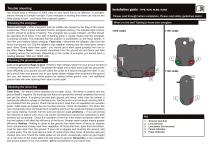
electric fencing is a simple concept. If your energiser is working then there can only be two other places to look - your fence line or ground system. Please read through before installation. Please read safety guidelines leafet. Checking the energiser What's in the box? Getting to know your energizer Sound and sight - Most energizers emit an audible tick caused by the fring of the output transformer. This is a good indication that the energiser working. The indicator light or fence monitor should be pulsing or fashing. This energizer has a pulse indicator, and this should be operating at all...
Open the catalog to page 2All Strainrite fencing system catalogs and technical brochures
 PRODUCT CATALOGUE
60 Pages
 Quad Jenny Trailer
1 Page
 FEN00260 MXB240 Instructions
2 Pages
 Solar Energizer Guide
2 Pages
