A100 J QUICK REFERENCE GUIDE

A100 J QUICK REFERENCE GUIDE
- Hydraulics: Connect the red pipe for supply (25-35 lpm) and the blue pipe for free flow return.
- Electrics: Connect the 12V supply to the 3-pin plug and the wrapper harness to the controller.
- Joystick: Mount in the tractor cab within comfortable reach of the operator.
- Remove the transport pin from the load arm.
- Adjust the load arm width for the correct bale size.
- Position the dispenser to center the film on the bale.
- Load the film roll into the dispenser, thread correctly, and attach to the Cut & Start.
Note: Refer to the Operators Manual for detailed information.
- Operate the load arm by pressing the button and moving the joystick on the Y-axis.
- Displays current and target number of wraps, channel indicator, and program key.
- Functions include resetting store total, setting run-on time, and selecting channels.
- Loading: Lower the load arm, load the bale, and lower the arm again.
- Wrapping: Rotate the table, increase speed after ½ revolution, and use automatic wrapping. Stop when the target wraps are reached.
- Unloading: Reverse the table to tipping position, offload the bale, and cut the film.
- Rotate the table to the loading position.
- Raise the load arm fully.
- Insert the transport pin to secure the load arm.
Guidelines for wraps based on bale diameter and layers: 120 cm requires 16, 24, or 32 wraps; 150 cm requires 20, 30, or 40 wraps. Adjust for misshapen bales.
Adjust the cutter closing point by moving the bolt on the linkage to ensure the film is fully gathered when the cutter closes.
Catalog excerpts

A100 J QUICK REFERENCE GUIDE The quick reference guide is not a substitute for the Operators Manual! Please refer to Operators Manual for more detailed information Red pipe > Supply (25-35lpm) Blue pipe > Return (Free flow return!!) A. Connect 12V supply to 3pin plug B. Connect wrapper harness to controller Mount the joystick in the tractor cab. Place it in a position that is in comfortable reach to the operator. ENTERING THE WORKING POSITION 1. Remove the transport pin from the load arm. 2. Adjust the load arm width to suit the correct bale size. 2 3. Adjust the position of the dispenser to ensure that the film will be applied to the centre of the bale. 4. Add the film roll into the dispenser, ensuring that it is threaded correctly, and attach the film to the Cut & Start.
Open the catalog to page 1
JOYSTICK OPERATION Load arm operated by pressing the button and operating the joystick on the Y-axis. CONTROLLER OPERATION Current No. of Wraps Channel Indicator RUN-ON Time + (Increase time to stop) RUN-ON Time – (Reduce time to stop) Program Key - Reset Store Total - Set Select Channel
Open the catalog to page 2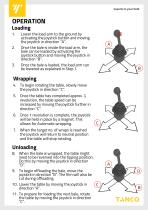
Lower the load arm to the ground by activating the joystick button and moving the joystick in direction “A”. Once the bale is inside the load arm, the bale can be loaded by activating the joystick button and moving the joystick in direction “B”. Once the bale is loaded, the load arm can be lowered as explained in Step 1. 4. To begin rotating the table, slowly move the joystick in direction “C”. 5. Once the table has completed approx. ½ revolution, the table speed can be increased by moving the joystick further in direction “C”. 6. Once 1 revolution is complete, the joystick will be held in place...
Open the catalog to page 3
ENTERING THE TRANSPORT POSITION 1. Rotate the table into the loading position. 2. Raise the load arm fully. 3. Insert the transport pin into the load arm. This will prevent the load arm from lowering when driving on the road. The transport pin should also be used when the machine is being parked. This is a guideline only! Misshapen bales may require more wraps to achieve full coverage . Model Bale Diameter 4 layres 6 layres 16 wraps 24 wraps 32 wraps 20 wraps 30 wraps 40 wraps FILM CUTTING ADJUSTMENT The point during tipping where the cutter closes can be adjusted by moving the bolt to a different...
Open the catalog to page 4All Tanco catalogs and technical brochures
 280 CS OPERATORS HANDBOOK
38 Pages
 I70 - Bale Shear
25 Pages
 S100 A QUICK REFERENCE GUIDE
4 Pages
 1400 V QUICK REFERENCE GUIDE
4 Pages


- Mower
- Mounted mower
- PTO-driven mower
- Flail mower
- Bale gripper
- Mower-conditioner
- Bale spear
- Round bale gripper
- Bale wrapper
- Rear-mount mower
- Round bale wrapper
- Front mower
- Folding mower
- Individual bale wrapper
- Automatic bale wrapper
- Square bale gripper
- Screening shovel bucket
- Towed bale wrapper
- High-capacity shovel bucket
- Rectangular bale grab