JR5000 ID5000 XR5000 Quickstart Guide
1 /72Pages

JR5000 ID5000 XR5000 Quickstart Guide
1 /72Pages
Catalog excerpts
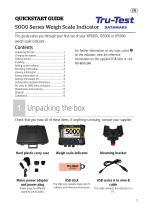
QUICKSTART GUIDE This guide takes you through your first use of your XR5000, ID5000 or JR5000 weigh scale indicator. For further information on any topic, press on the indicator, view the reference information on the supplied USB stick or visit tru-test.com 1 Unpacking the box Check that you have all of these items. If anything is missing, contact your supplier. Hard plastic carry case Mains power adaptor and power plug Power plugs for different countries are included. Weigh scale indicator Mounting bracket USB series A to mini-B cable The USB stick contains Data Link PC software and reference information. This cable connects the indicator to a PC.
Open the catalog to page 1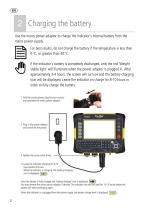
2 Charging the battery Use the mains power adaptor to charge the indicator’s internal battery from the mains power supply. For best results, do not charge the battery if the temperature is less than 0 oC, or greater than 40 oC. If the indicator’s battery is completely discharged, only the red ‘Weight stable light’ will illuminate when the power adaptor is plugged in. After approximately 3-4 hours, the screen will turn on and the battery charging icon will be displayed. Leave the indicator on charge for 8-10 hours in order to fully charge the batter
Open the catalog to page 2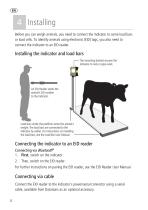
4 Installing Before you can weigh animals, you need to connect the indicator to some load bars or load cells. To identify animals using electronic (EID) tags, you also need to connect the indicator to an EID reader. Installing the indicator and load bars Connecting the indicator to an EID reader Connecting via Bluetooth® 1. First, switch on the indicator. 2. Then, switch on the EID reader. For further instructions on pairing the EID reader, see the EID Reader User Manual. Connecting via cable Connect the EID reader to the indicator’s power/serial connector using a serial cable, available from...
Open the catalog to page 4
5 Setting up the indicator The first time that you turn on the indicator, follow the step by step instructions to set the language, country, date and time. When shipped, the indicator is set up to manually record animal weights and IDs, without drafting. You should change the way that the indicator is set up to suit the task that you are about to perform. Applying a favourite setup Favourite setups are saved configurations that change the settings of the indicator to suit a particular purpose. The indicator comes pre-loaded with various favourite setups such as ‘Weigh with ID’ (weigh animals...
Open the catalog to page 5
6 Recording information Sessions When you record information such as weight, it is stored in a ‘session’. A session is like a file on a computer. We recommend that you start a new session each day or for each group of animals. To start a new session, from the Home screen press Weighing an animal Ensure that the indicator is displaying 0.0. If not, press 1. Move the animal onto the platform. 2. If recording IDs, enter the animal’s VID or scan the EID tag using an EID reader. 3. When the ‘weight stable’ message appears, press The indicator will record the weight along with any other information...
Open the catalog to page 6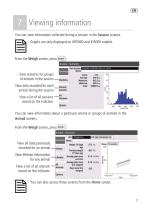
7 Viewing information You can view information collected during a session in the Session screens. Graphs are only displayed on XR5000 and ID5000 models. From the Weigh screen, press You can view information about a particular animal or groups of animals in the Animal screens. From the Weigh screen, press You can also access these screens from the Home screen.
Open the catalog to page 7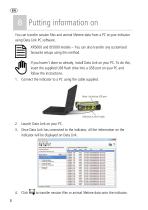
8 Putting information on You can transfer session files and animal lifetime data from a PC to your indicator using Data Link PC software. XR5000 and ID5000 models – You can also transfer any customised favourite setups using this method. If you haven't done so already, install Data Link on your PC. To do this, insert the supplied USB flash drive into a USB port on your PC and follow the instructions. 1. Connect the indicator to a PC using the cable supplied. 2. Launch Data Link on your PC. 3. Once Data Link has connected to the indicator, all the information on the indicator will be displayed...
Open the catalog to page 8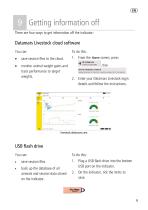
9 Getting information off There are four ways to get information off the indicator: Datamars Livestock cloud software You can: save session files to the cloud. 1. From the Home screen, press monitor animal weight gains and track performance to target weights. 2. Enter your Datamars Livestock login details and follow the instructions. save session files. back up the database of all animals and session data stored on the indicator. To do this: 1. Plug a USB flash drive into the bottom USB port on the indicator. 2. On the indicator, tick the items to sav
Open the catalog to page 9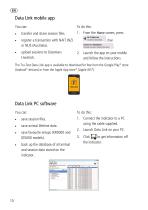
Data Link mobile app You can: • transfer and share session files. upload sessions to Datamars Livestock. 1. From the Home screen, press register a transaction with NAIT (NZ) or NLIS (Australia). . 2. Launch the app on your mobile and follow the instructions. The Tru-Test Data Link app is available to download for free from the Google Play* store (Android* devices) or from the Apple App store* (Apple iOS*). Data Link PC software You can: • save session files. save animal lifetime data. save favourite setups (XR5000 and ID5000 models). back up the database of all animal and session data stored...
Open the catalog to page 10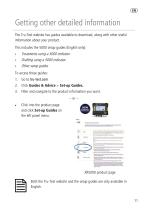
Getting other detailed information The Tru-Test website has guides available to download, along with other useful information about your product. This includes the 5000 setup guides (English only): Treatments using a 5000 indicator Drafting using a 5000 indicator Other setup guides To access these guides: 1. Go to tru-test.com 2. Click Guides & Advice > Set-up Guides. 3. Filter and navigate to the product information you want. ~ or ~ • Click into the product page and click Set-up Guides on the left panel menu. XR5000 product page Both the Tru-Test website and the setup guides are only available...
Open the catalog to page 11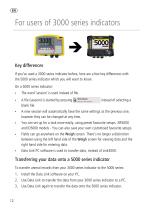
For users of 3000 series indicators Key differences If you’ve used a 3000 series indicator before, here are a few key differences with the 5000 series indicator which you will want to know. On a 5000 series indicator: The word ‘session’ is used instead of file. A file (session) is started by pressing blank file. A new session will automatically have the same settings as the previous one, however they can be changed at any time. You can set up for a task more easily, using preset favourite setups. XR5000 and ID5000 models - You can also save your own customised favourite setups. Fields can...
Open the catalog to page 12All True-Test catalogs and technical brochures
 ID5000
2 Pages
 SRS2 EID Stick Reader
2 Pages
 SRS2 Stick Reader
64 Pages
 XRS2 Stick Reader
88 Pages

- Multi-purpose instrument with screen
- Digital multi-purpose instrument
- Weight indicator
- Milk meter
- Mobile ID reader
- Digital weight indicator
- Digital milk meter
- Multi-purpose instrument with touchscreen
- Yield milk meter
- ID reader with data storage
- Weight indicator with screen
- Keypad multi-purpose instrument
- Keypad weight indicator
- Milk tester