
- Catalogs
- Vet Ray Technology
- VXvue Quick Guide

VXvue Quick Guide

VXvue Quick Guide
This document is a quick guide for using the VXvue software, which is used for veterinary imaging. It provides step-by-step instructions for patient entry, protocol selection, exposure, database access, and exporting images.
Patient Entry
Users must enter their username and password to access the system. Patient information should be entered as required to start a study. In cases where patient information is unavailable, an 'Emergency' option can be used to initiate a study.
Protocol Selection
Users can select the species, anatomical area, and views by clicking on the animal representation on the left side of the screen. The selected views will appear on the right side in the chosen order. Exposures can be made without additional steps.
Exposure
Once the exposure is complete, images will be displayed. To repeat a view, click the corresponding thumbnail. Additional exposures can be made on the last image, and views can be corrected after the exam is completed. It is important to close studies after exams to avoid confusion.
Database Access
To access previous studies, double-click on the study or highlight it and click 'Open' to view images. Searches can be refined by entering patient or study information. New studies can be started, or existing studies can be reopened to insert new views.
Exporting Images
To export images to a disk or flash drive, click 'Export' and select 'All Images'. Choose the file format (DICOM and/or JPEG), set the export path, check all burning options, and click 'Start'.
Exit
To exit the software, click the 'Exit' tab and choose from 'Logoff', 'Exit', 'Shutdown', or 'Cancel'.
Technical Support
For technical support, users can call 888.4VETRAY or 888.483.8729.
Catalog excerpts
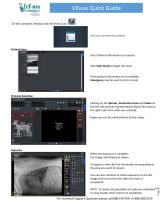
VXvue Quick Guide On the Computer Desktop click the VXveu Icon Enter your username and password Patient Entry Enter Patient information as required. Click Start Study to begin the exam. If the patient information is not available, Emergency may be used to start a study Protocol Selection Clicking on the Species, Anatomical area and Views on the left side (animal representation) places the view on the right side in the order you selected. Exposures can be made without further steps. When the exposure is complete, the images will display as shown. To repeat a view click the thumbnail corresponding to the view you want to repeat. You can also continue to make exposures on the last image and correct the view after the exam is completed. NOTE: To reduce the possibility of confusion remember to close studies when exams are completed. For Technical Support Questions please call 888.4VETRAY or 888.483.8729
Open the catalog to page 1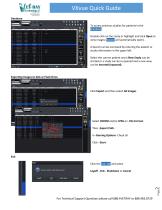
VXvue Quick Guide Database To access previous studies for patients in the Database: Double click on the study or highlight and click Open to view images (Viewer will automatically open). A Search can be narrowed by entering the patient or study information in the upper left. Select the correct patient and a New Study can be started or a study can be re-opened and a new view can be Inserted (exposed). Exporting Images to disk or Flash Drive Click Export and then select All Images Select DICOM and/or JPEG on -File FormatThen -Export PathIn -Burning Options- Check all Click –Start- Exit Click the...
Open the catalog to page 2All Vet Ray Technology catalogs and technical brochures
 BASIC VET
2 Pages
 Premium Vet
2 Pages
 DYNAVET
4 Pages
 MultiVet 3-in-1
4 Pages
 My Vet Cloud
2 Pages
 QXLink Viewer User Guide
5 Pages
 Canon Vet Quick Start
2 Pages

- Agriculture software
- Data management software
- Real-time software
- Veterinary X-ray system
- Digital veterinary X-ray system
- Domestic animal veterinary X-ray system
- Cloud software
- Veterinary radiography flat panel detector
- Flat panel detector
- Direct conversion flat panel detector
- Data acquisition software
- Fixed veterinary X-ray system
- Mobile veterinary X-ray system
- Data display systems software
- Digital flat panel detector
- Veterinary X-ray system with table
- Horse veterinary X-ray system
- Analog veterinary X-ray system
- 17 x 17 flat panel detector
- 14 x 17 flat panel detector