
Catalog excerpts

V40 Agricultural UAS User Manual Version 1.2
Open the catalog to page 1
Dear user, thank you for choosing XAG products. For safety purposes and better user experience, it is highly recommended that you read this manual carefully and strictly follow the instructions hereof. If you have any questions about this document, please contact our Technical Support team via email: info@xa.com
Open the catalog to page 2
Safety Guidelines • Please make sure that the drone operator has passed the drone operation training programme and obtained a drone pilot certificate prescribed by laws and regulations where the product is used in advance. Never operate the drone without permission unless otherwise provided. • bserve the surroundings, ensure a safe distance from the obstacles and the crowd as well O as eliminate unsafe conditions including environmental factors like bad weather and extreme temperatures before operation. • NEVER operate while drowsy, drunk or in a poor mental state so as to prevent...
Open the catalog to page 3
Please check that the following items are all present when unpacking the box. Should there be any item missed, please contact your dealer. Airframe (including Liquid Tank) [1]:ACS2(B) ControlStick namely ACS2(B) Remote Control 2
Open the catalog to page 4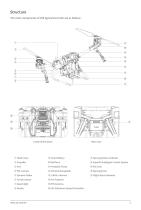
The main components of V40 Agricultural UAV are as follows: Rear view ⑰ Spraying Status Indicator ⑤ Dynamic Radar ⑥ Terrain Sensor ⑦ Searchlight ⑧ Nozzle ⑫ Airframe Nameplate ⑬ 2.4GHz Antenna ⑭ Arm Fastener ⑱ SuperX4 Intelligent Control System ⑳ Spraying Hub
Open the catalog to page 5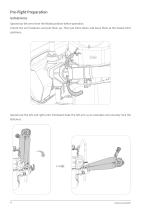
Pre-flight Preparation Unfold Arms Spread out the arms from the folded position before operation. Unlock the arm fasteners and pull them up. Then put them down and leave them at the lowest limit positions. Spread out the left and right arms frontward (take the left arm as an example) and securely lock the fasteners.
Open the catalog to page 6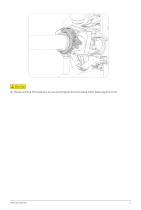
Please see that the fasteners are securely tightened and locked while fastening the arms.
Open the catalog to page 7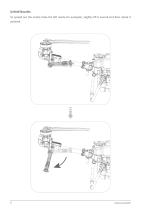
Unfold Nozzles To spread out the nozzle (take the left nozzle for example), slightly lift it inward and then rotate it outward.
Open the catalog to page 8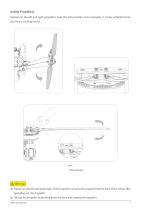
Unfold Propellers Spread out the left and right propellers (take the left propeller as an example). It is fully unfolded when you hear a clicking sound. Spring Plunger lease see that the spring plunger of the propeller has securely snapped into the base of the clamp after P spreading out the propeller. Fold up the propeller by pushing down the base and rotating the propeller.
Open the catalog to page 9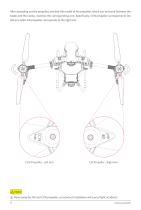
After spreading out the propeller, see that the model of the propeller, which can be found between the blade and the clamp, matches the corresponding arm. Specifically, CCW propeller corresponds to the left arm while CW propeller corresponds to the right arm. Never swap the CW and CCW propeller, as incorrect installation will cause flight accidents.
Open the catalog to page 10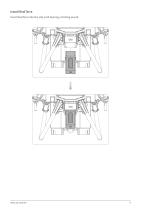
Install RealTerra Insert RealTerra into the slot until hearing a clicking sound.
Open the catalog to page 11
Smart Battery Indicators / Buttons There is 1 power button and 6 indicators on the smart battery screen. Solid: Normal Slow Flash: Overcooled Fast Flash: Overheated Double Flash: Error Battery Level Indicator Battery Status Indicator Power Button Long press twice to power ON/OFF - upon connection with the drone or the charger, long-press the power button for at least 1 second until all the battery level indicators flash simultaneously, followed by the other long-press for at least 1 second until the battery beeps and all the status indicators are on/off. Charge Smart Battery Charge the...
Open the catalog to page 12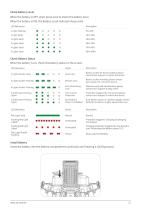
Check Battery Level When the battery is OFF, short press once to check the battery level. When the battery is ON, the Battery Level Indicators keep solid. Check Battery Status When the battery is on, check the battery status on the screen. LED Behaviour 2 Lights Double Flash Fault Lock 3 Lights Double Flashing Remote Lock 4 Lights Double Flashing Anti-dismantling Lock 2/4 Alternate Flashing Lights Dual-battery Power on Disabled 2/3 Alternate Flashing Lights Over current Protection Battery locked for the low battery,please contact tech support to unlock the device. Battery locked...
Open the catalog to page 13
• Smart battery should be fully charged and used in strict accordance with instructions preceding operation. • NEVER insert/remove the battery when it is ON, or it may cause damage to the interface. • is a MUST to check and update to the latest battery firmware and software version preceding It operation. Loss caused by failing to do so shall be borne by the user. • optimal ambient temperature range for the battery is from 10 ℃ to 45 ℃ . Chances are that fire, An even explosions will happen at a temperature over 45℃ . • NEVER connect the cathode and anode with a wire or other metals, as...
Open the catalog to page 14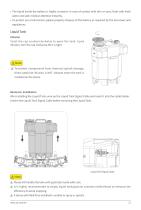
• The liquid inside the battery is highly corrosive. In case of contact with skin or eyes, flush with fresh water and seek medical attention instantly. • protect our environment, please properly dispose of the battery as required by the local laws and To regulations. Liquid Tank Infusion Twist the cap counterclockwise to open the tank. Upon infusion, turn the cap clockwise till it is tight. T o protect components from chemical splash damage, direct pesticide infusion is NOT allowed when the tank is installed on the drone. Removal / Installation Afrer installing the Liquid Tank, wire up the...
Open the catalog to page 15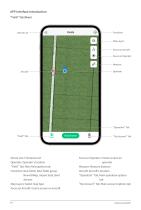
APP Interface Introduction "Field" Tab (Main) Device List Map Layers Focus on Aircraft Focus on Operator Measure Operator Device List: Full device list Focus on Operator: entre screen on C "Field" Tab: Main field options tab Measure: Measure distance Operator: Operator's location Functions: New fields, New fields group, New HDMap, Import data, Bind devices Map Layers: Select map type Focus on Aircraft: entre screen on aircraft C Aircraft: Aircraft's location "Operation" Tab: ain operation options M tab "My Account" Tab: ain account options tab M
Open the catalog to page 16
Tap on “Operation” tab to view the operation options. Focus on Aircraft Focus on Operator Measure Aircraft Operator Volume Required Operation Area Spraying Settings Flight Settings Start Operation Return: Return to “Field” Tab (Main) Flights Required: stimated flights required E Spraying Settings: Spraying settings Operation Area: Area of selected field Start Operation: Start operation Volume Required: stimated volume required E Flight Settings: Flight settings
Open the catalog to page 17All XAG catalogs and technical brochures
-
 M500 Remote Sensing UAS
28 Pages
-
 P40 Agricultural Drone
35 Pages
-
 XAG P100 Agricultural Drone
42 Pages
-
 XAG APC1 Autopilot Console
16 Pages